
Connecting DHQ to your Office 365 environment
Created by Greg Katz, Modified on Fri, 28 Mar, 2025 at 10:51 AM by Greg Katz
Source:
https://docs.microsoft.com/en-us/azure/active-directory/saas-apps/sharepoint-on-premises-tutorial
Values:
Enterprise application name (in Azure AD): DHQ
Trust identifier (in Azure AD) / realm (in SharePoint): urn:sharepoint:youragency
loginUrl (to Azure AD): Will be generated by APP
SharePoint site URL: https://youragency .policedhq.com/
SharePoint site reply URL: https://youragency.policedhq.com/_trust/
SharePoint trust configuration name: AzureADTrust-youragency
UserPrincipalName of the Azure AD test user: Please provide to ARMS a test user on your Azure AD.
Configure an enterprise application in Azure Active Directory:
To configure the federation in Azure AD, you need to create a dedicated Enterprise application. Its configuration is simplified using the pre-configured template SharePoint on-premises that can be found in the application gallery.
Create the enterprise application
- Sign in to the Azure Active Directory portal.
- Go to Enterprise applications, and then select All applications.
- To add a new application, select New application at the top of the dialog box.
- In the search box, enter SharePoint on-premises. Select SharePoint on-premises from the result pane.
- Specify a name for your application (Please use DHQ), and click Create to add the application.
- In the new enterprise application, select Properties, and check the value for User assignment required?. For this scenario, set its value to YES and click Save.
- *** I would recommend setting this to “Yes” and creating a DHQ Access Security Group later to add all PD users that need access to DHQ into. Please provide this security group name to DTS to use as a base access group for DHQ.
Configure the enterprise application
In this section, you configure the SAML authentication and define the claims that will be sent to SharePoint upon successful authentication.
- In the Overview of the Enterprise application DHQ, select 2. Set up single sign-on and choose the SAML in the next dialog.
- On the Set up Single Sign-On with SAML page, select the Edit icon in the Basic SAML Configuration pane.
- In the Basic SAML Configurationsection, follow these steps:
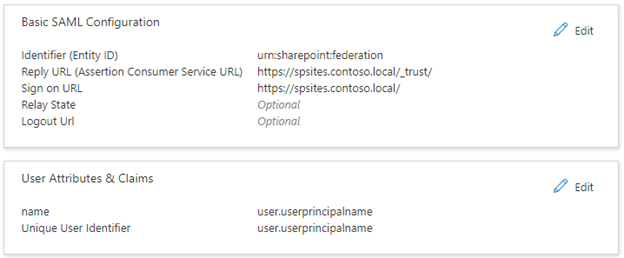
- In the Identifier box, ensure that this value is present: urn:sharepoint:youragency .
- In the Reply URL box, enter a URL by using this pattern: https://youragency .policedhq.com/_trust/.
- In the Sign on URL box, enter a URL by using this pattern: https://youragency .policedhq.com/.
- Select Save.
- In the User Attributes & Claims section, delete the following claim types, which are useless since they won't be used by SharePoint to grant permissions:
- http://schemas.xmlsoap.org/ws/2005/05/identity/claims/emailaddress
- http://schemas.xmlsoap.org/ws/2005/05/identity/claims/givenname
- http://schemas.xmlsoap.org/ws/2005/05/identity/claims/surname
The settings should now look like this:
Copy the information that you'll need later in SharePoint:
- In the SAML Signing Certificate section, Download the Certificate (Base64). This is the public key of the signing certificate used by Azure AD to sign the SAML token. SharePoint will need it to verify the integrity of the incoming SAML tokens.
We will need this Certificate to setup the Sharepoint side, please email to dhqsupport@arms.com.
- In the Set up SharePoint corporate farm section, copy the Login URL in a notepad and replace the trailing string /saml2 with /wsfed.
Please provide this URL to ARMS in the email with the certificate
Important
Make sure to replace /saml2 with /wsfed to ensure that Azure AD issues a SAML 1.1 token, as required by SharePoint.
- In the Set up SharePoint corporate farm section, copy the Logout URL
Please provide this URL to ARMS in the same email.
Add the group claim type to the enterprise application
- In the Overview of the Enterprise application SharePoint corporate farm, select 2. Set up single sign-on.
- In the User Attributes & Claimssection, follow these steps if there is no group claim present:
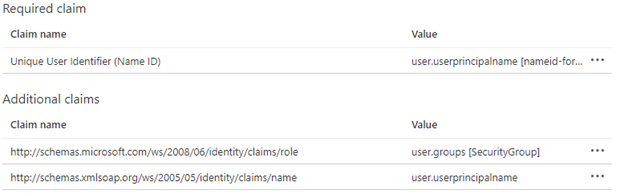
- Select Add a group claim, select Security groups, make sure that Source Attribute is set to Group ID
- Check Customize the name of the group claim, then check Emit groups as role claims and click Save.
- The User Attributes & Claims should look like this:
Grant EntraCP access to Azure AD
This page will guide through the steps to grant EntraCP access to your Azure AD tenant, by creating an app registration. This is required to allow qualified lookup of users and groups within DHQ.
Webpage is located at https://EntraCP.yvand.net/docs/usage/register-application/
Permissions required
EntraCP requires permissions GroupMember.Read.All and User.Read.All of type application (not delegated):

Create the app registration
Create the app registration using the Azure portal
- Sign-in to your Azure Active Directory tenant.
- Go to “App Registrations” > “New registration” > Type the following information:
- Name: DHQ-EntraCP
- Supported account types: “Accounts in this organizational directory only (Single tenant)”
- Click on “Register”
- Click on “API permissions”
- Remove the default permission.
- Add a permission > Select “Microsoft Graph” > “Application permissions”. Select GroupMember.Read.All and User.Read.All.
- Click on “Grant admin consent for TenantName” > Yes
- Click on “Certificates & secrets”: EntraCP supports both a certificate and a secret, choose either option depending on your needs. Please use the Secret option.
Provide the App (Client) ID and client secret to ARMS.