---
title: Gorham, ME Detail Bidding System
description: Gorham detail bidding
---
[Skip to content](https://kb.arms.com/dhq/gorham-me-detail-bidding-system#main-content)
English
Show submenu for translations

Open main navigation
Close main navigation
- English
Show submenu for translations
- Contact us
Contact us
How can we help you?
- There are no suggestions because the search field is empty.
1. [DHQ](https://kb.arms.com/dhq?hsLang=en)
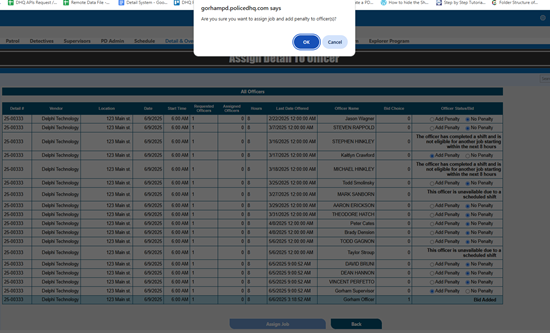
2. [Administration Guides](https://kb.arms.com/dhq/administration-guides?hsLang=en)
3. [Detail Bidding](https://kb.arms.com/dhq/administration-guides?hsLang=en#detail-bidding)
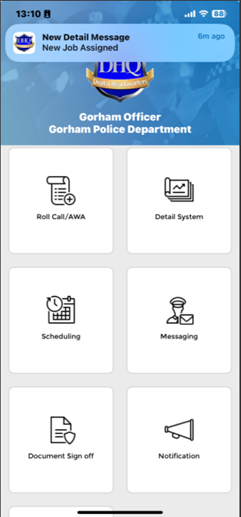
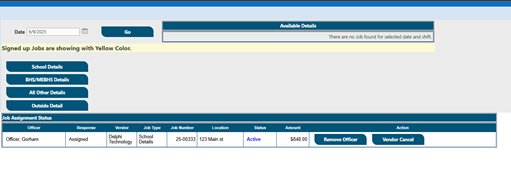
# Gorham, ME Detail Bidding System
### Gorham, ME Detail Bidding System
Created by Greg Katz, Modified on Fri, 6 Jun, 2025 at 8:05 AM by Greg Katz
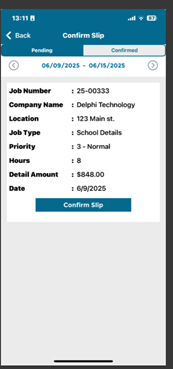
**User Profile Setup for Detail & OT**
Detail & Overtime The system requires the following setting to be on the personnel data card of each officer/user profile:
1. **Personnel Details**: User must have all the details filled in, like phone number, department seniority, badge, and employee ID.
2. **Schedule and Shift Details: The** user should have a work email, and a shift assigned.
3. **Other Details:** User should have a cell, work on details (Y/N), work overtime (Y/N), work on schedule (Y/N), the last assignment date must be placed, the officer overtime rate should be added, and most importantly, the pay code and position.
4. **Group Permission Details:** User must be added into the detail’s members& details officers’ group.
**Detail Job—Bid Assignment**
To create a detail job, click on the top bar that says Detail System in DHQ.
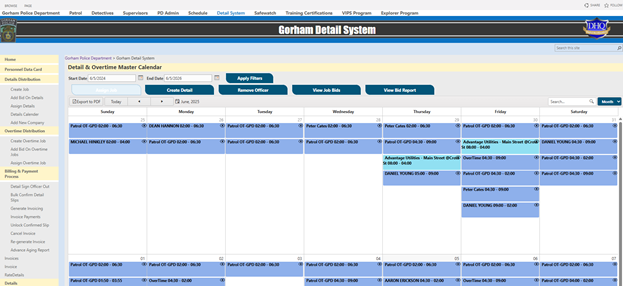
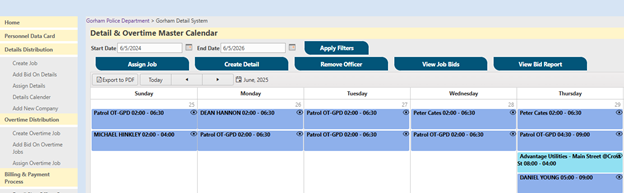
1. Here we have few permissions required to create a job in the system; the user must have Detail Manager OR Detail Supervisor OR Detail DPW; otherwise, the user can't create a job.
2. New Detail job can be added through Left NAV list (“Create Job”) OR middle page
Create “Create Detail” buttons.
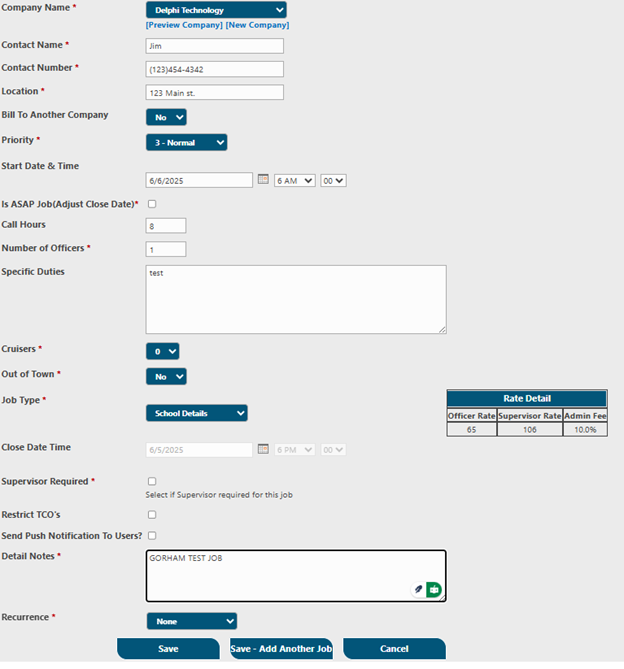
3. Create a detailed form that looks like the one below, where you must add all the details as required in the job. And select job type and timings.
4. The cruiser drops down from zero to one or two and can be used when a detail job needs to be added.
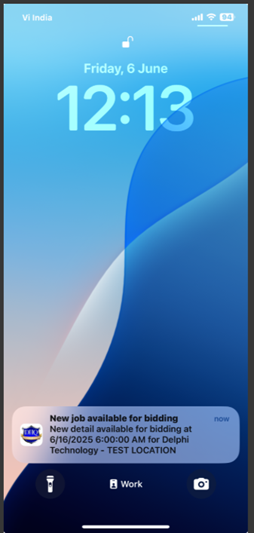
5. If needed recurrence feature can be used, and for sending notification we have send push notification feature
6. Close time: At the time you create a job, it will lock down the close date for bidding, but you can go over it and adjust it when needed.
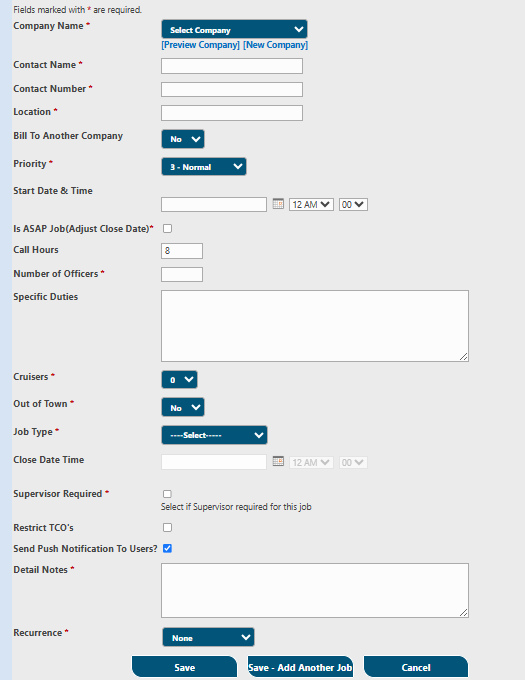
7. You can use the recurring function to add jobs with different dates to the new job creation page. If you want to create jobs with the same details but at different times, the Save and Add More Job option is your best bet.
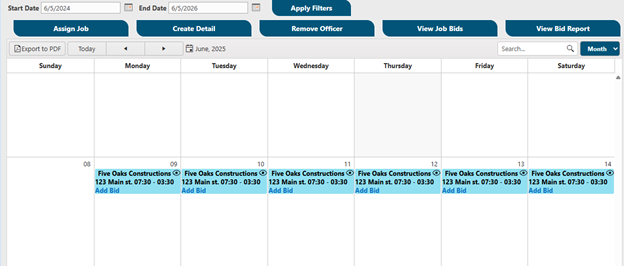
We have given officers a few more options, however once a job has been established, the supervisor may view all the open positions in **Calendar view**. By clicking the **Add Bid** link under the job details, an officer can place a bid; the supervisor can view the details and make changes once the work is created by clicking on eyeball icon (right hand side of job vendor).
8. **Add Bid**: The user has two options for adding bids: either click Add Bid on Details from the Left Navigation or choose Add Bid Link from Calendar View.
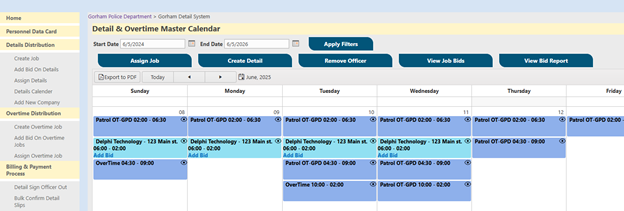
The "Add bid" option will be visible until the job's closing date, after which the "Add bid link" will be deleted.
9. **Officer Add Bid:** When a user clicks on the "add bid" link, the screen below appears, listing all the information, including the job where bids can be added for the current date and the previous bid. **Important** users can add bids on detail and overtime jobs from the same screen (Overtime flow will be explained later in this document
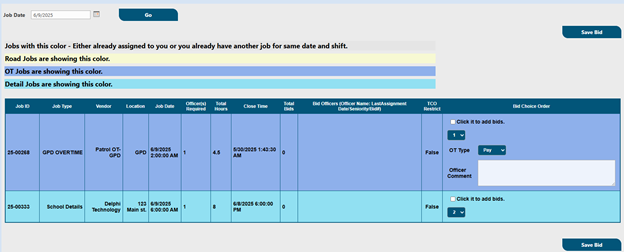
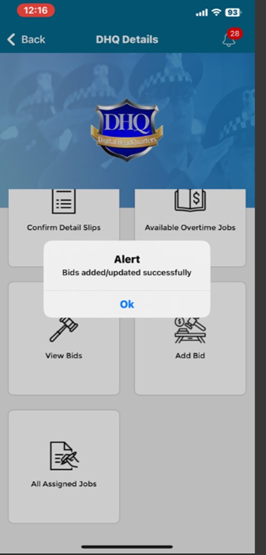
As can be seen, we have distinct colors designated for road job, details, and overtime jobs. Bids can be added from DHQ App as well here is the screen confirmation from mobile app.
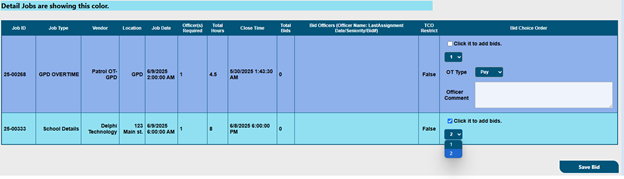
10. During the bid process, the user can customize their preferences for the job. On the same screen, they will see a dropdown menu with a list of numbers based on the number of jobs received on the chosen day.
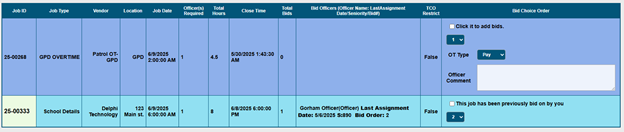
11. The same screen will begin displaying the sequence's chance of getting the job when the user adds a bid.
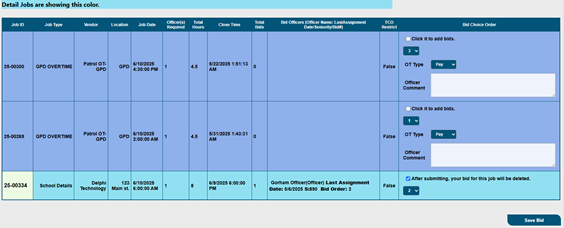
12. **Remove Bids:** When a user opens the add bid screen, they can see any bids that have already been placed on the detail’s jobs. If they are not interested in working on the project, they can tick the box and click the save button.
13. **Supervisor Action: Assign Detail jobs:** Only members of the Detail Manager, Detail Billing, and Detail Supervisor groups can assign detail jobs to officers throughout the job assignment procedure; anybody else will receive an error notice.
There are two ways to access the job assignment page from the Detail system home screen: either click the Assign Details navigation link on the left or click the Assign Job button in the middle of the calendar view.
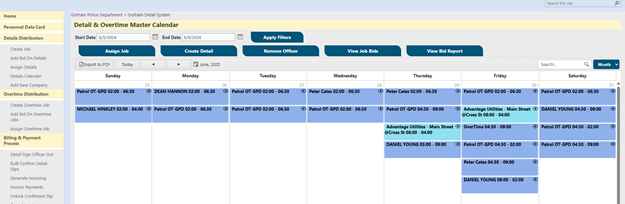
14. **Assignment Screen:** Supervisors can assign jobs based on date and job type by clicking on the assign detail link, which will display the page below. As stated below, the supervisor will view all the open positions after choosing a day from the picker. on right hand side.
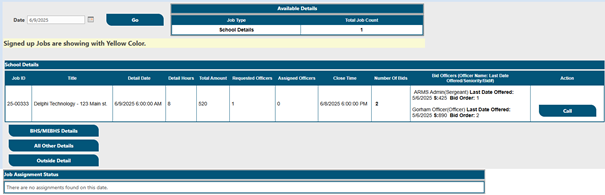
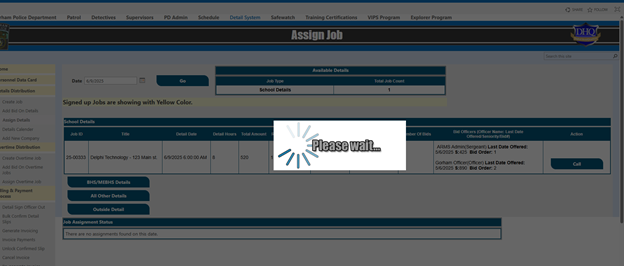
15. Supervisor must click on the Call button to proceed for assignment it will give a little pause on the screen with please wait screen.
16. The supervisor will see the assignment screen once this screen has finished loading, where all the officers will be listed along with their schedule (approving time off, working on another shift, working on another job on same day or time).
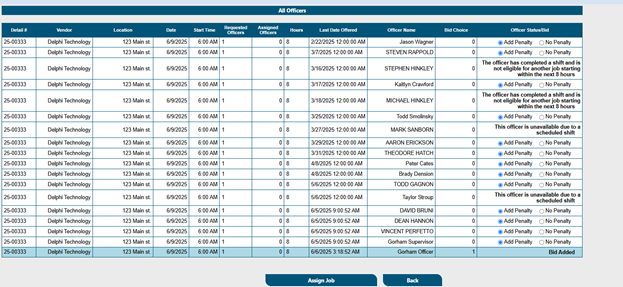
17. The supervisor will be prompted to confirm again and ask if they are sure they want to move forward when they click the Assign Job option.
18. The screen below will appear following a successful assignment.
19. 
20. Here, the administrator can see buttons to remove officers and cancel vendors for each officer assignment. If an officer is needed, they can be removed, freeing up a spot for another officer on that job. If the vendor cancels the job, the system will automatically detect that it is less than 120 minutes from the start of the detail. The system therefore considers it a vendor cancellation, either with or without penalty.
21. **Officer Detail Slip Confirmation:** Once Job is assigned to officer, they can now confirm their slips and submit it for payroll. Detail Slips can be confirmed from web and DHQ app both, here are the mobile app screen layouts:
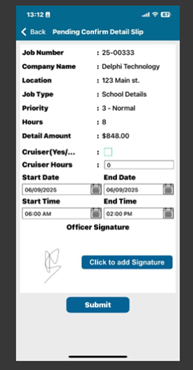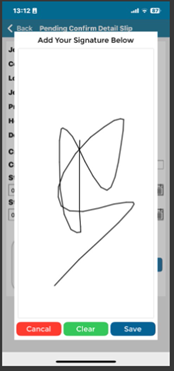
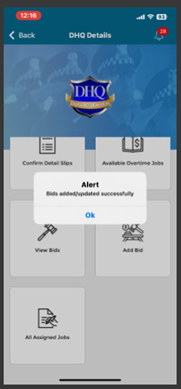
1. **Detail Payroll & Slip Lock:** In this section, the supervisor can fill in the job# and review the slips that the officers have turned in, make any required corrections, and lock them for payroll so that they can be invoiced and forwarded to vendors.
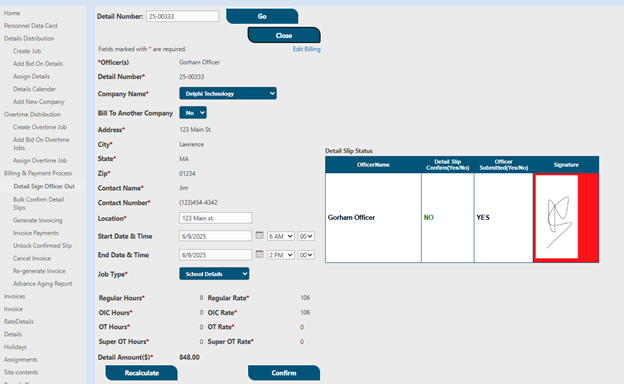
2. **Invoice and Payments:** The invoice page, which can be accessed from the left menu under Billing and Payments, will show all the slips and jobs that the supervisor has confirmed.
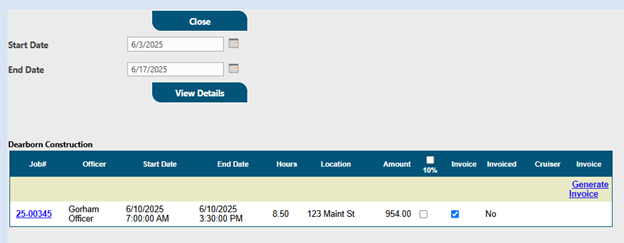
3. **Generate Invoice:** When a supervisor hits "Generate Invoice" on the screen above, a PDF invoice is generated and saved to a separate document library; only billing staff and supervisors can make invoices and handle payments. If an additional 10% administrative charge needs to be sent, kindly mark the 10% in the grid.
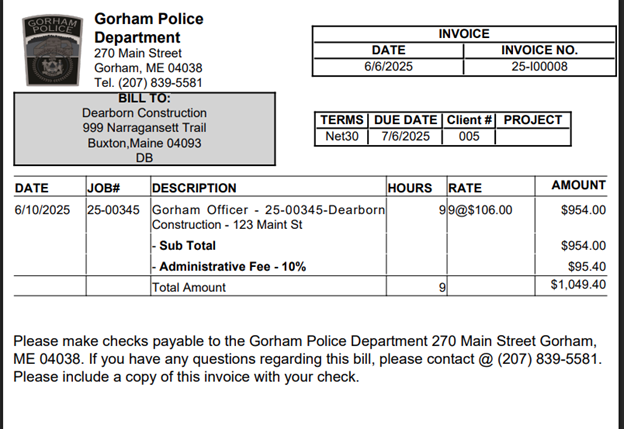
1. **Payment**: The billing person might proceed with payment after the job has been billed.
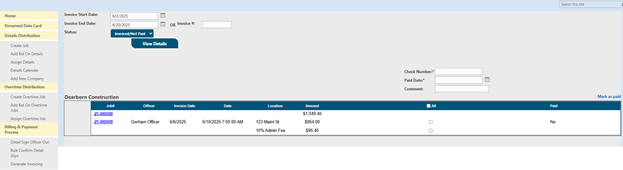
2. **Payment Detail/Check:** The billing person must fill out the payment page with all of the payment information.

3. Payment Done: Billing personnel can access the paid data by choosing the dropdown value to pay after a successful payment has been made.

- [Administration Guides](https://kb.arms.com/dhq/administration-guides?hsLang=en#main-content)
- [AWA Roll Call](https://kb.arms.com/dhq/administration-guides?hsLang=en#awa-roll-call)
- [Cruiser Check](https://kb.arms.com/dhq/administration-guides?hsLang=en#cruiser-check)
- [Detail Bidding](https://kb.arms.com/dhq/administration-guides?hsLang=en#detail-bidding)
- [Document Sign Off](https://kb.arms.com/dhq/administration-guides?hsLang=en#document-sign-off)
- [Forms Based Authentication](https://kb.arms.com/dhq/administration-guides?hsLang=en#forms-based-authentication)
- [Microsoft Office Settings](https://kb.arms.com/dhq/administration-guides?hsLang=en#microsoft-office-settings)
- [Mobile App](https://kb.arms.com/dhq/administration-guides?hsLang=en#mobile-app)
- [Office 365/Azure Connection](https://kb.arms.com/dhq/administration-guides?hsLang=en#office-365-azure-connection)
- [Passwords](https://kb.arms.com/dhq/administration-guides?hsLang=en#passwords)
- [Permissions](https://kb.arms.com/dhq/administration-guides?hsLang=en#permissions)
- [Personnel Cards](https://kb.arms.com/dhq/administration-guides?hsLang=en#personnel-cards)
- [Smart Police](https://kb.arms.com/dhq/administration-guides?hsLang=en#smart-police)
- [Scheduling](https://kb.arms.com/dhq/administration-guides?hsLang=en#scheduling)
- [Training](https://kb.arms.com/dhq/administration-guides?hsLang=en#training)
- [Quartermaster](https://kb.arms.com/dhq/administration-guides?hsLang=en#quartermaster)
- [Register New User](https://kb.arms.com/dhq/administration-guides?hsLang=en#register-new-user)
- [User Guides](https://kb.arms.com/dhq/user-guides?hsLang=en#main-content)
- [AWA Roll Call](https://kb.arms.com/dhq/user-guides?hsLang=en#awa-roll-call)
- [Cruiser Check](https://kb.arms.com/dhq/user-guides?hsLang=en#cruiser-check)
- [Event Tracking](https://kb.arms.com/dhq/user-guides?hsLang=en#event-tracking)
- [Messaging](https://kb.arms.com/dhq/user-guides?hsLang=en#messaging)
- [Mobile App](https://kb.arms.com/dhq/user-guides?hsLang=en#mobile-app)
- [Safe Watch](https://kb.arms.com/dhq/user-guides?hsLang=en#safe-watch)
- [Smart Police](https://kb.arms.com/dhq/user-guides?hsLang=en#smart-police)
- [Scheduling](https://kb.arms.com/dhq/user-guides?hsLang=en#scheduling)
- [Training](https://kb.arms.com/dhq/user-guides?hsLang=en#training)
- [Quartermaster](https://kb.arms.com/dhq/user-guides?hsLang=en#quartermaster)
- [Document Sign Off](https://kb.arms.com/dhq/user-guides?hsLang=en#document-sign-off)
- [DHQ Modules](https://kb.arms.com/dhq/dhq-modules?hsLang=en)
[](http://arms.com)
[mailto:email@email.com](mailto:email@email.com)
Copyright © 2026, End2End Public Safety