
Click to Download the PDF File

“How To”
User Guide:
Bankruptcy
When a judgment debtor files for bankruptcy, it puts an automatic stay on the levy or eviction.
Wage Garnishment or Bank/Third-Party Levy (or any property levy)
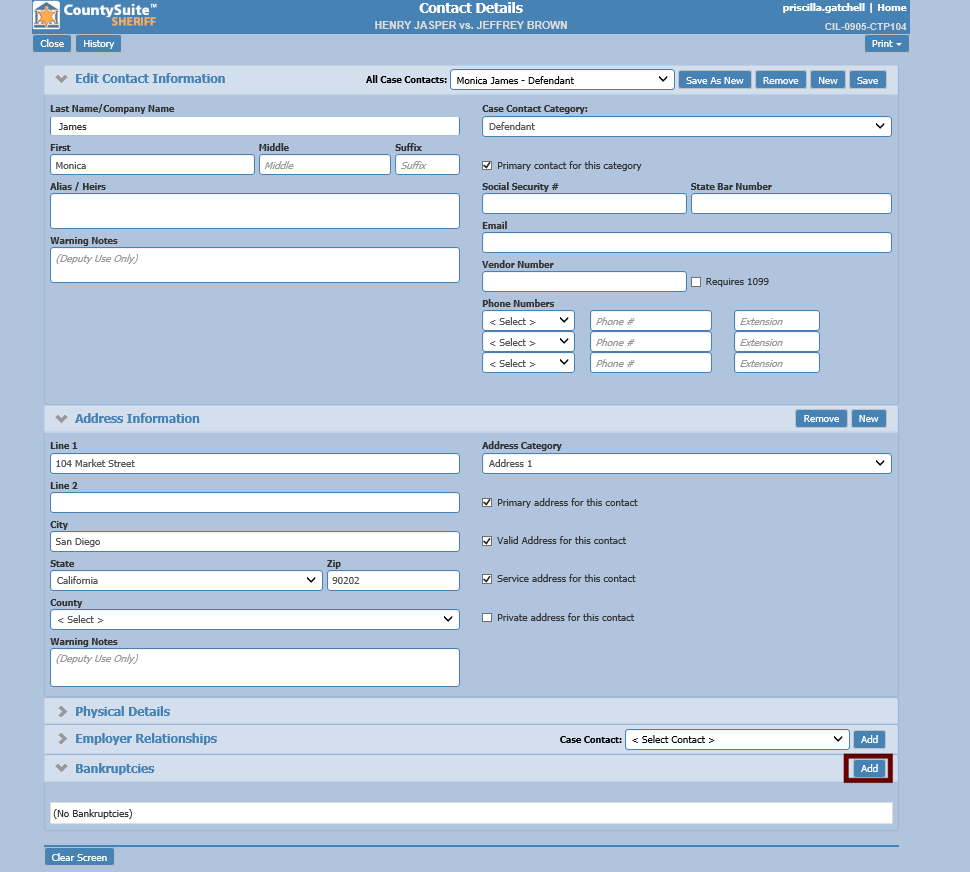
On the Contact Details page, the Bankruptcy section is located at the bottom of the page. If a bankruptcy for this person exists, it will show in this section. If a new bankruptcy should be entered, click the Add button. Clicking Add will take the user to the Bankruptcy Details page.
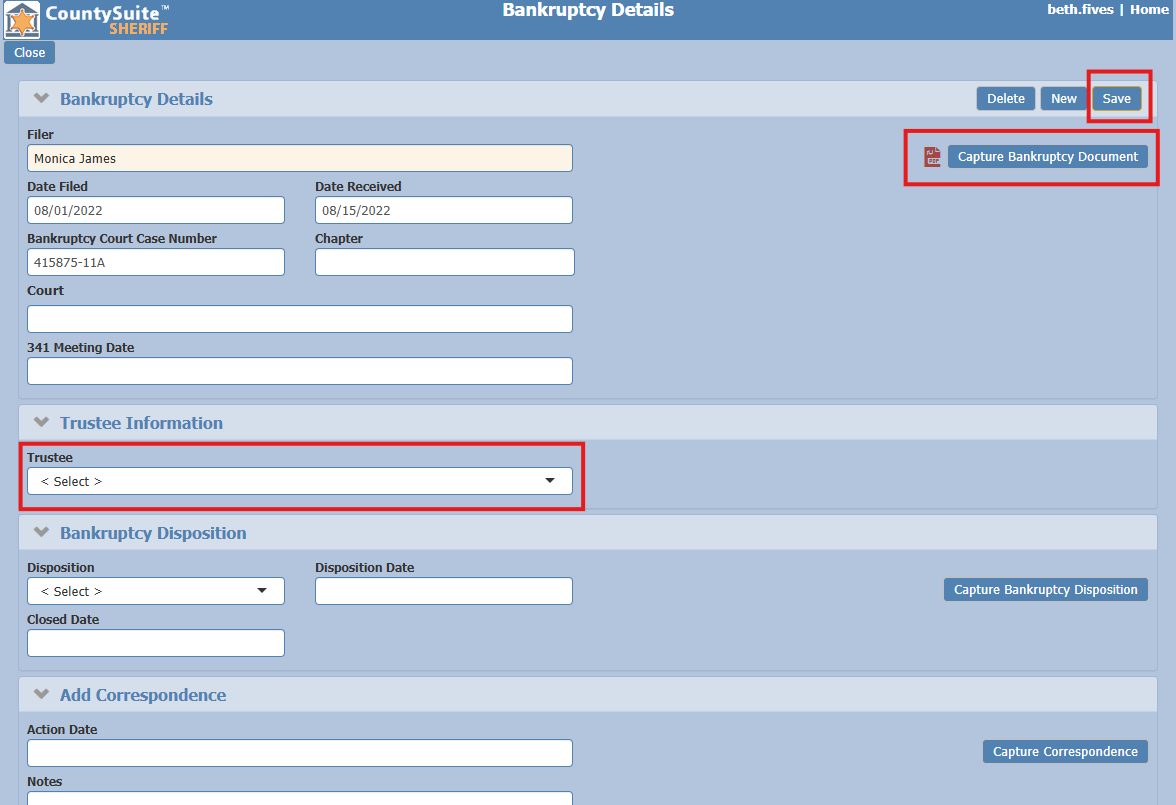
- Complete the Bankruptcy Details section.
- Date Filed: Date bankruptcy petition was filed.
- Date Received: Enter the stamped (clock-in) date.
- Bankruptcy Court Case Number: Enter the BK case number.
- Chapter: Enter the BK type filed.
- Court: Enter the BK court location.
- 341 Meeting Date (Optional): If information is available.
- Capture Bankruptcy Document: Scan and attach the bankruptcy documents.
- Save your changes.
- A Trustee must be selected in the Trustee Information section if you are holding any funds. The application will generate a copy of the bankruptcy notice to the Trustee only when a trustee is selected.
- If the Trustee does not exist in the drop-down on this page, go to the Contacts page from the Home page and add the new Trustee.

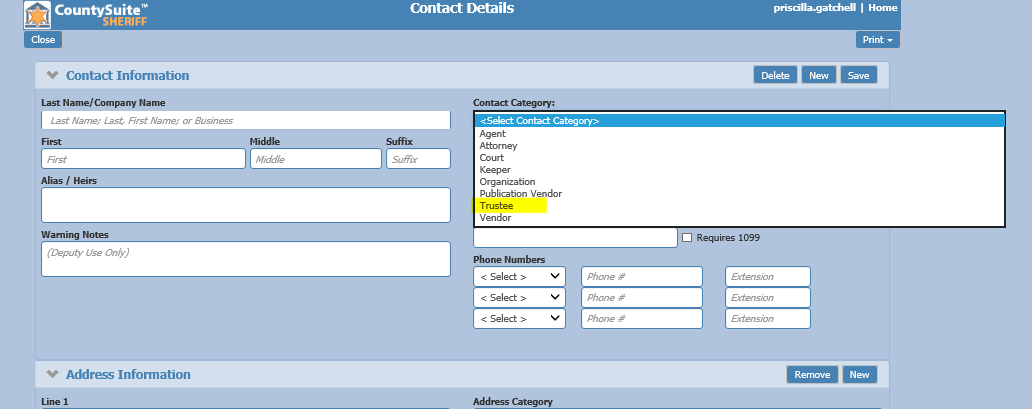
- You may then return to the Bankruptcy Details and select the Trustee in the drop-down list.
- If the Trustee does not exist in the drop-down on this page, go to the Contacts page from the Home page and add the new Trustee.
- Once all the details have been entered, click the Save button. Remember, these details pertain to the person, not a specific file at this point. Therefore, the Bankruptcy Document that was captured will not show as a File Action on a specific file but can always be located by going to the bankruptcy page of the Contact record for the individual who filed for bankruptcy.
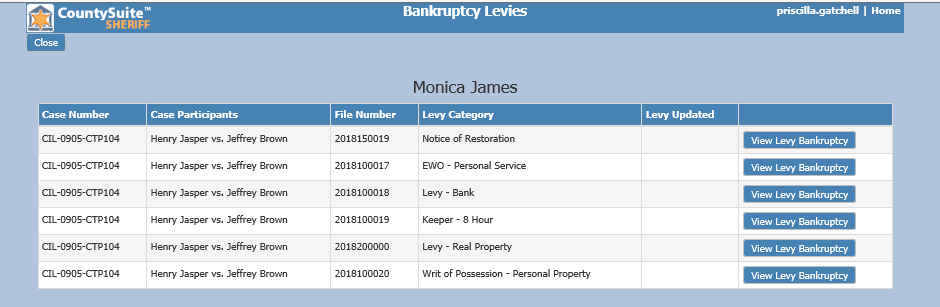
- Once the bankruptcy has been saved, a View Bankruptcy Levies button will appear at the top right side of the page. Click the button to go to the Bankruptcy Levies page which shows a list of all files related to this contact.
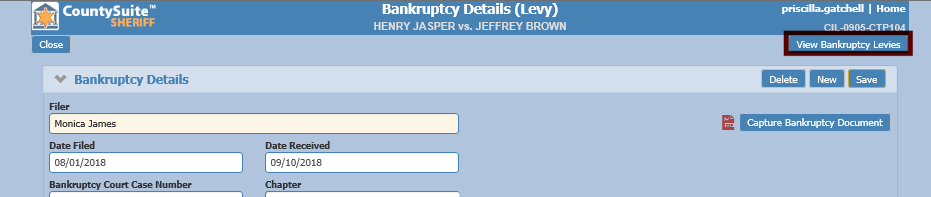
- Use the details provided on the bankruptcy document to determine which of the listed case files will be affected.
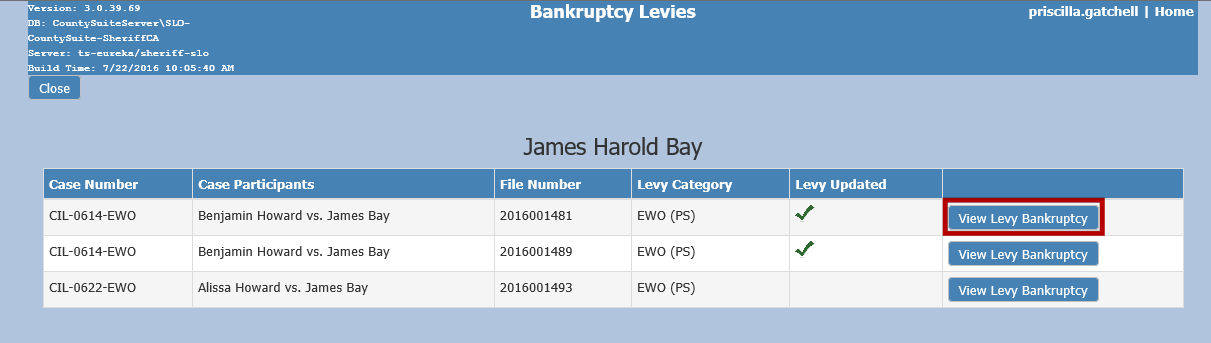
- Clicking the View Levy Bankruptcy button next to any file will take the user to the Bankruptcy Details (Levy) information page for that specific file. If bankruptcy levy details have already been entered for a specific file, a green check mark will show in the Levy Updated column.
Bankruptcy – Levy Details
Clicking the View Levy Bankruptcy button takes you to the Bankruptcy Details (Levy) page where information is entered specific to the levy (service). The top portion of the page displays all the information previously entered through the Contact Details screen. If changes need to be made to this information, use the Edit Bankruptcy button in the top right-hand corner.
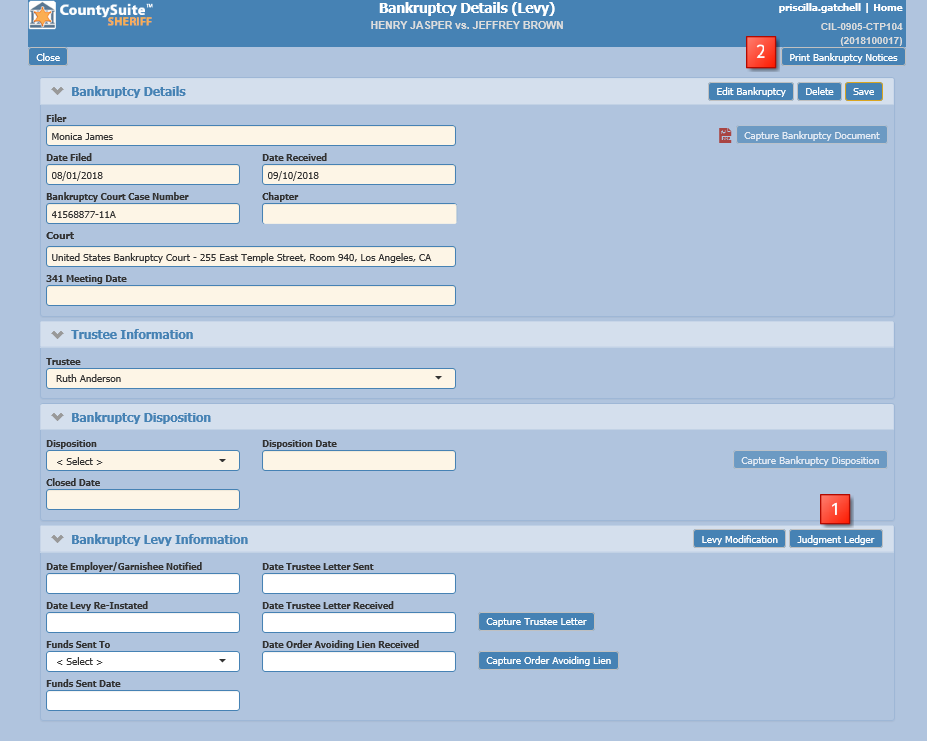
- Before printing bankruptcy notices, the first step is to use the Judgment Ledger button to determine if the Sheriff Office is currently holding any money on the file. Click the button to open the ledger as a separate tab. Review the ledger to determine the amount being held and then go back to the Bankruptcy Details (Levy) page.
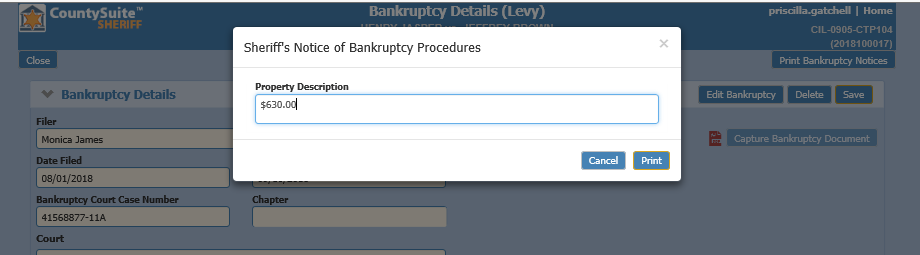
- Click the Print Bankruptcy Notices button to generate notices to inform the Plaintiff/Attorney, Defendant, and Trustee (if applicable) that the bankruptcy has been filed with the Sheriff’s Office. You will enter the amount of money being held on the Ledger in the Property Description pop-up when printing the notices.
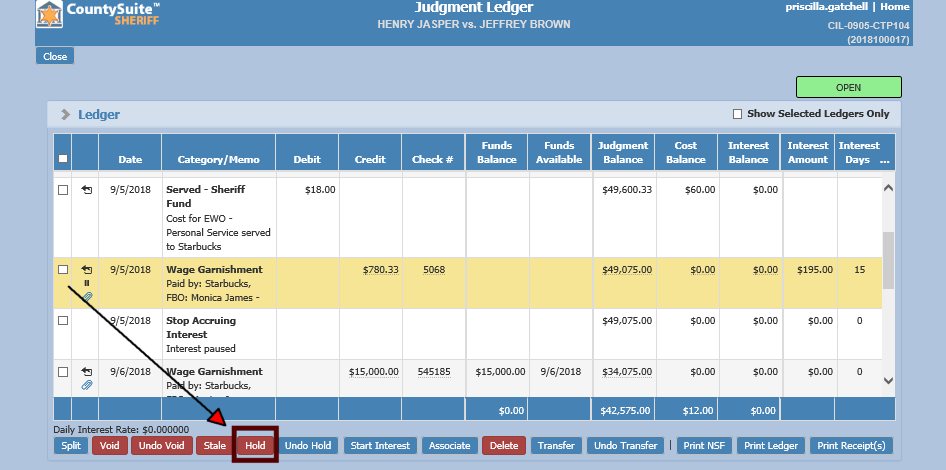
- If any money is available on the file and the user has determined it should not be issued out in a check run, use the Hold button on the Judgment Ledger to ensure no payments will be issued out now that a bankruptcy has been filed. The system gives the user the flexibility to decide which payments should be held and which can still be paid out instead of putting an automatic hold on everything once a bankruptcy is filed.
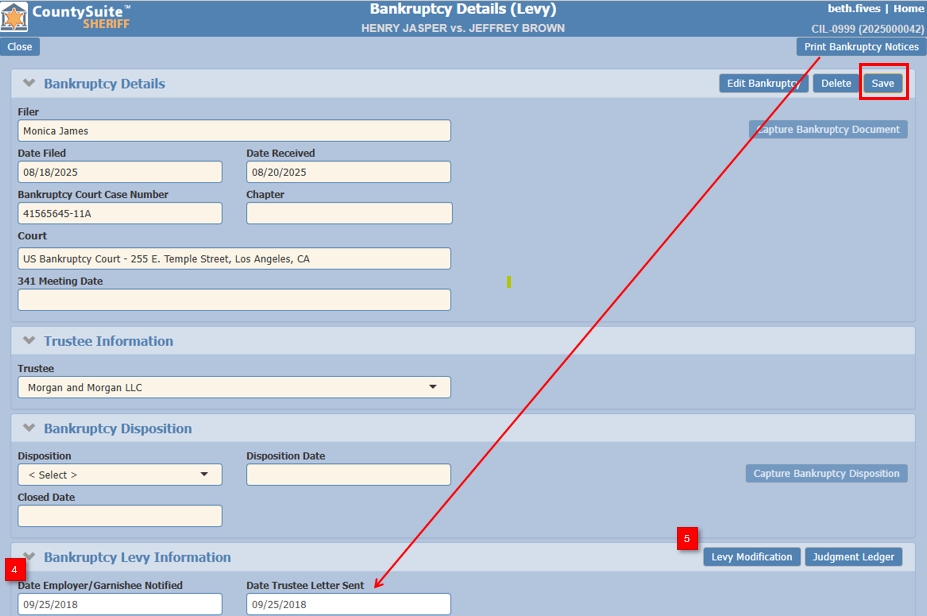
- Once the Bankruptcy Notices have been printed, the “Date Trustee Letter Sent” field will auto-fill with the date the notice was printed (if a Trustee was selected). You will enter the “Date Employer/Garnishee Notified” based on the date you mail those notices. Click Save.
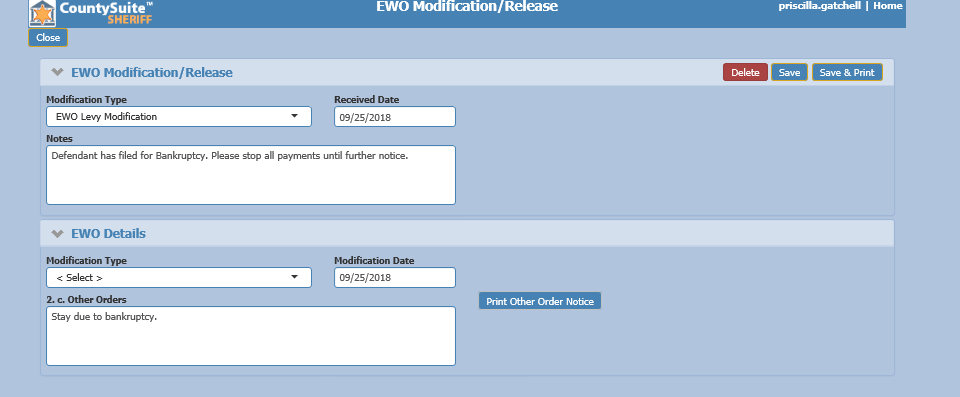
- Click the Levy Modification button to generate a notice to the Employer/Garnishee that a bankruptcy has been filed and instruct them to stop all payments until further notice. This will open a separate tab to enter all bankruptcy information. Click Save & Print to generate a modification notice to the Employer/Garnishee.
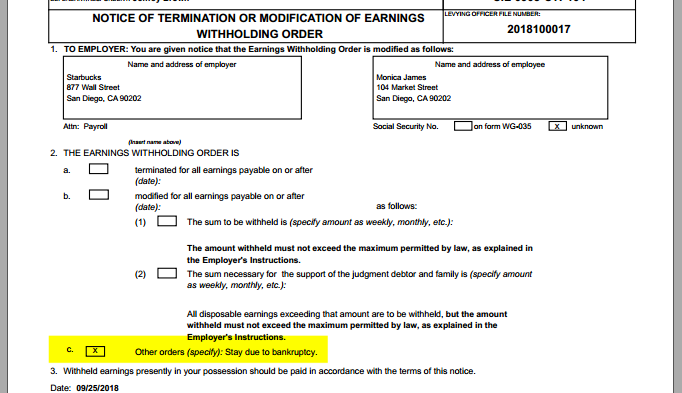
Example of Modification Notice:
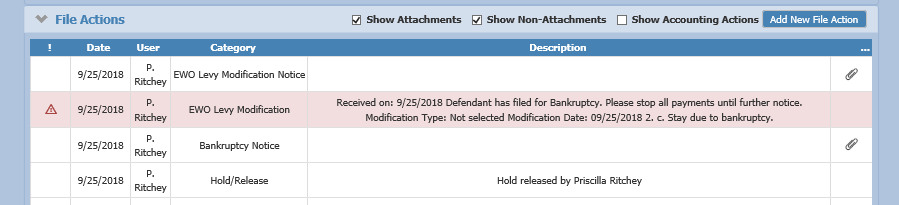
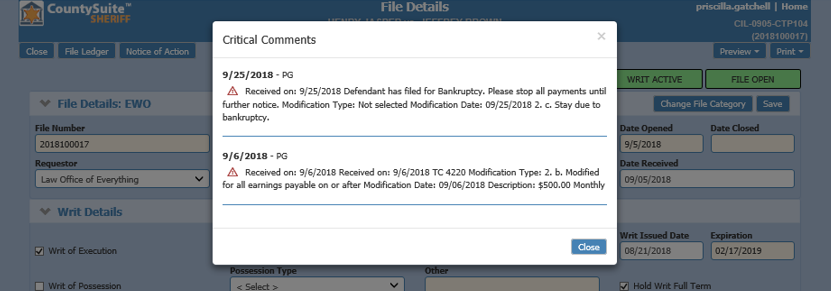
Generating the modification will create a file action to track the bankruptcy on a specific file/service. It will also pop-up as a critical comment any time a user goes to the File Details page for the specific file.
Bankruptcy on Eviction
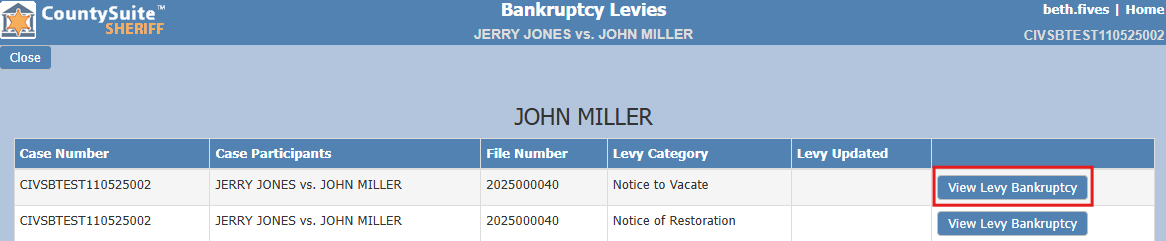
Use these additional steps specific to a bankruptcy associated with an Eviction. From the Bankruptcy Levies page, click on the View Levy Bankruptcy for the Notice to Vacate.
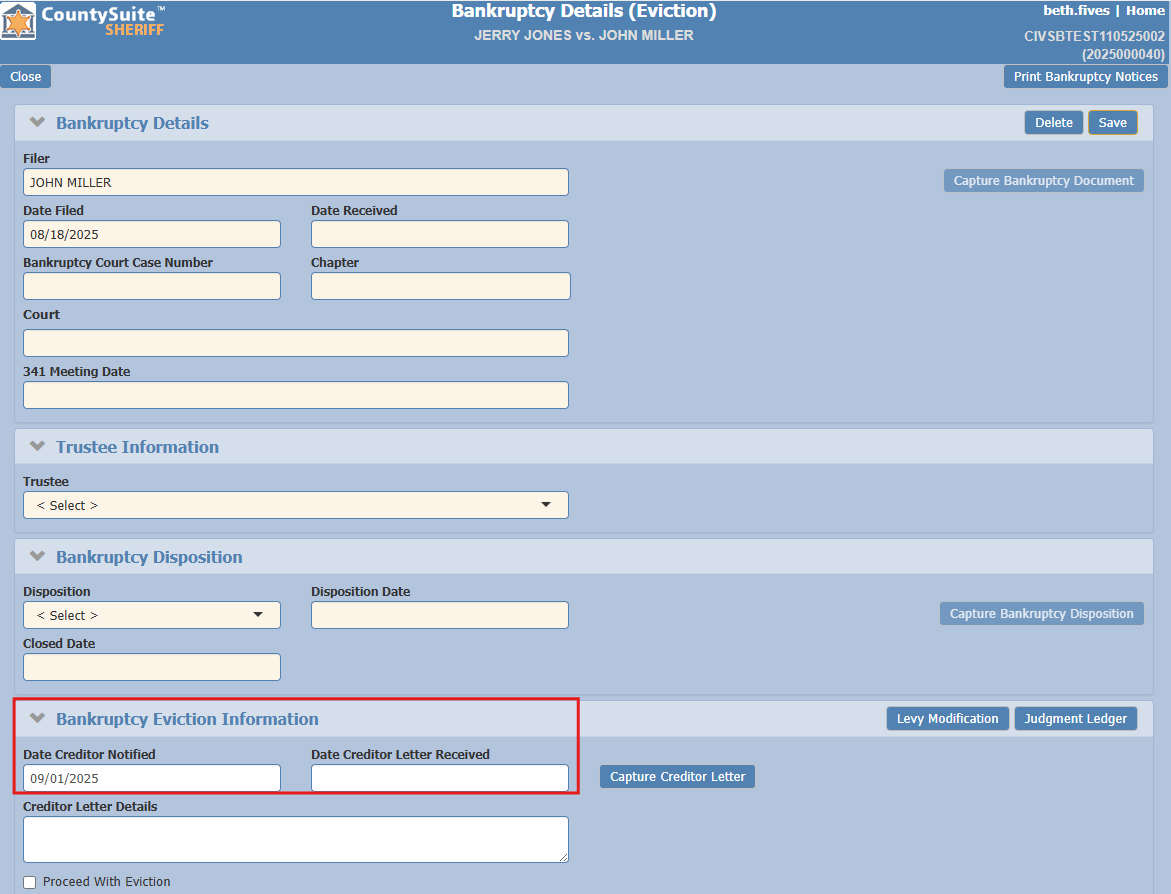
The Bankruptcy Details (Eviction) page has an additional section at the bottom for tracking the process. Enter the “Date Creditor Notified” and click Save.
Click Close to return to the File Details page. The Notice to Vacate AND the Notice of Restoration services have both been flagged with the Bankruptcy.

If you receive notification that the Eviction may proceed, return to the Bankruptcy Levy page:
- From File Details page, click on either of the Services (Vacate or Restoration).
- From the Services Details page, click on the Bankruptcy.
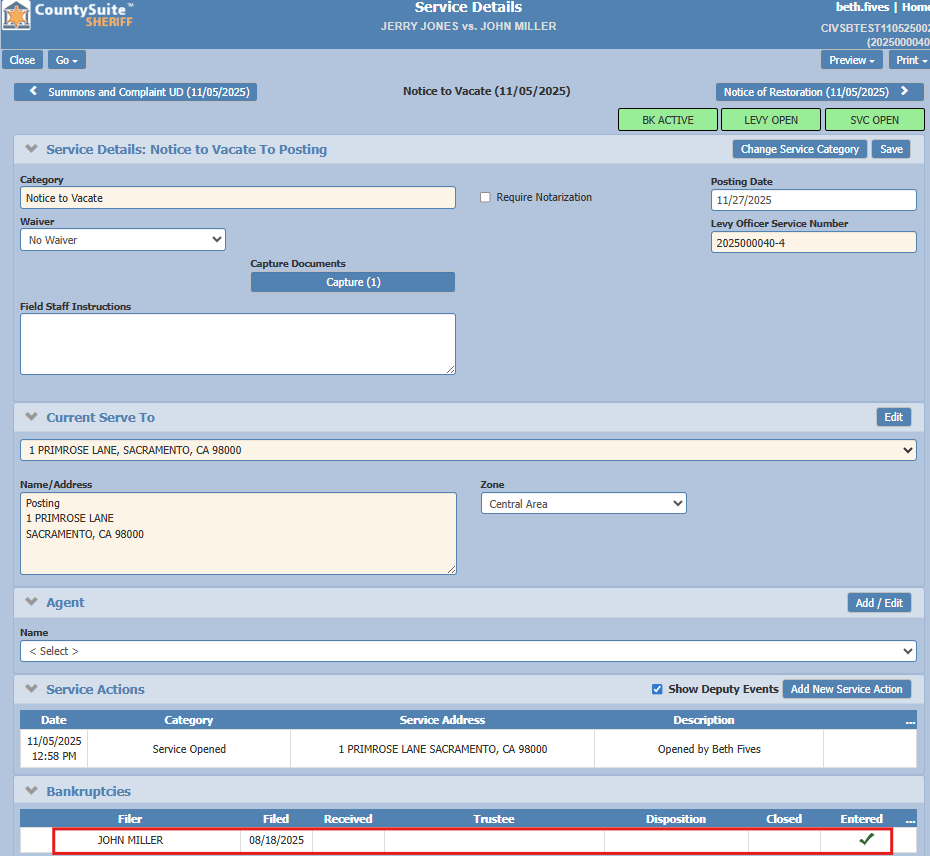
- Enter the “Date Creditor Letter Received” and if available, scan the instructions using the “Capture Creditor Letter” button.

- Click the box to “Proceed With Eviction”. This checkbox removes the notification that appears on the Deputy Services page so that the Deputy will know that they may proceed with the eviction.
- Click Save.
Updating a Bankruptcy
Once the above bankruptcy details have been entered, a user can add additional information to this bankruptcy.
The File Details page will show a bankruptcy icon on the specific service(s) affected by the bankruptcy.

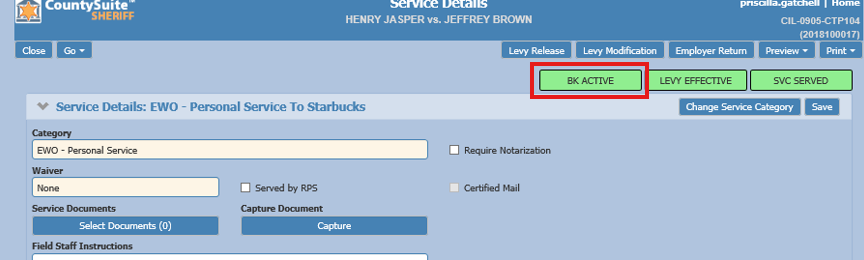
The Service Details page displays a “BK ACTIVE” icon at the top of the page if the Bankruptcy is active.
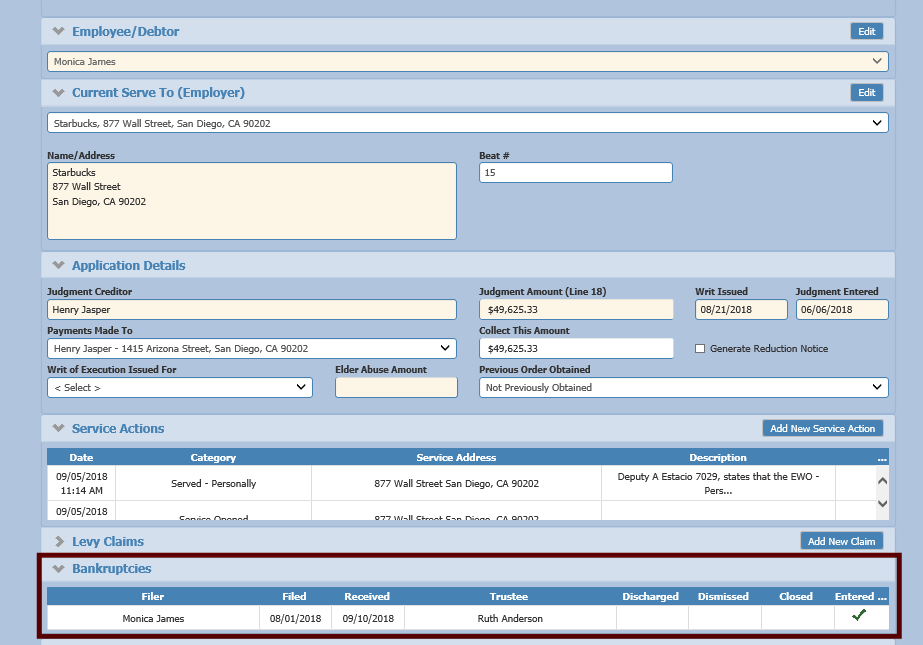
At the bottom of the Service Details page, the bankruptcy section will be filled out with all the current information. Clicking on this will take the user to the Bankruptcy Details (Levy) page.
The Bankruptcy Details (Levy) page at the service level can be used to manage the Bankruptcy further.
- Use the Capture buttons to scan in a letter from a Trustee (if applicable) or scan in an Order Avoiding Lien:
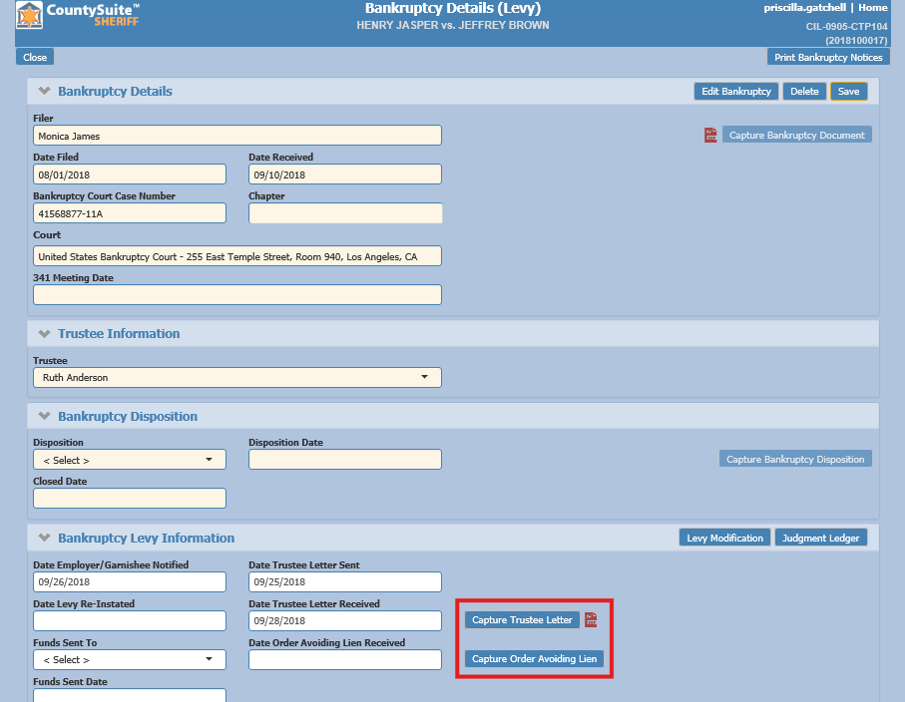 Because these entries are for a specific service/levy, a file action will be created for any documents that are captured:
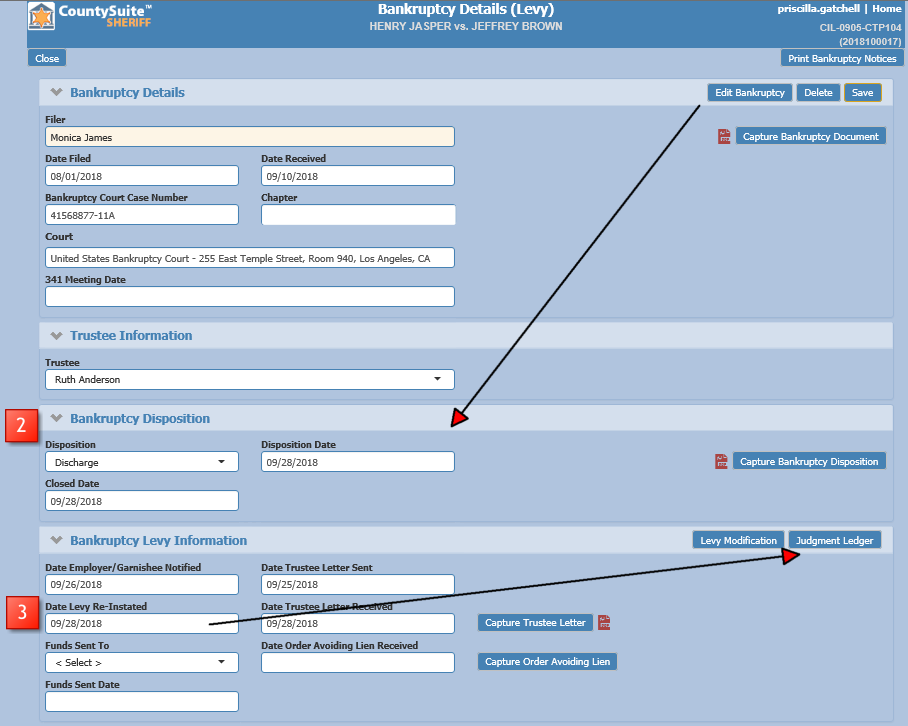
- When the bankruptcy is dismissed/discharged, use the Edit Bankruptcy button to fill out the Bankruptcy Disposition section and scan in the appropriate documents. Click Save.
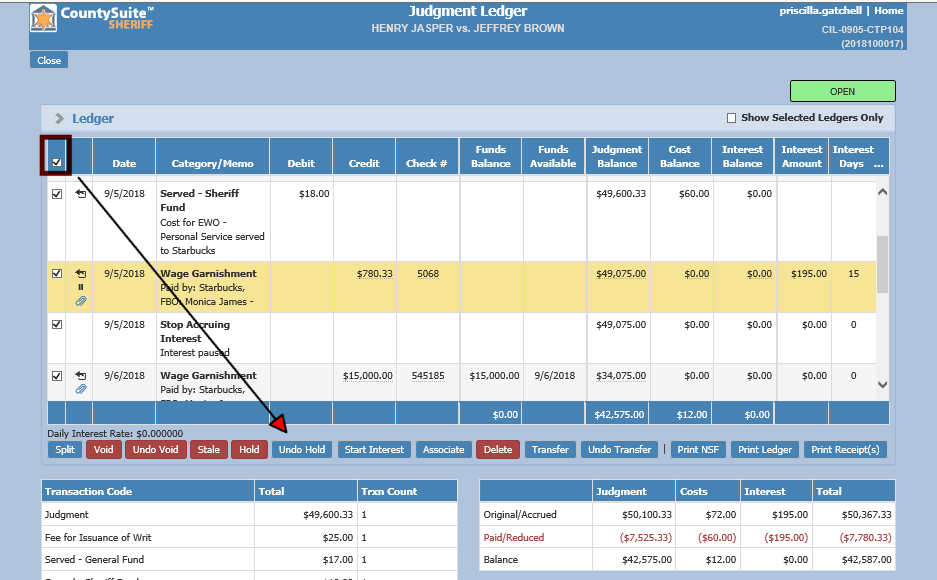
- If dismissal/discharge will cause the levy to be re-instated use the Bankruptcy Levy Information section to fill enter the Date Levy Re-Instated. If the payments that were on hold can now be issued out, click the Judgment Ledger button to open a separate tab for the ledger and remove the hold on payments so they will be part of the next check run (depending on funds available date).NOTE: Sometimes the easiest way to remove a hold on all payments on a long Judgment Ledger is to select the top check box so all items on the ledger are selected and then click the Undo Hold button. A message will appear stating that not all ledger items were on hold and therefore not all items could be undone. This will not cause any issues in the system so the user may confirm the update when prompted.
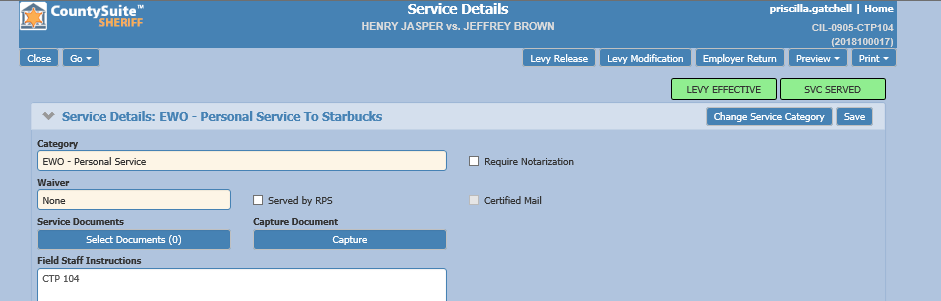
Once the bankruptcy is no longer active, the status icon will be removed from the top of the Service Details page:
The bottom of the Service Details page will show the bankruptcy with a closed date:

On the File Details page, the bankruptcy icon will show as a green check mark to note that a bankruptcy once existed in this file, but is no longer active:
