---
title: End-of-Month Accounting Process
description: End-of-Month Accounting Process
---
[Skip to content](https://kb.arms.com/teleosoft/end-of-month-accounting-process#main-content)
English
Show submenu for translations

Open main navigation
Close main navigation
- English
Show submenu for translations
- [Customer Portal](https://helpdesk.arms.com/tickets)
[Customer Portal](https://helpdesk.arms.com/tickets?hsLang=en)
How can we help you?
- There are no suggestions because the search field is empty.
1. [Teleosoft](https://kb.arms.com/teleosoft?hsLang=en)
2. [Teleosoft Documents](https://kb.arms.com/teleosoft/teleosoft-documents?hsLang=en)
# End-of-Month Accounting Process
[Click here to download the PDF](https://kb.arms.com/hubfs/CountySuite%20Civil%20Court%20PA%20-%20How%20To%20-%20End%20of%20the%20Month%20Process.pdf?hsLang=en)

**How To**
**User Guide:**
**End-of-Month Accounting Process**
End-of-Month Accounting Process
*Prerequisite: End-of-Day balancing must be completed before the End-of-Month Process can proceed. Refer to “How To: End of Day Balancing”.*
End-of-Month Process consists of: Reviewing Check Details, Confirming Payee Details, Printing of Consolidated Checks, Writ Tax Commission, Form 711, Act 119, and Accounting Reports.
How Check Freezing Works
Checks freeze in the following month when a new cost is brought in for that check. If a filing category has multiple costs that go into different end of month checks, it will freeze all affected checks. The check freezing logic sees that a cost is transferred to accounts in a different month than the other costs, this will freeze the previous month’s check/checks to say Month-MM.YYYY (example June-06.2025) as well as create a new separate check to accumulate costs for the current month.
Since checks do not automatically freeze when the next month starts. Smaller counties where new costs might not be brought in for a few days after the start of the new month can manually freeze their checks by highlighting the check and entering a temporary check number into the check number field in the entry details.
Checks do not need to be frozen to print out the checks, however, for the Writ Tax Comm. to work correctly, the Department of Revenue Check and Treasurer’s Check need to be frozen (have a check number without a printed date)
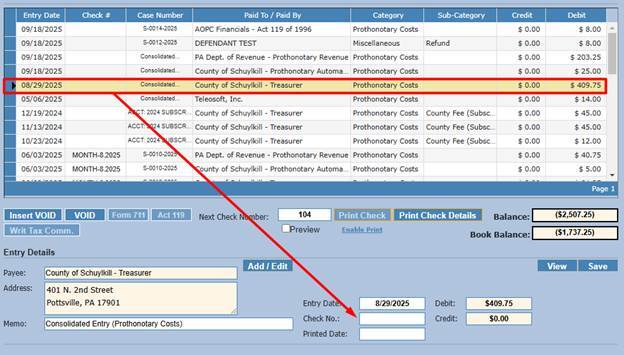
How to Manually Freeze Check
1. On the Accounts Page, highlight one of the consolidated checks, click in the Check No box in the Entry Details section.
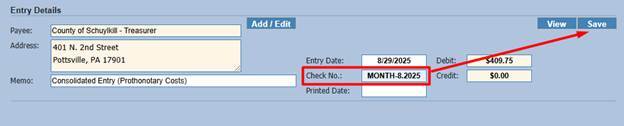
2. Enter “FREEZE” or Month-MM.YYYY in Check No. field.
3. Click Save.
The saved frozen check number will be reflected in the Check # column of the ledger grid.
Form 711
The Form 711 confirms the totals in the Department of Revenue check.
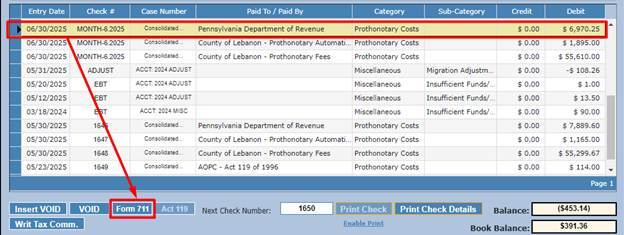
1. Highlight the previous month’s Department of Revenue check.
2. Click Form 711.
3. Add lines 4 and 16, this should equal the total of the Department of Revenue Check.
4. If adding lines 4 and 16 equals the total of the Department of Revenue check on the Accounts page, you can apply the Writ Tax and Print the Check (Reference sections below).
5. Highlight the Department of Revenue check.
6. Click the Writ Tax Comm. button.
7. Confirm that the totals of the Department of Revenue check and the Treasurer’s check changed based off of the writ tax. (Department of Revenue will be less since Writ Tax is subtracted from it and the Treasurer’s check will be more since the Writ Tax is added to it).
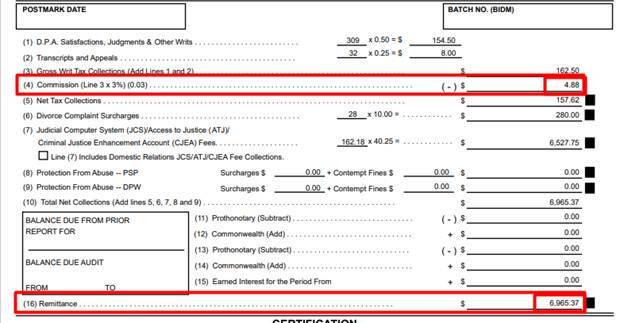
If you add these lines and they do not equal, there may be an issue with the state tax being counted. This issue may occur if the State Tax is divided in increments that are not 25 or 50 cents. Please reach out to our Support Team so that they can further assist with this issue.
Writ Tax
After confirming the totals using the Form 711 and both the Department of Revenue and Treasurer’s checks are frozen, the writ tax commission can be applied on the Department of Revenue check.
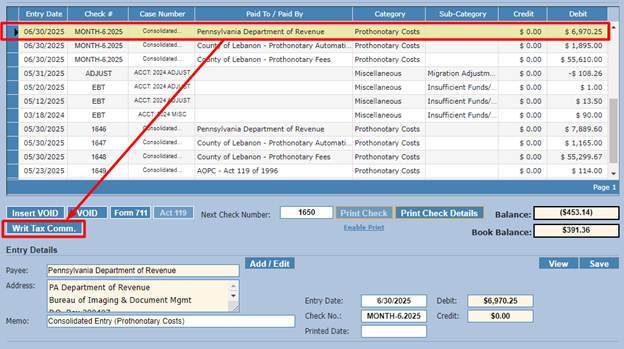
The Department of Revenue check should now match Line 16 of Form 711.
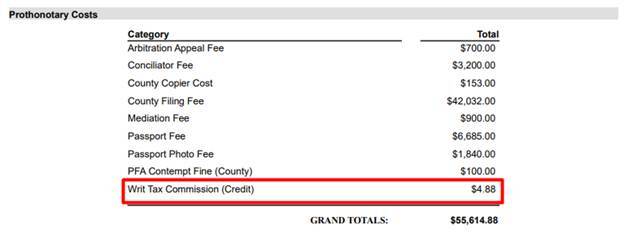
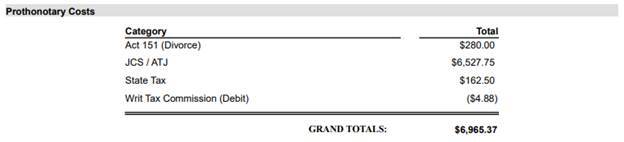
Additionally, the last page of the Print Check Details will show a line for the Writ Tax Commission.
The Department of Revenue check will show a negative amount and say Writ Tax Commission (Debit).
The Treasurer’s check will show a positive amount and say Writ Tax Commission (Credit).

Department of Revenue Check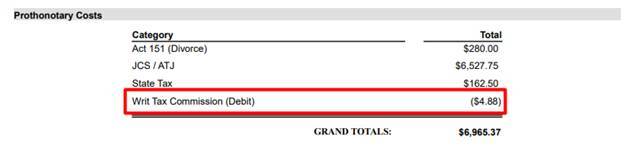
Treasurer’s Check
Act 119
The Act 119 report shows the AOPC costs from Custody filings.
1. Highlight the previous month’s Act 119 check.
2. Click the Act 119 button.

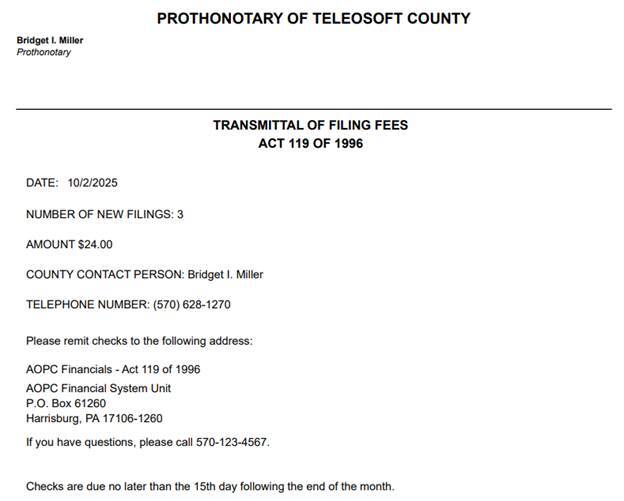
The Act 119 report includes today’s date, the number of custody filings, total amount in the check, the County Contact Person which defaults to the Protonotary but can be configured to show a different name, as well as the AOPC contact information.
Review of Check Details
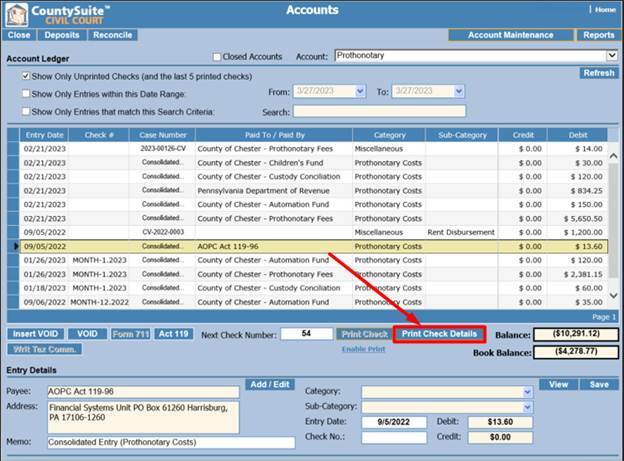
Before printing a consolidated check, the Print Check Details will show every cost in that check.
To print/open the Print Check Details report on the Accounts page:
1. Click on the consolidated check you want to review.
2. Then, click on the Print Check Details button.
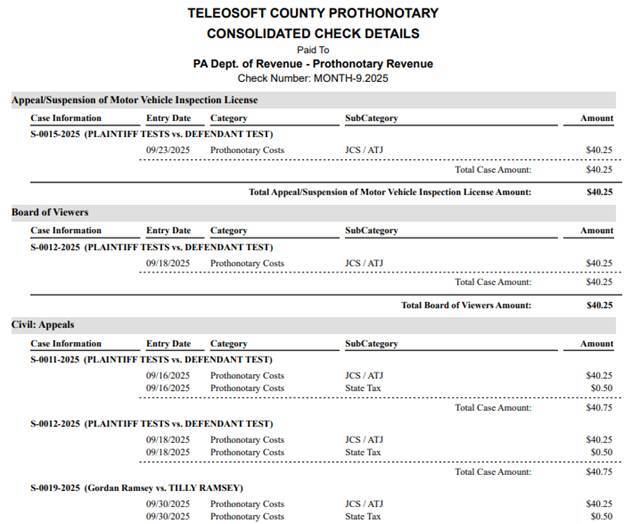
The Print Check Details report is divided by filing category. Under each different filing category, you will see all the cases and the costs from each case that are in that check.
The last page of the Print Check Details report will show the totals of each cost category grouped together.
Confirm Payee Details
1. Highlight each end of month check and review the Entry Details.
2. If the payee information is correct, continue to Print Check/Print Consolidated Check sections below.

If the payee information is incorrect:
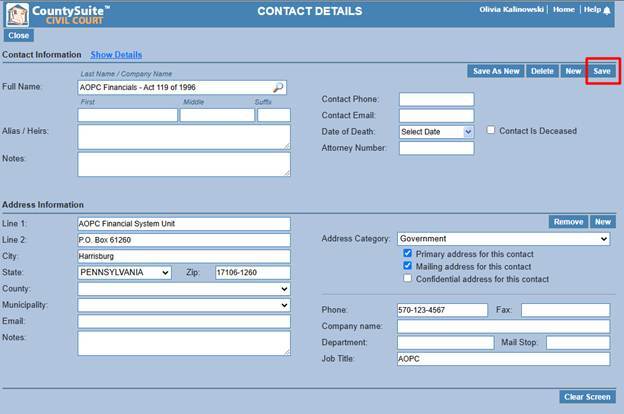
1. Click Close on the Accounts page.
2. Once on the home page, click Contacts.
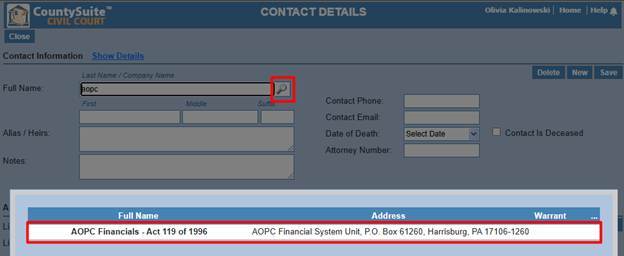
3. Write the payee name that needs to be corrected and click the magnifying glass to search for the contact that needs to be to be corrected.
4. Select the contact name and address that needs to be corrected.
5. Correct the contact information – name and address. Then click Save.
6. Go back to the Accounts page, the user should now see the corrected payee information after highlighting the end of month check.
7. Now that the payee information is correct, continue to Print End of Month Check section below.

How to Print End of Month Checks
After verifying the check totals, the user can print their end of month consolidated checks.
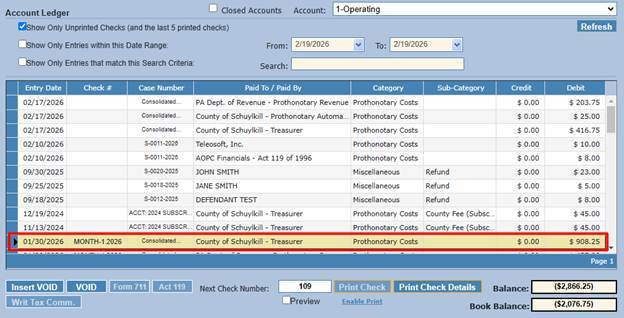
Confirm that the Next Check shows the correct check number before printing it. The Next Check Number shows the next available number after the current highest printed check number.
If the user does not see the frozen checks, the user will need to search for the checks by unchecking the box “Show Only Unprinted Checks (and the last 5 printed checks)” and checking the box next to “Show Only Entries that match this Search Criteria”. The user can type the check number of “Month” to find all the frozen checks or type the payee name, then clicking the Refresh button.

1. Select the check that you would like to print on the Accounts Page.
2. Once the check is highlighted, click “Enable Print”. *This is a safeguard to avoid printing the consolidate check during the month.*
3. Click “Print Check” button.
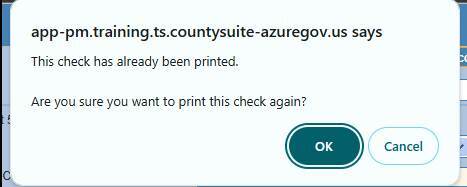
4. If the Check is frozen, you may receive a warning pop-up of “This check has already been printed. Are you sure you want to print this check. Click “OK”, this will open the pdf with the Check information.
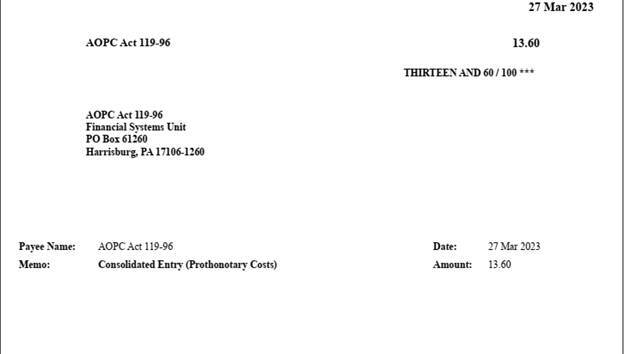
5. After clicking Print Check, the Next Check Number will get assigned to the highlighted check and today’s date will get added as the Printed Date. Additionally, a pdf version of the check will open in a new tab.


Accounting Reports
1. Click Accounts.
2. Click Reports
On the Accounting Reports page, the user can switch between the county’s different bank accounts (including User-Defined accounts, which are separate bank accounts that are created for particular cases).
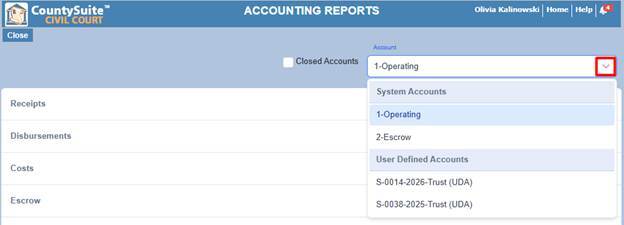
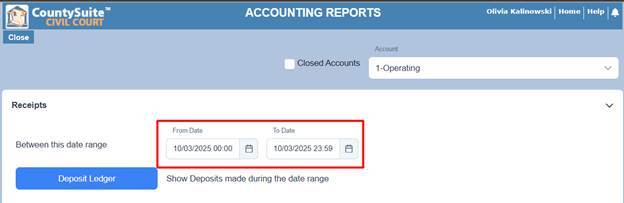
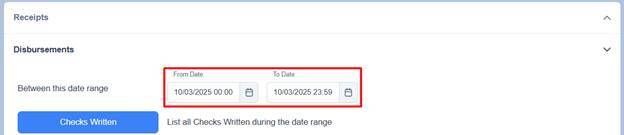
Some helpful reports for the end of month are Deposit Ledger, Receipt Ledger, Receipts Voided, and the Checks Written.
The user can click between the different sections to see additional available reports.
The user can modify the dates to pull the results for those dates. Each section’s dates default to the Start Date being today’s date 12 am and the End Date being today’s date 11:59 pm.
- [Teleosoft Documents](https://kb.arms.com/teleosoft/teleosoft-documents?hsLang=en#main-content)
- [Test](https://kb.arms.com/teleosoft/teleosoft-documents?hsLang=en#test)
- [Courts](https://kb.arms.com/teleosoft/courts?hsLang=en#main-content)
- [Civil Court](https://kb.arms.com/teleosoft/courts?hsLang=en#civil-court)
- [CA Sheriff](https://kb.arms.com/teleosoft/ca-sheriff?hsLang=en)
[mailto:support@arms.com](mailto:support@arms.com)
Copyright © 2026, End2End Public Safety