Setup: Setup Features
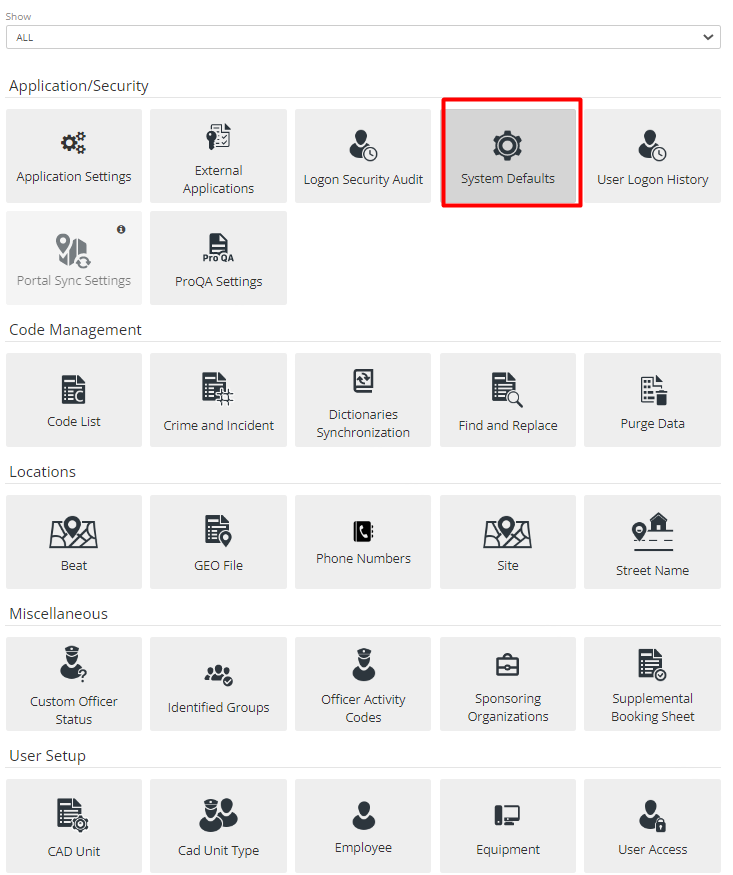
Accessing Setup Menu
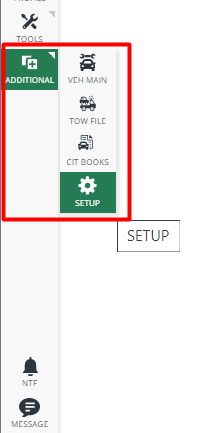
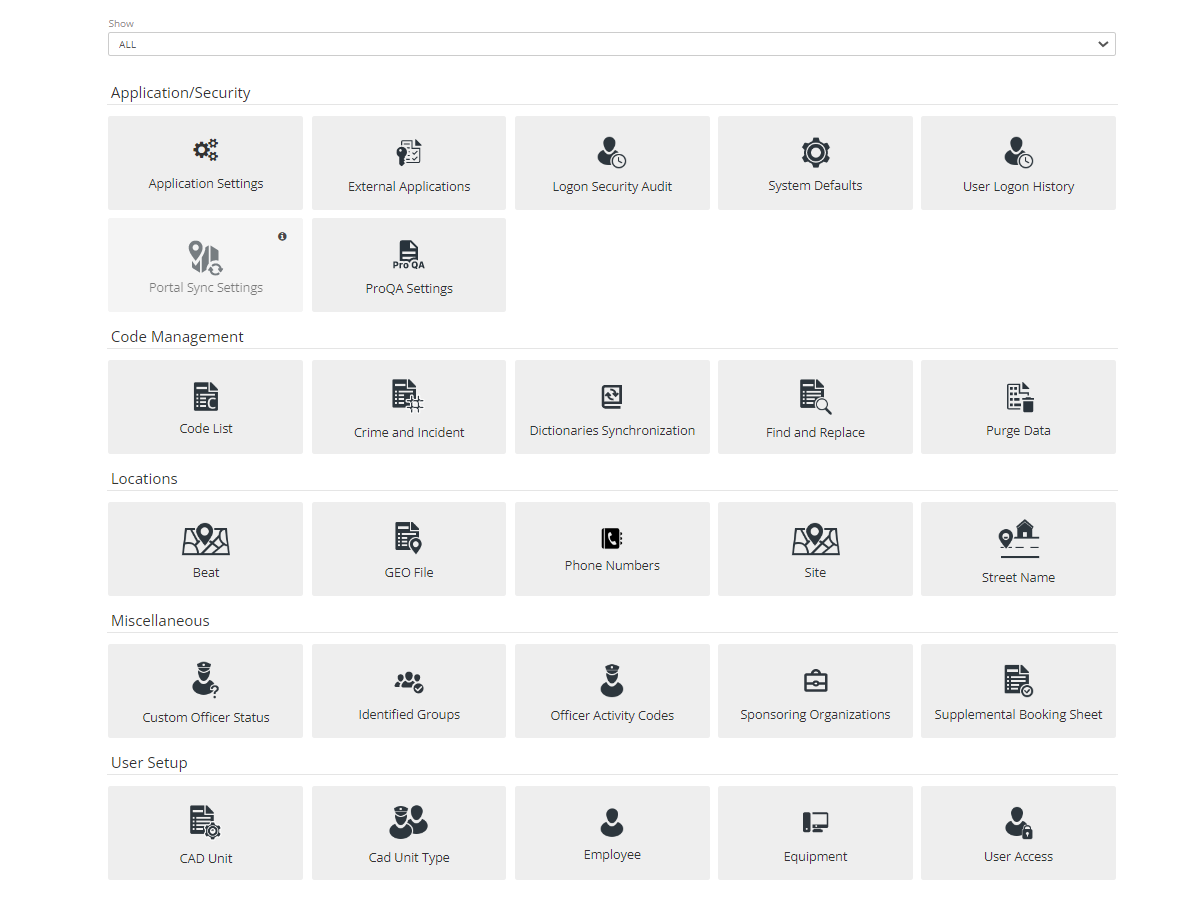
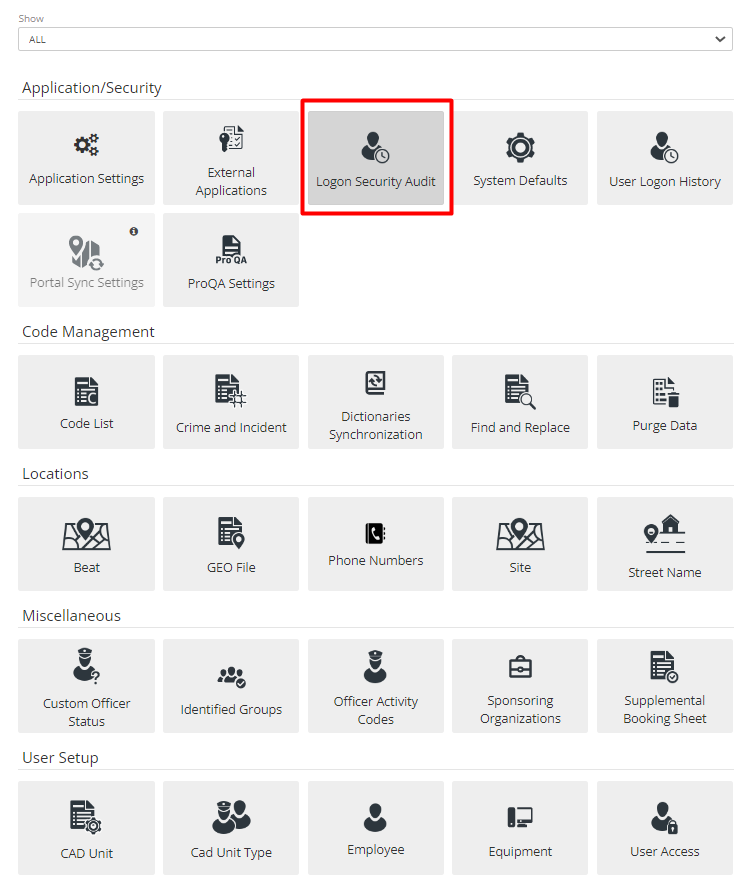
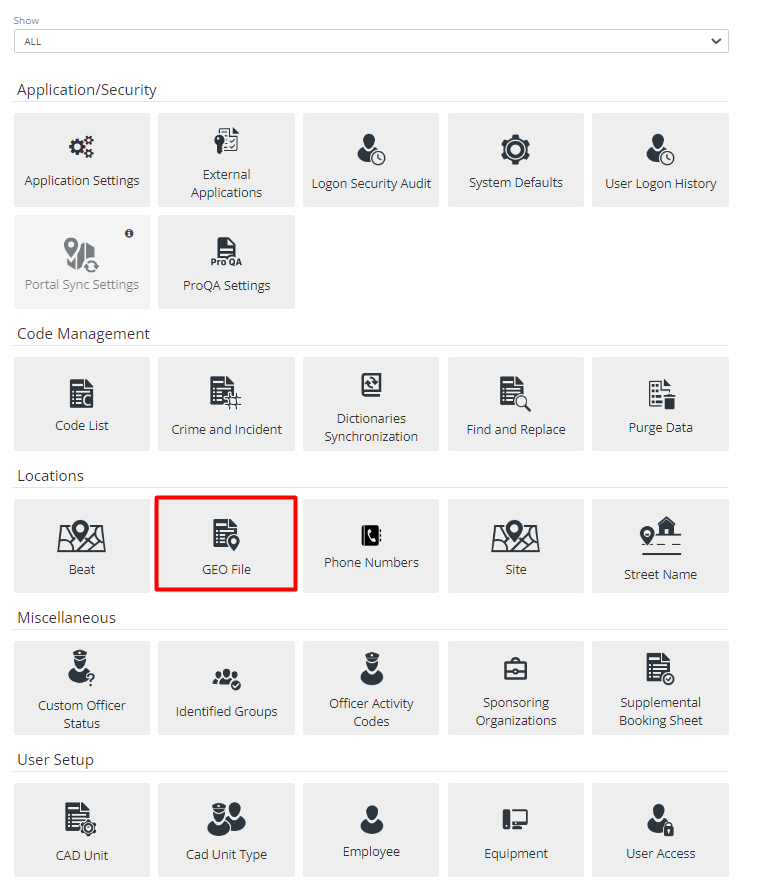
The "Setup" button takes the Administrator to the Mobile Setup menu. This menu is like the ARMS Desktop Client's Setup menu (Thick Client). The various tiles make it easier for the Administrator to adapt the ARMS System to the Department’s specific needs. It is distinguished by category, and there is a dropdown menu at the top for navigation. The "Setup" button can be found under Side-Menu>"Additional."
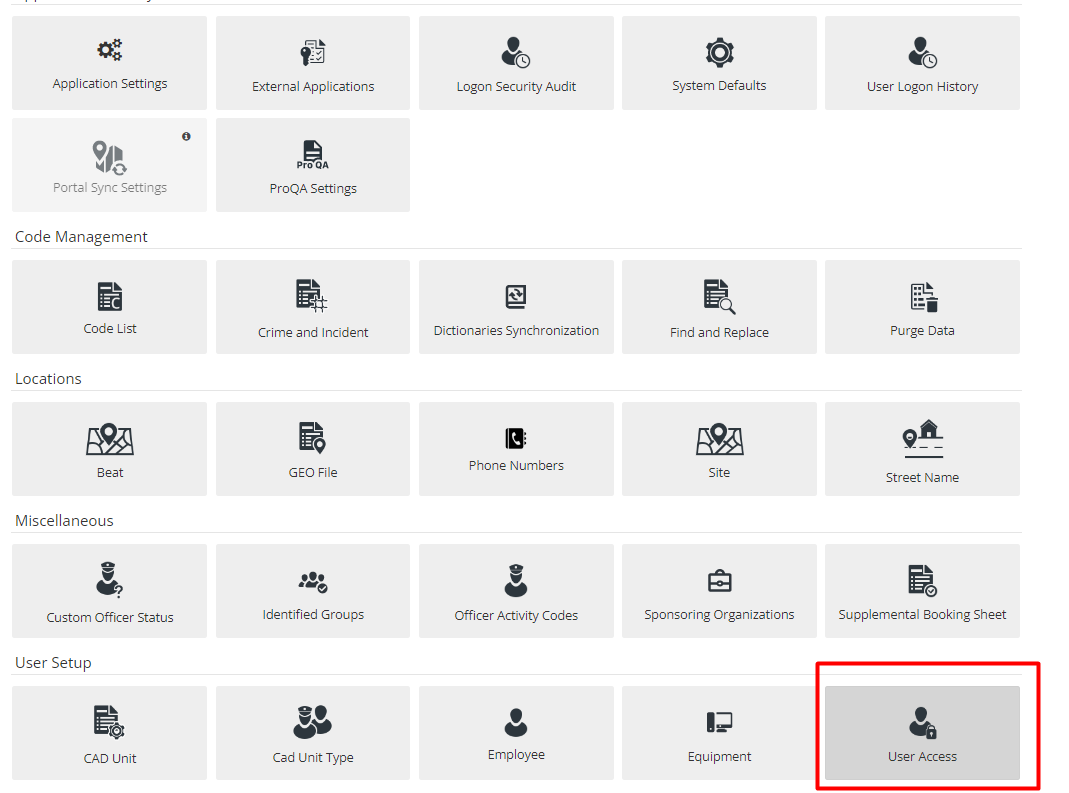
The “Setup” button can be accessed by Roles which has its permissions. If any employee is new and requires Administrator access, then the Administrator who has that access must provide it. To grant access, the Administrator must Go to the Setup Menu, then the User Access Tab.
Then locate the User record for whom permissions need to be configured.

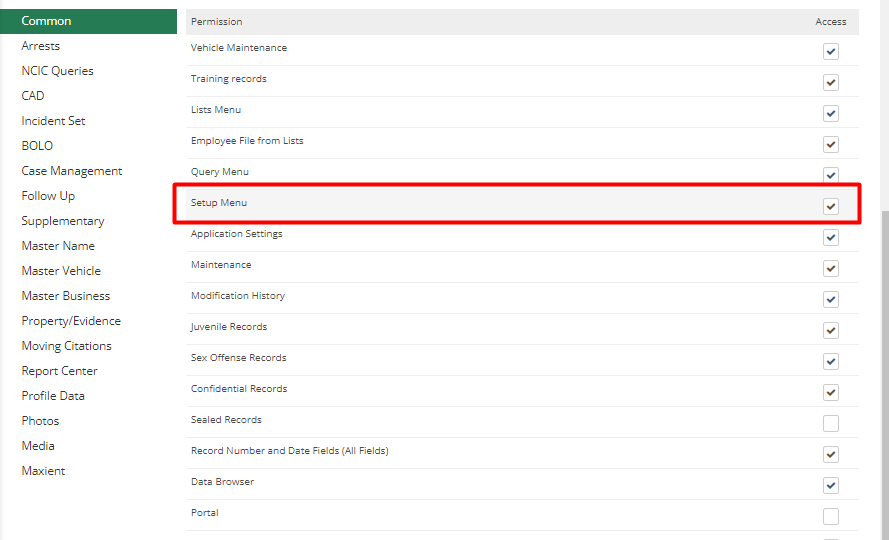
Select the Setup Menu checkbox on the Common Tab.

Once enabled, new employees can log into their accounts and access the setup menu.
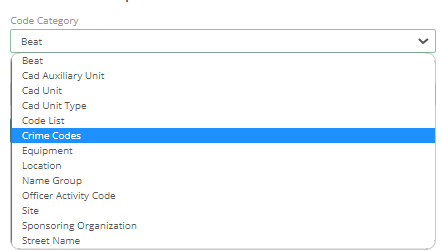
System Defaults
System Defaults is where Admin can set up information for ARMS, which will likely not require any change.
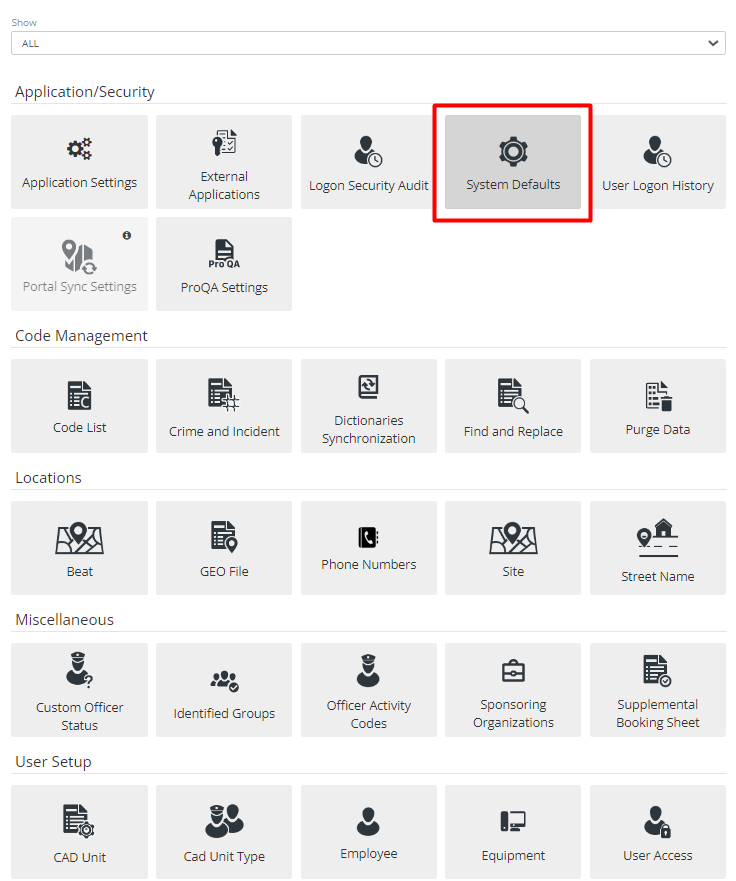
Go to Additional Tab > Setup > System Defaults on the side menu to configure ARMS' default settings. The First Tab that appears is Department Info, where the Administrator can enter the Department’s Name, Chief, Address, Phone number, ORI Number, Department Badge, and other pertinent information. Much of this information will pull out when Admin prints out Reports.
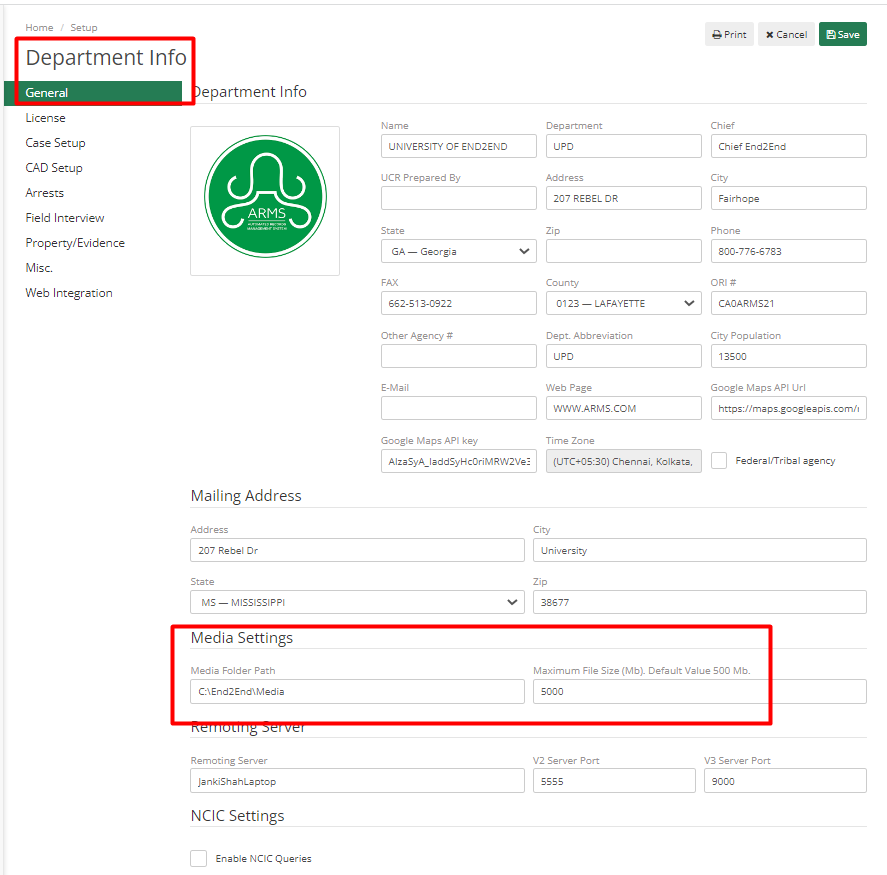
Admin may scroll down to see a variety of additional fields.
Mailing Address – Here, the Admin can put the mailing information of the Department.
Media Settings - In this section, Admin can modify the maximum file size that an Officer can attach to the case. The default setting for this is 500 MB.
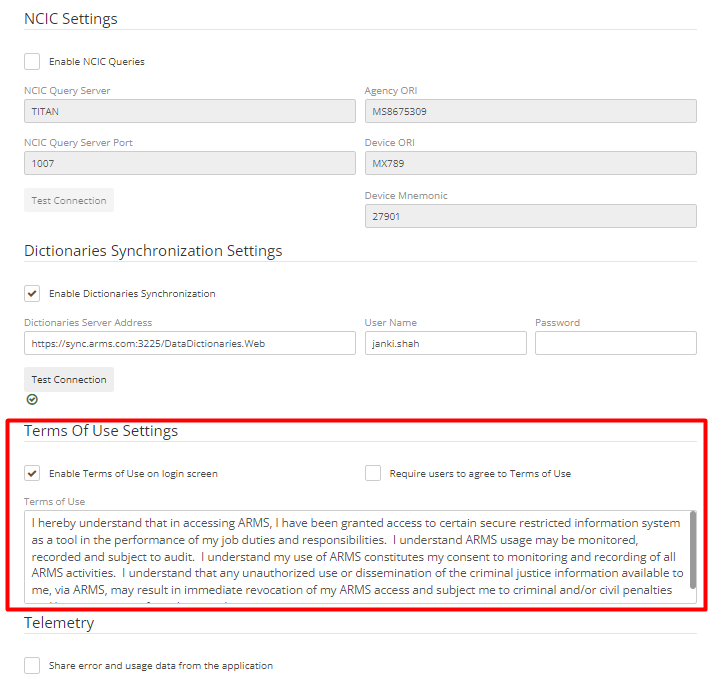
Terms of Use Settings – If Department wants to display Terms of Use to all their employees on Login Page, then they can enable it by checking the “Enable Terms of Use on Login screen” checkbox. To make it mandatory for Employees to log in by accepting terms Admin can also check the “ Requires user to agree to Terms of use” checkbox. Text can be modified as per the requirement of the Department.
Case Setup Tab –This is where Admin can auto-assign the case numbers and modify the case number’s formatting as per the Department’s requirement.
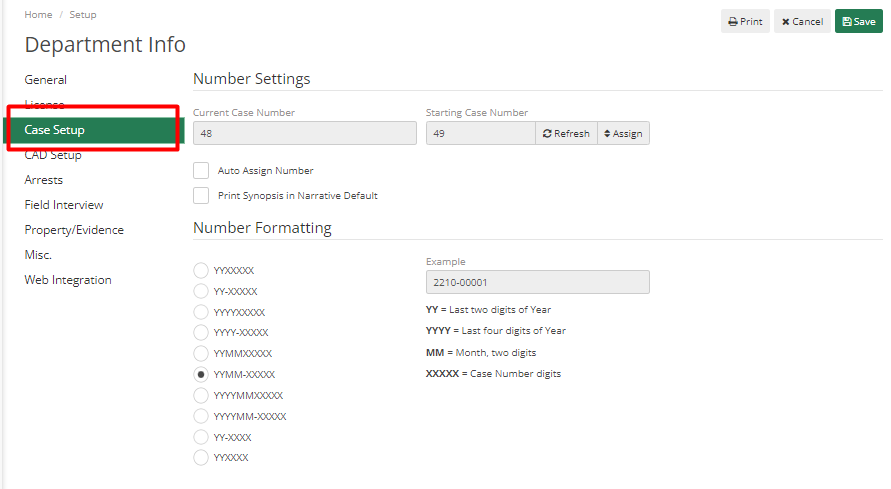
Starting number can be modified from here, if Admin wants to print a synopsis along with the Narrative, then they can set the value in the “Assign Starting Case Number” field.
CAD Setup tab – Similar to Case setup, Admin can change starting/next CAD number by adding a value in the “Starting CAD Number” field. Department users can set the default for Received via the drop-down.

Similarly, in the Arrest and Property Evidence tab Admin can assign a start value, change the number formatting, and enable auto-assign.
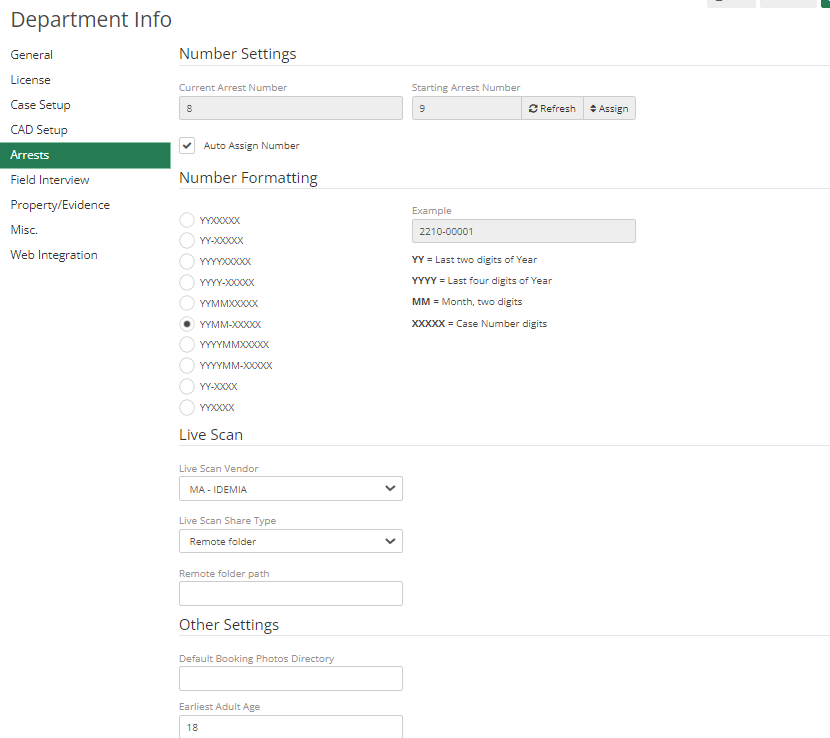
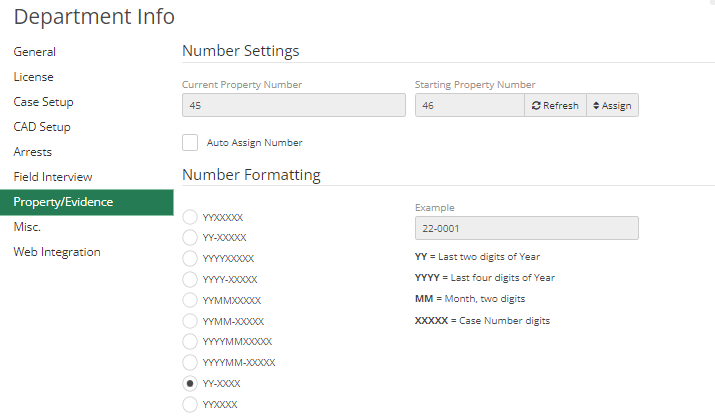
To quickly differentiate between the Case Number, CAD Number, Order Number, and Property Number. Simply. Set different number formatting for each.
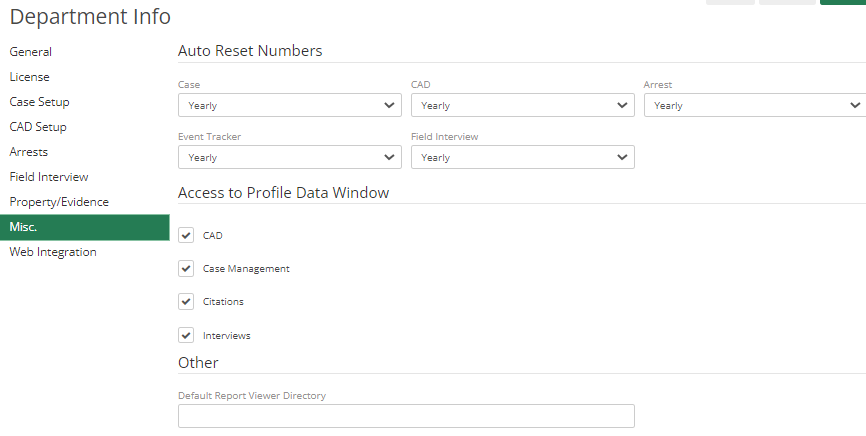
Miscellaneous tab- Auto reset numbers for the new year.
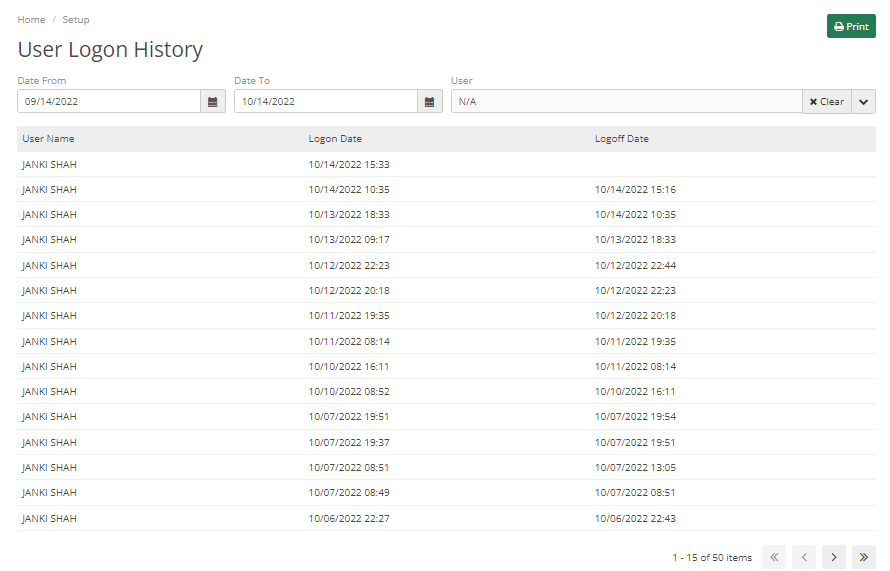
User Logon History
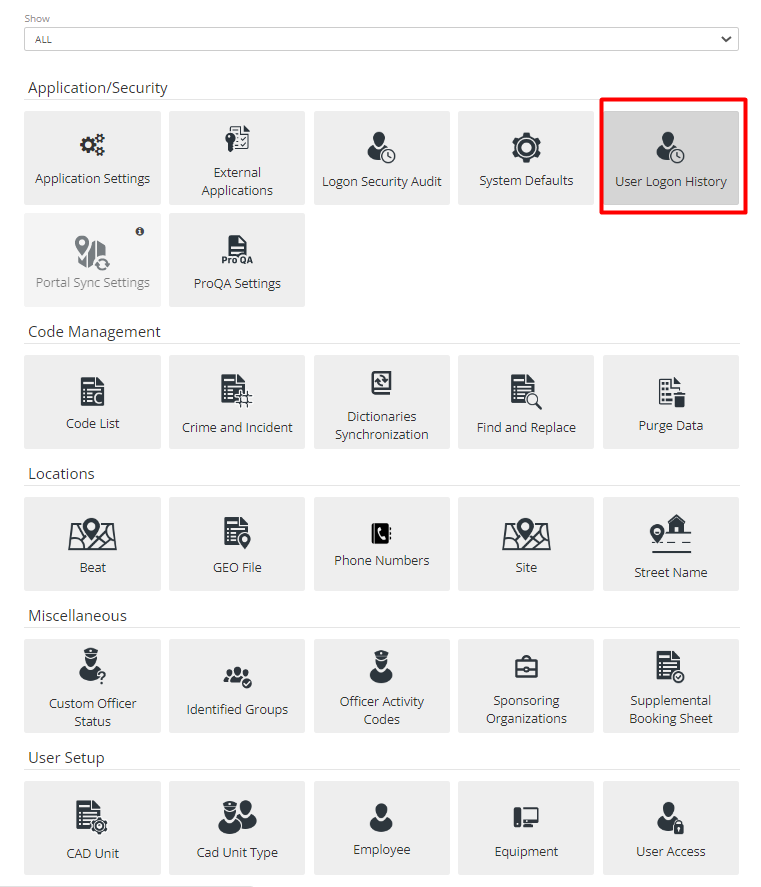
User logon History is a quick way to see all the users and the most recent login in arms. Data can be viewed as per the selected date. It shows when the user was logged on and logged off.
Logon Security Audit
Logon Security Audit is a way to check different Logon Attempts. If someone gets locked up or if someone checked their logon security audit. It will list all the user’s credentials and details of when someone tried to log in.
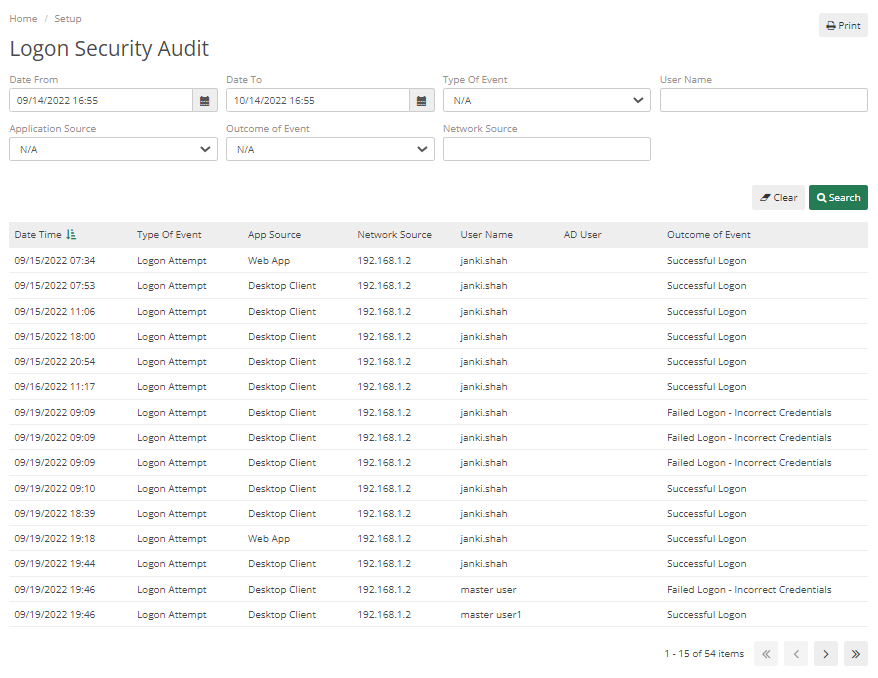
Administrators can also search by adding specific details in the fields like Username, Type of Event, Application Source, Network Source, Outcome of Event, Date from, and Date To.
If someone tries to print a logon audit, then it will also show in Logon Security Audit.
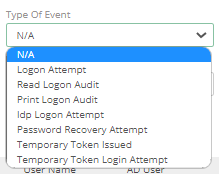
It displays data for different Types of Events.
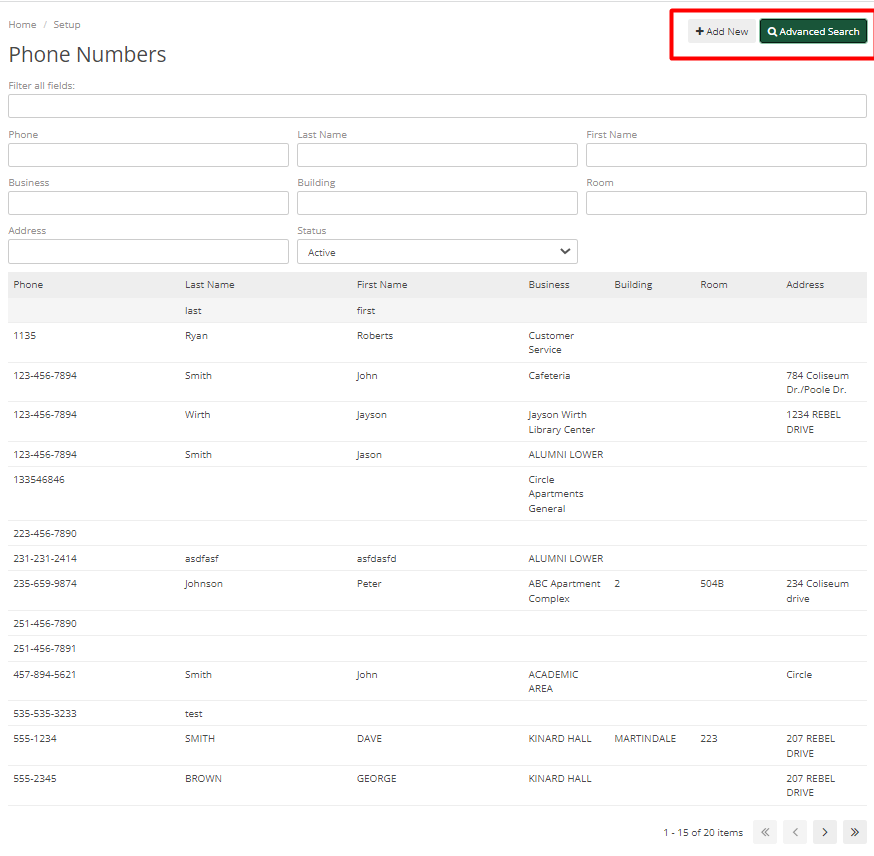
Phone Numbers
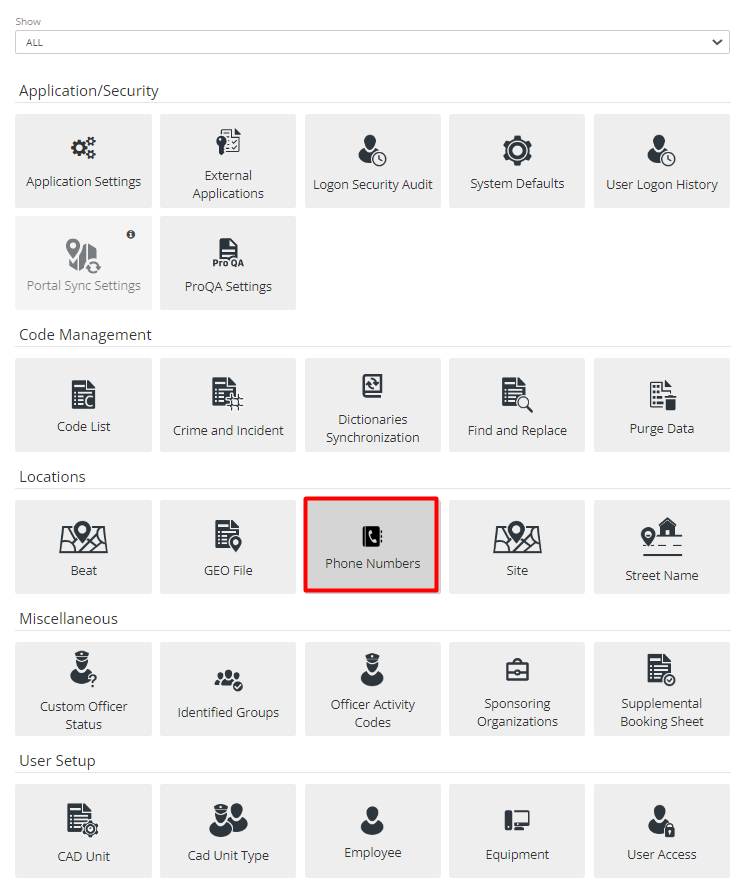
It is a place to view all phone numbers added to the system. Admin can also use the advance search option and can also add a new phone number from this option.
Sponsoring Organization
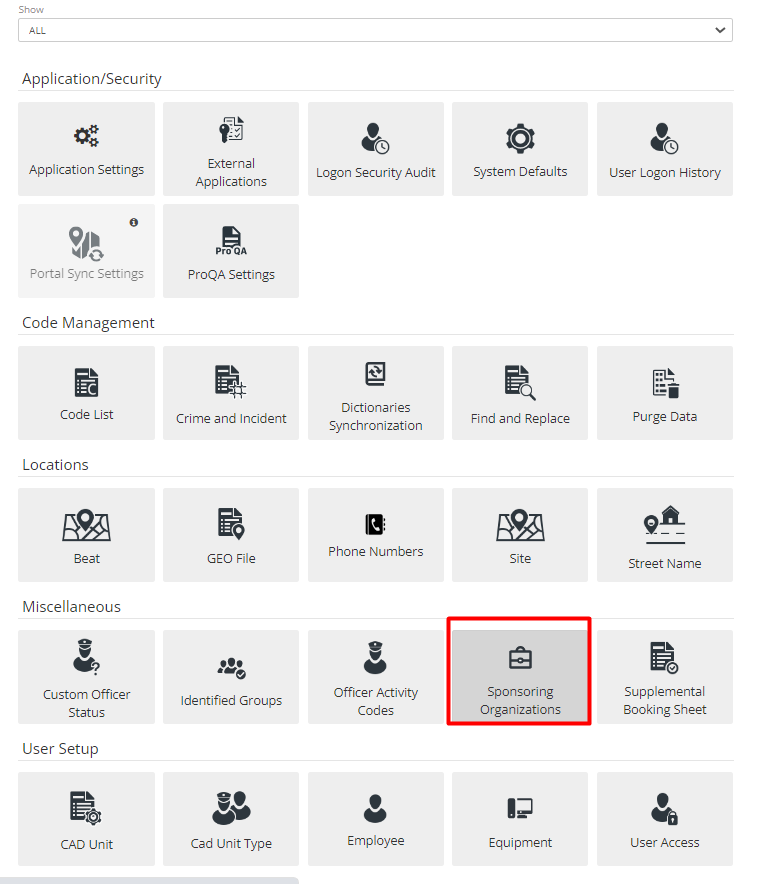
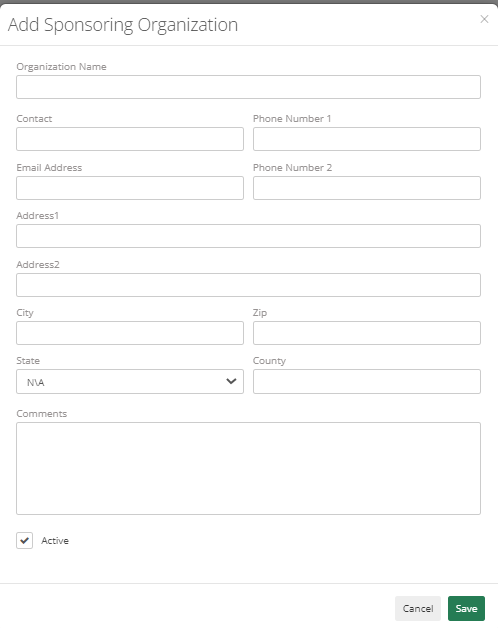
Sponsoring Organizations is where the Department can keep track of organizations that may sponsor the Department. There is a search and add new button, which helps search and add new organizations.
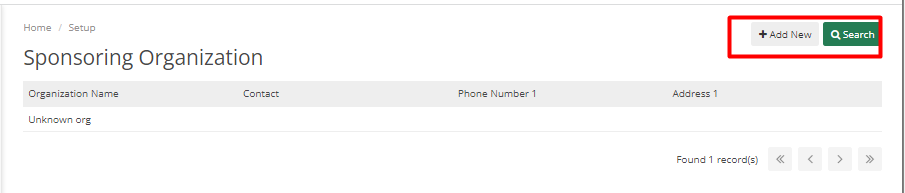
Multiple fields help the Department to add details about the Organizations like Organizations Name Contact, Phone Number, Email Address, City, Zip, State, Country, and whether it’s an Active or De-active organization.
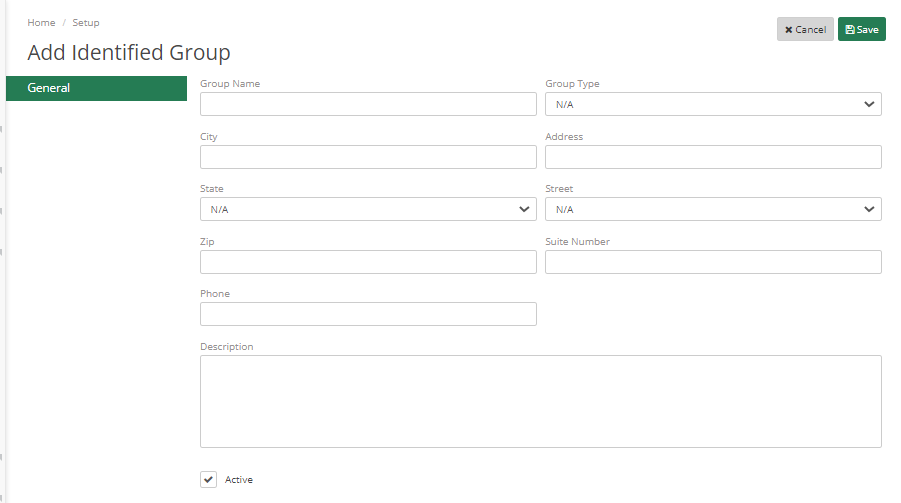
Identified Groups
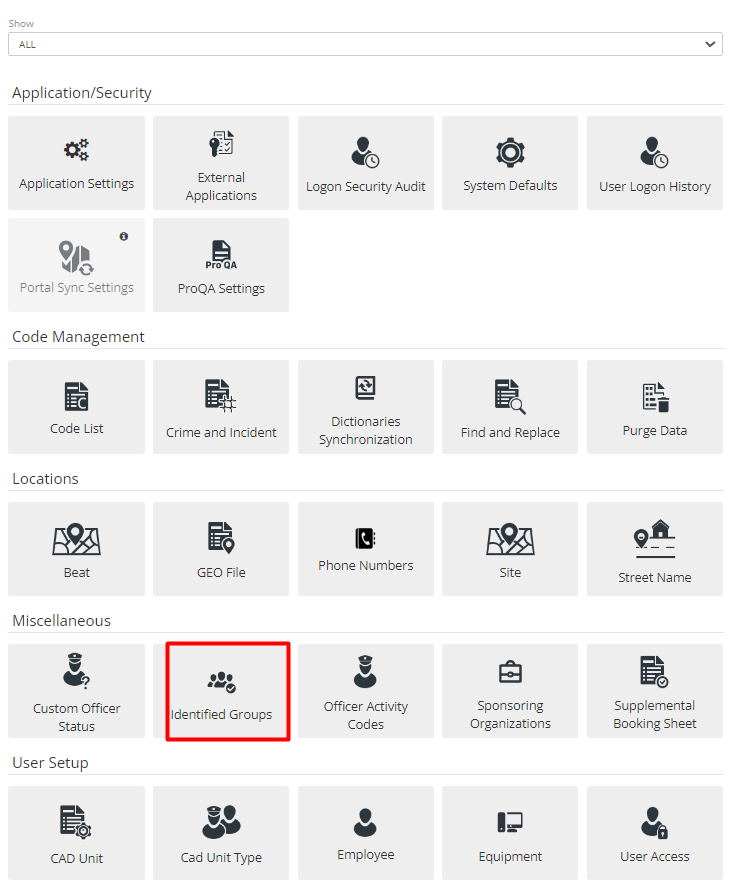
Identified Groups is where the Department can keep track of Groups. Can Add New and Search Groups. Multiple fields are available to Add Identified Group such as Group Name, Group Type, City, Address, State, Street, ZIP, and Suit #4 Description, whether it’s active or not.
Setup: Employee and Unit Setup
Employee File
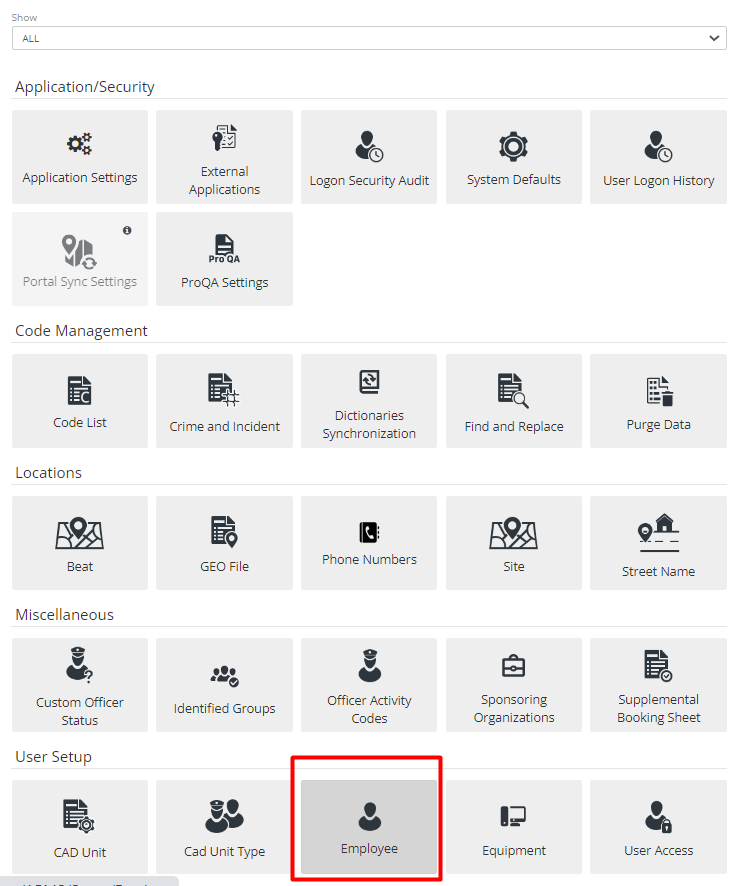
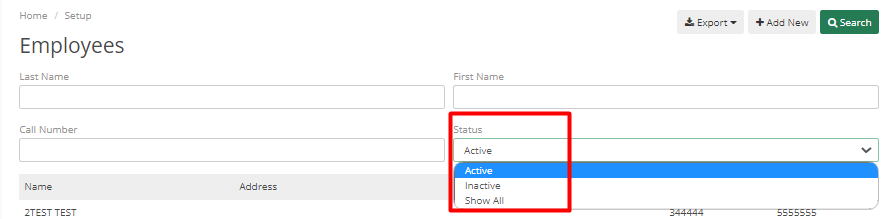
To Add Employees to the ARMS system, Go to Employee and create a new employee by clicking on Add New button.

Admin can also search, and filter data as required, there is an option in search to Show only active employees from the list.
Admin can add multiple data to employee files like personal details, emergency contacts, photos, etc.
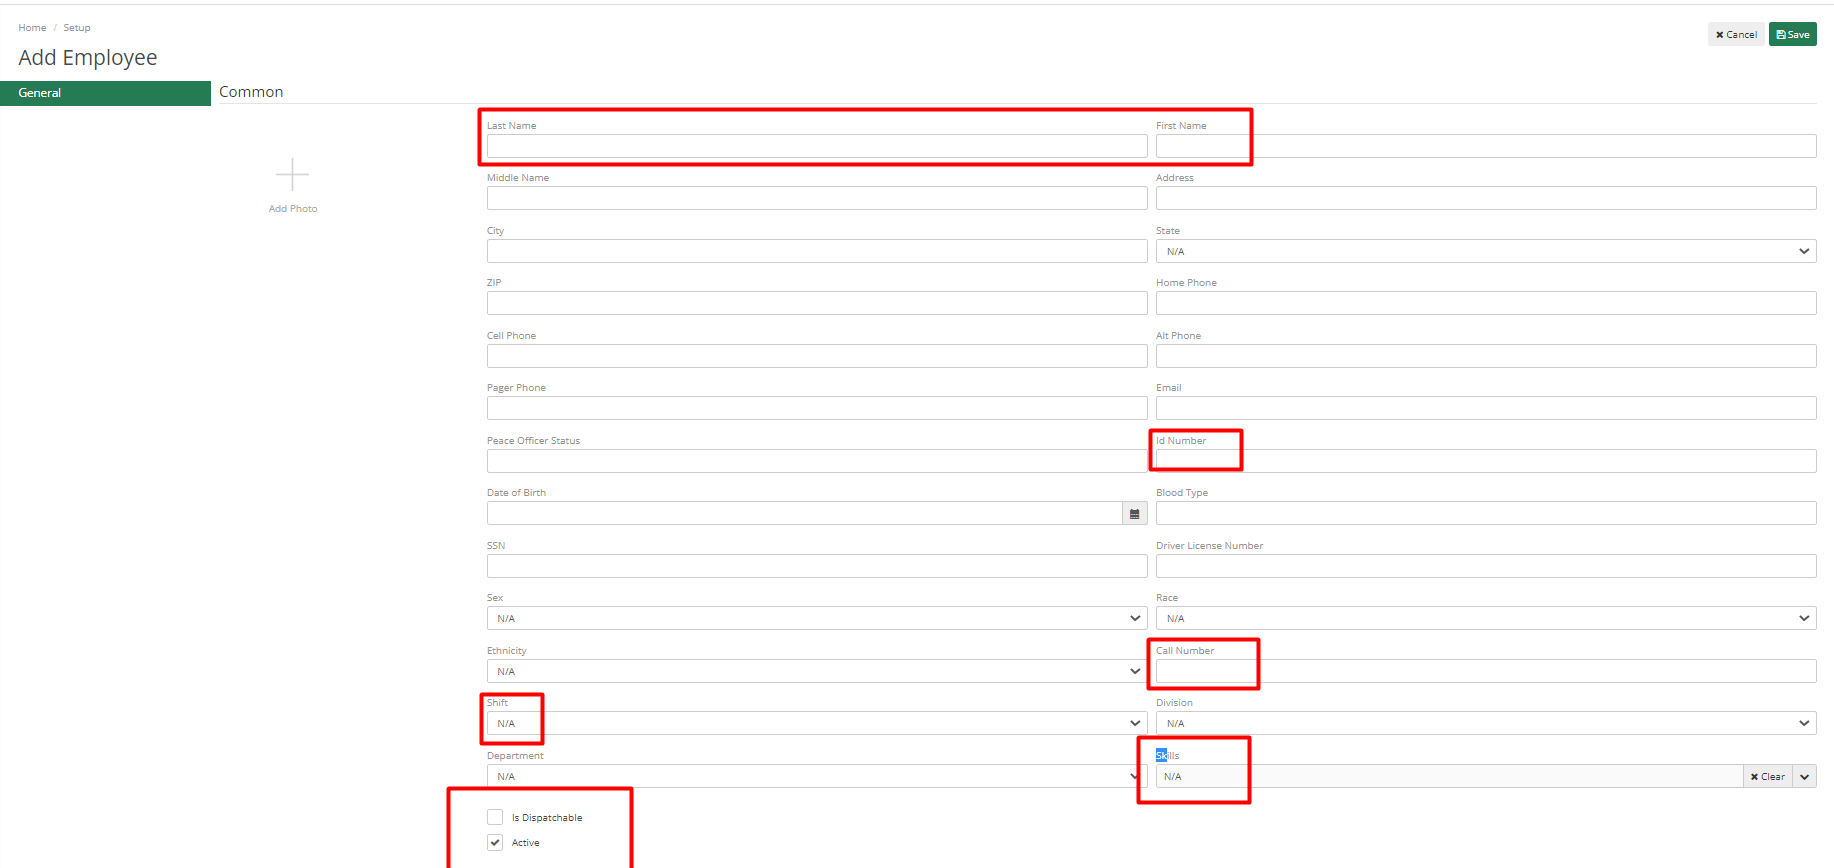
First Name, Last Name, and Employee ID number are required fields when adding an employee. The call number is a mandatory field for dispatchable staff, and the Is Dispatchable option needs to be selected. Once finished, add the Shift of an Employee and other data if available.
The Division and Skillset of an employee can be selected if there are any skills/division set up in the code list, which will assist the Dispatcher in finding Officer for any case who have a particular skill set or belongs to a specific division.
To Active Employees account, check the Active checkbox. Other fields to be added if available are Emergency contact details, Academy Details, Entry/Exit Dates, and Rank and Salary Details.

Hit Save to add that Employee to the System.
Equipment
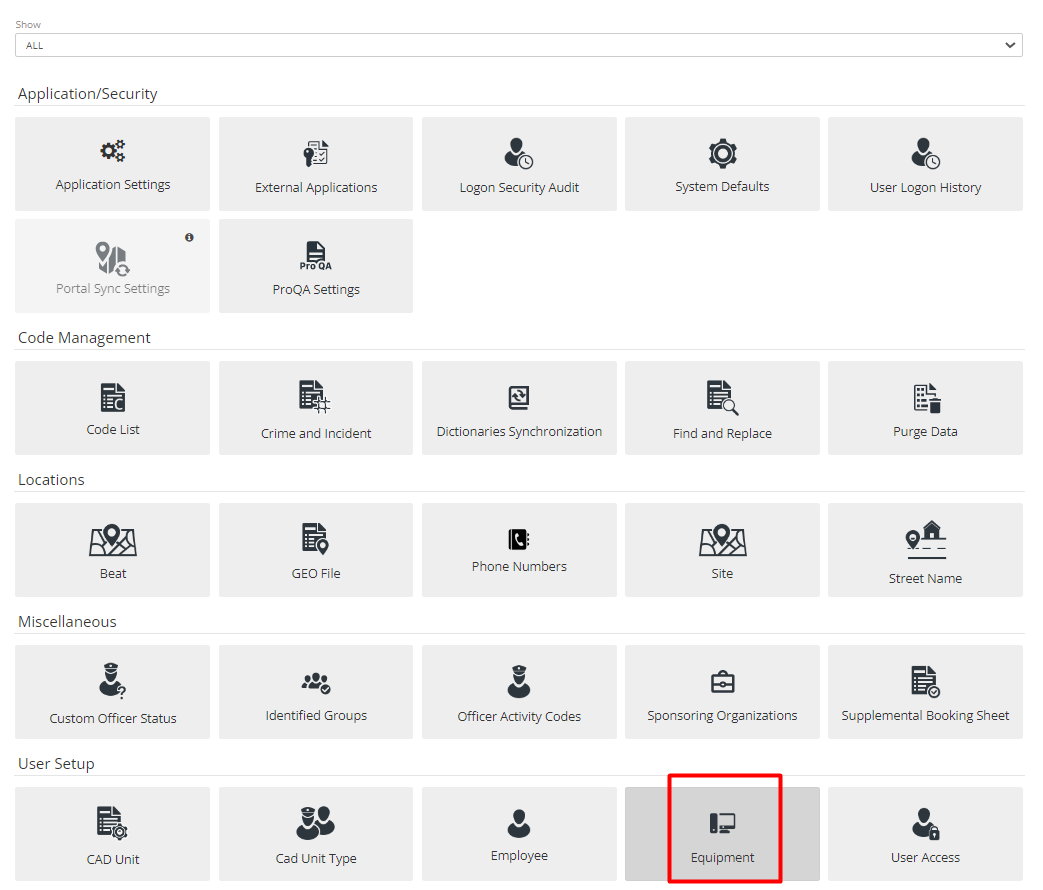
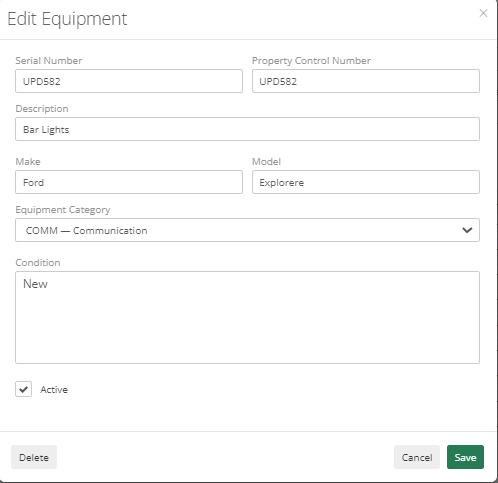
The Equipment section is used to track any kind of equipment for the Department. It can be searched or can be added new by clicking on Add New button.
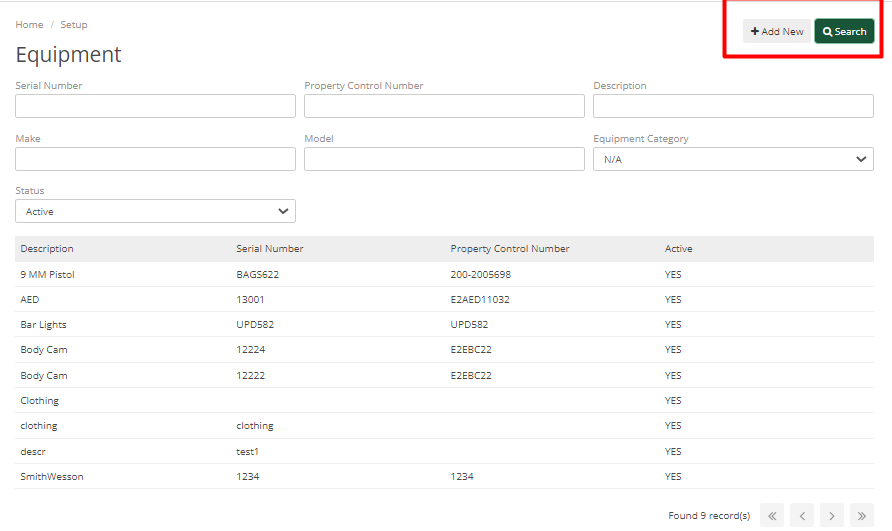
When Admins add new equipment, they can add data equipment details such as Serial number, Property Control Number, Description, Make, Model, Equipment Category, Condition of equipment, and whether that equipment is active or not.
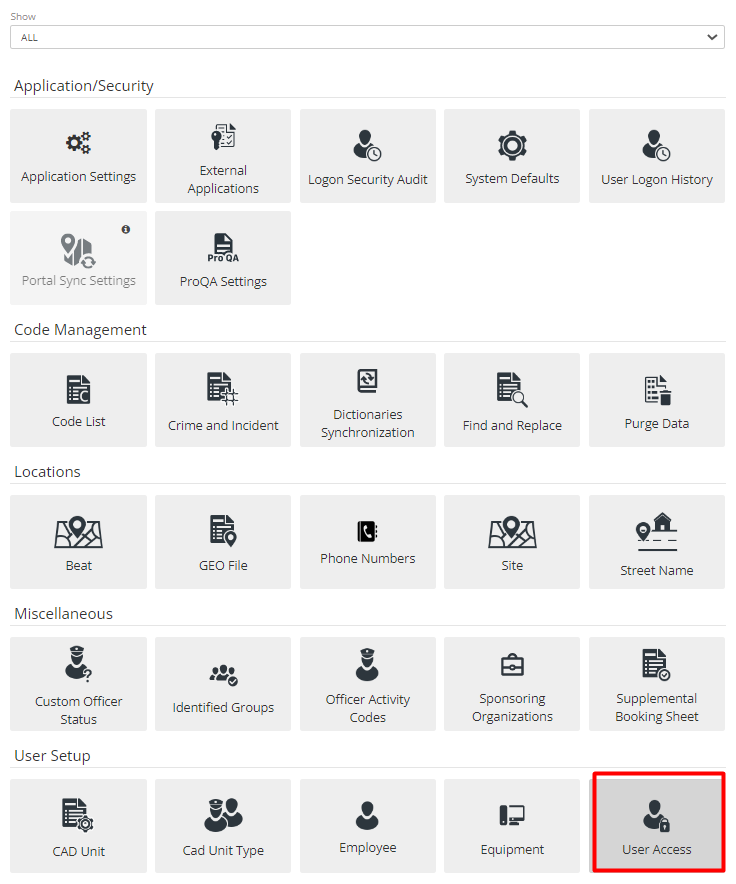
User Access
Once the Employee file is set up, Admin needs to provide access and permissions to the user. To do so, navigate to the User Access tab in Setup.
Admin does not require to set user permissions for Employees who just need to dispatch calls. For employees which need to add a Case report or CAD event then for them, permissions are required.
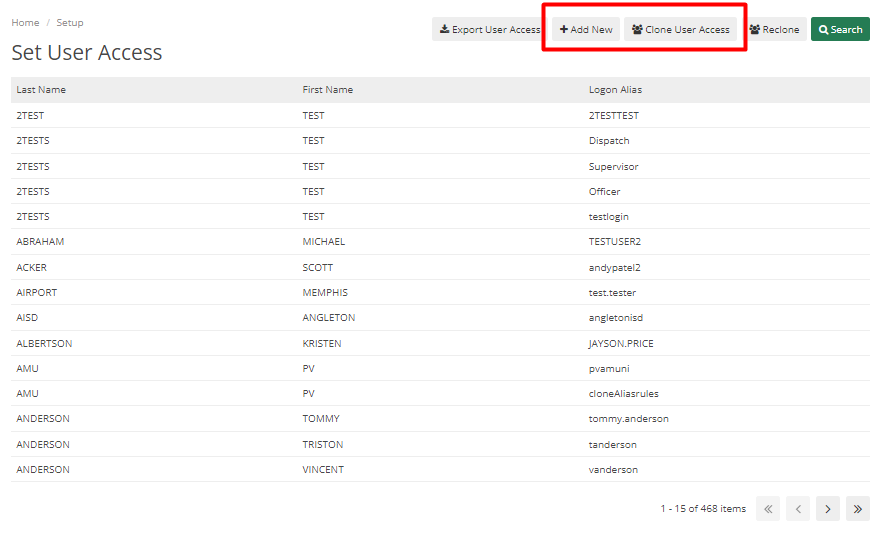
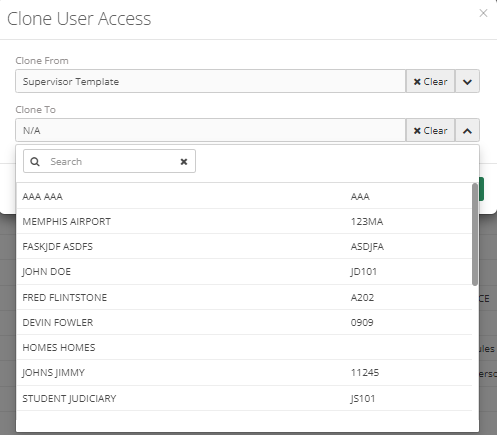
To add a new user, Admin can click on Add New or can click on Clone User Access to clone user permissions.
On click of clone user access, it will ask for Clone From. It has templates ARMS have added or Admin can also clone permissions from already created Employees.
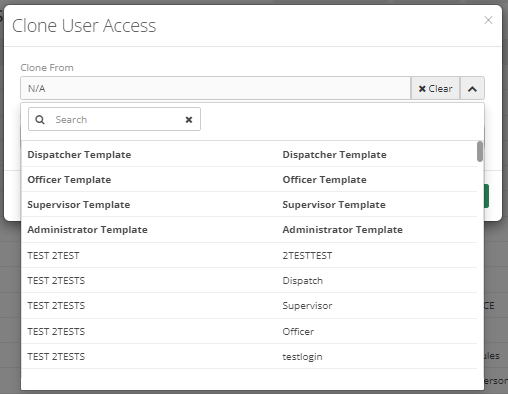
Clone To will show whom Admin wants to set permissions for. It will show a list of employees who do not have any access yet.
By selecting any user, Admin can view all its details with multiple fields.
Password – This field allows Admin to modify an employee’s password.
Change Password Every – This will change the password every set number of days. For example, if the value added is 90 days, then Password will change every 90 days for that employee.
Next Change Date – This will show the next day of changing the password.
Active Directory Domain and Active Directory User – If the user uses Windows Login to log in to their workstation, then these fields can be set up. So that ARMS can recognize Windows users.
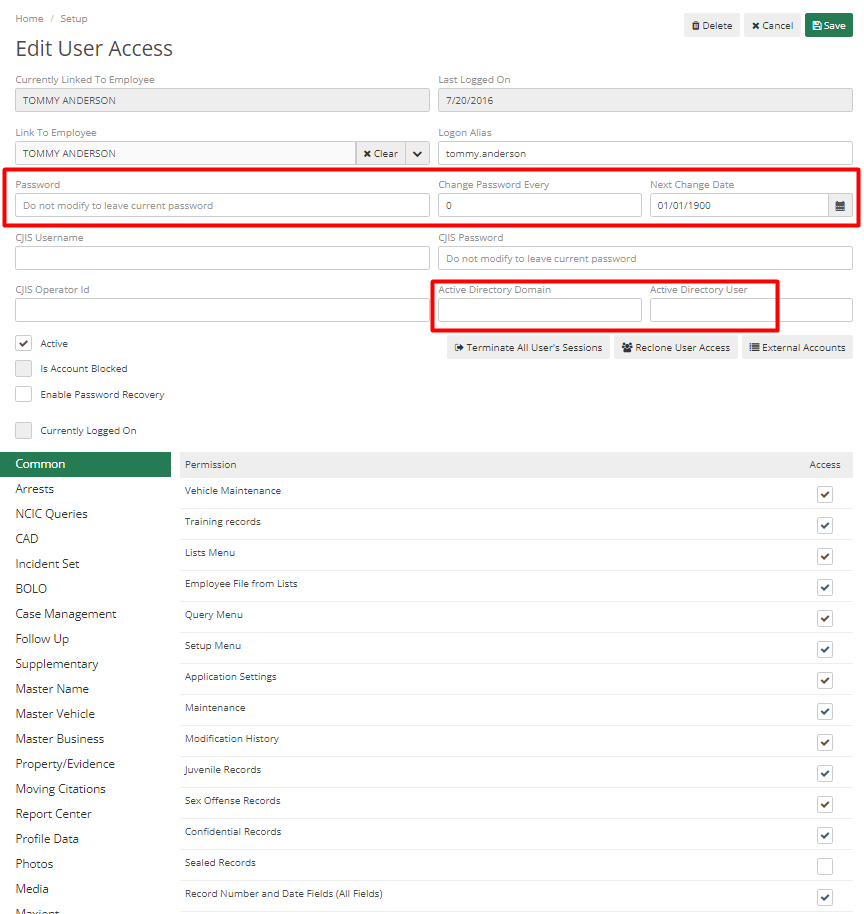
Active – This checkbox will allow Admin to deactivate a user who is no longer an employee of the Department. So, they cannot access ARMS.
Is Account Blocked – This checkbox will block Employees from password recovery, and will not be allowed to update their password and log in.
Enable Password Recovery – This would enable security questions for password recovery, if an employee forgot their password, then these security questions will help them recover their password.
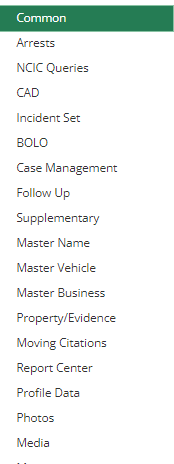
There are multiple tabs below fields that allow Admin to set permission for that Employee. The only important ones are described below:
Common- To give access to the setup menu to any employee, Admin needs t come to this tab and enable the setup Option here. If the person has access to the Setup menu, then they must be in the Admin Department or any employee with such kind of Role. It allows that employee to add new employees, modify permissions and code lists, etc.
Sex Offense Records, Juvenile Records, and Confidential Records, this checkbox is marked than the employee will be able to see Records of such Crimes otherwise it won’t allow it.
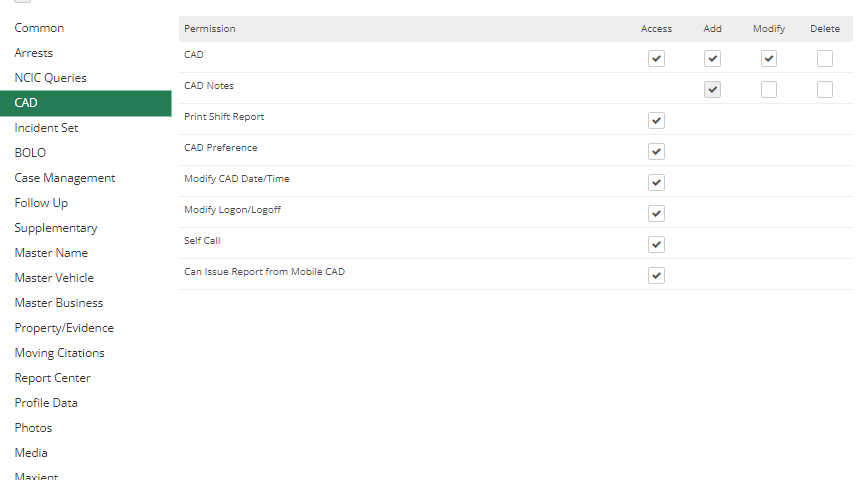
Other permissions can be given access by allowing them to view, add, modify, or delete as required. A few of them are explained below:
CAD – This section is not just for Dispatchers; it will relate to Officers as well. It has the “Self-Call” and “Can Issue Report from Mobile CAD” option which is related to Officers as officers can have permission to self-initiate calls and can have access to Mobile CAD to generate Case Report.
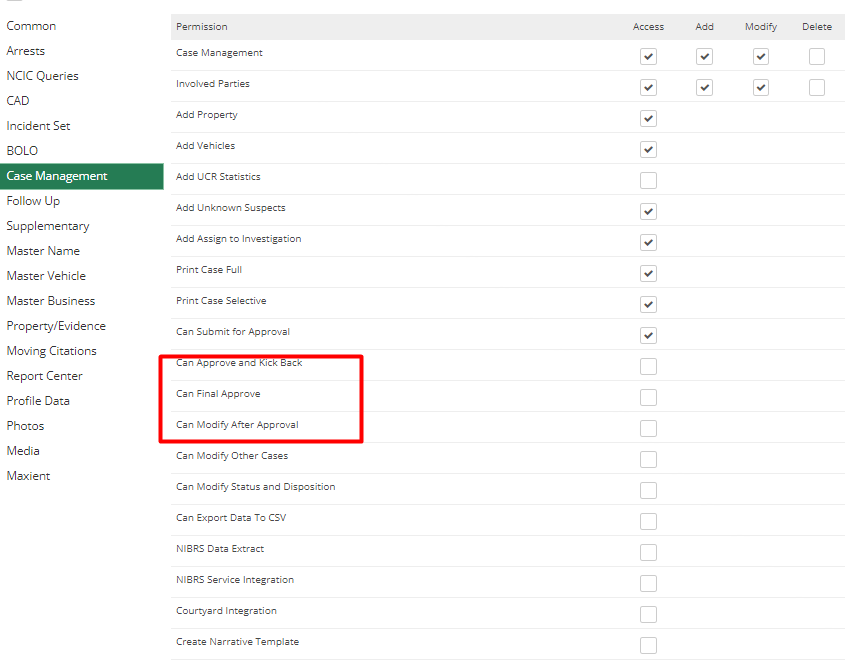
Case Management- This will help to set Approval Peers in ARMS. It has multiple options to set who can Approve or Kick Back Reports.
Once all permissions are set, hit “Save” and the User or an Employee will have access to ARMS.
External Applications
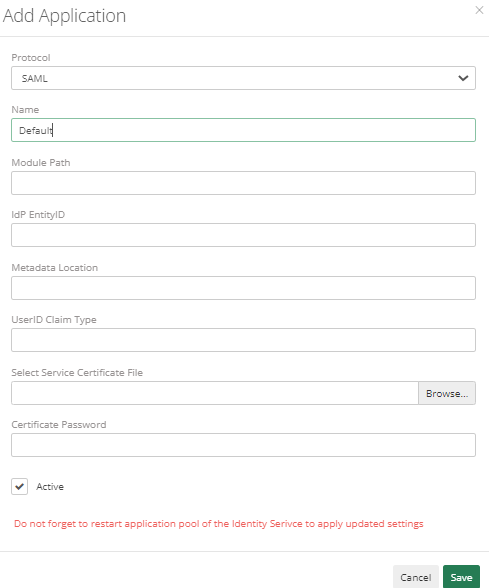
If Departments want to set up ARMS with external applications such as SAML or some type of login system, then it is required to open this section. It is more technical stuff so it may require the IT Department’s involvement.

Set up Protocol or Application to which the Department wants to connect. Also add mandate fields like Module Path, IdP Entity ID, Metadata Location, and Service Certificate file.
After adding an application, it can be selected for each user by going into the Setup menu> User Access menu. Select the user for which setup is required then click on the External Accounts button. This will ask to set an email address and will use this for the next logins instead of the ARMS default login setup.
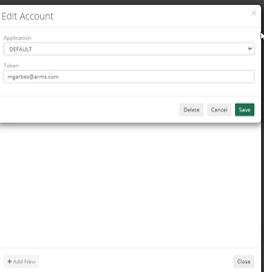
This can be used for two-way authentication etc. for extra security.
CAD Unit
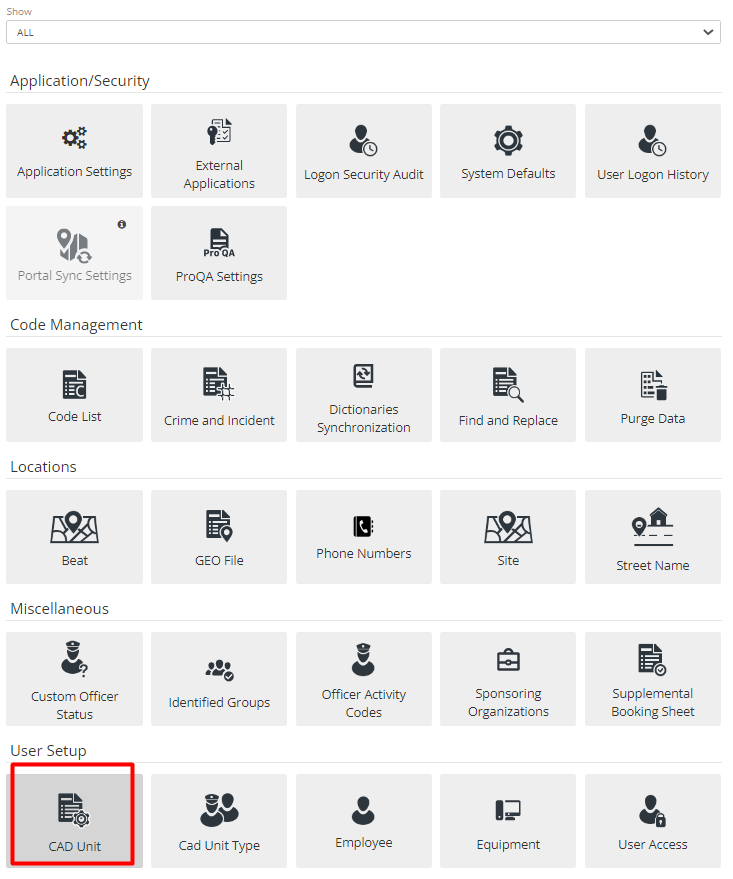
The final step for adding an employee to the ARMS system. Is to give CAD unit to an Employee. It’s a way for the Dispatcher to Log on, log off and assign Officers/Employees to the Call. It will also help the Dispatcher to keep track of employees when they are on shift.
If an Officer should be able to put cases and if Admin wants to track them in dispatch, then adding a CAD unit to that Employee is required.
Depending on the role and requirements of the Employee, the Administrator can set up a simple Employee file, an Employee with User Access, an Employee with user access and a CAD unit, or an Employee with just a CAD unit.
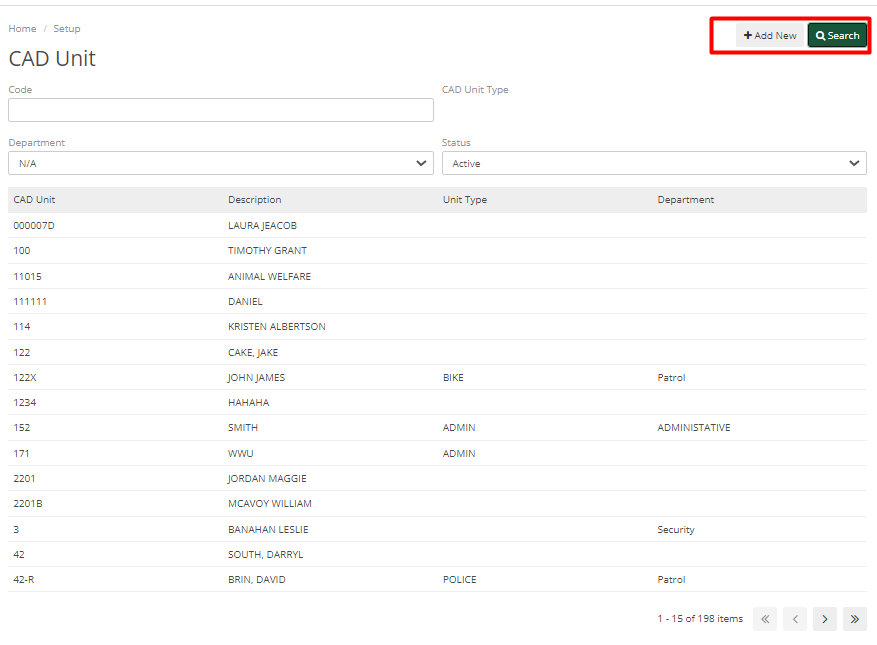
The search option helps search for an Employee from the list and Add New button will create a new CAD unit.
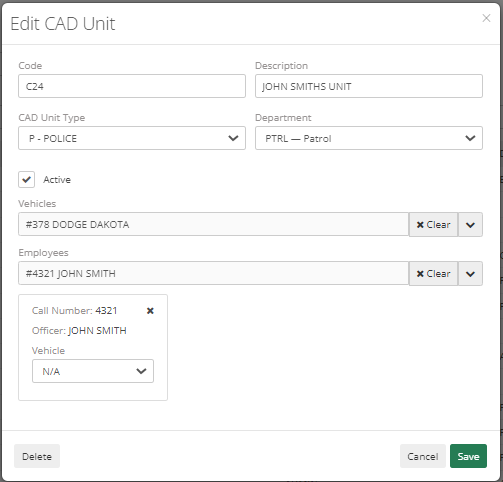
To add a Cad unit to an Employee, Admin needs to fill out details such as Employee Code Description, Cad Unit Type, Department, whether it’s Active or not, if an Employee has a Permanent vehicle which they always use, then a vehicle can also be added.
Multiple Employees can be added to a single CAD unit, by selecting Employees from the Employee field.
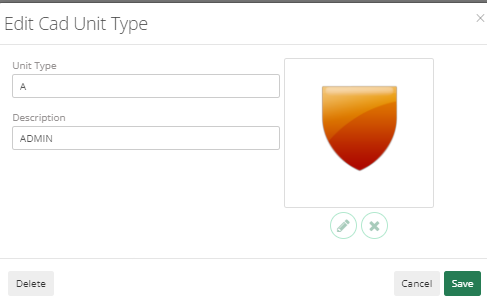
CAD Unit Type
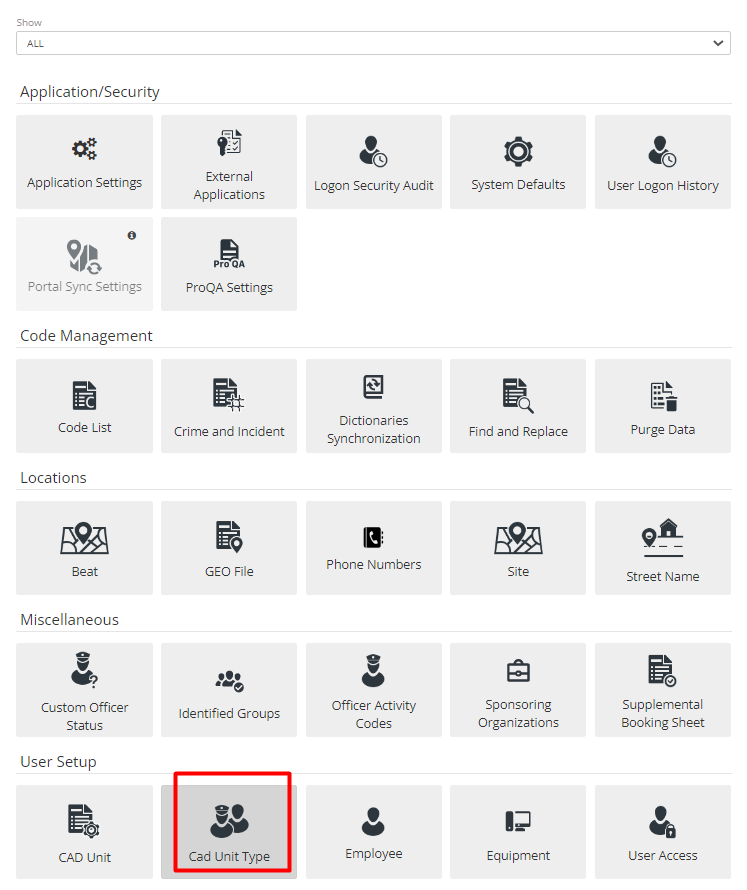
There is a field called CAD Unit Type in CAD Unit, to add data to this field Admin can go to Setup> CAD Unit Type.
There is a Unit Type, Description, and Icon that relates to that Unit Type.
In CAD, it will display in the Available Unit List and Open Call List as shown in the screen below:
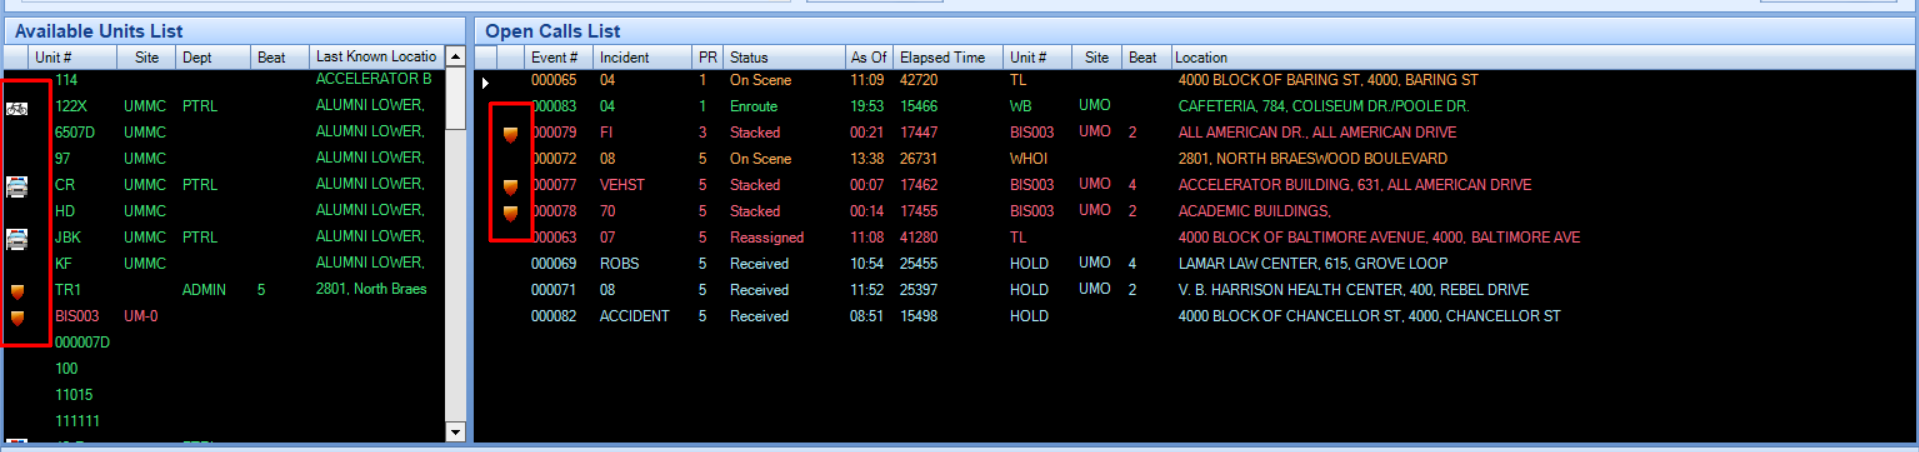
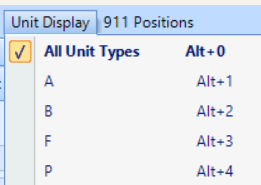
If the user wants to view only fire units or any specific units, then they can select it From the Unit display menu. It will show as per the selection in the Available Unit List and Open Calls List. Multiple unit types can be selected.
Vehicle Maintenance
From the Side Menu, go to the Additional Tab and go into the Vehicle Maintenance module. Here one can track information for all Department vehicles such as their Fuel usage, mileage usage, their repairs, services, and repairing vendor list with details. This module will also allow to print or download a CSV spreadsheet.

Department Vehicles
The first step in tracking vehicles of the Department is to set up all Department Vehicles.

Using the Vehicle Maintenance module, navigate to the Department Vehicles section and click on the Add button to add new Department Vehicles to the system Search can be used to search Vehicles.
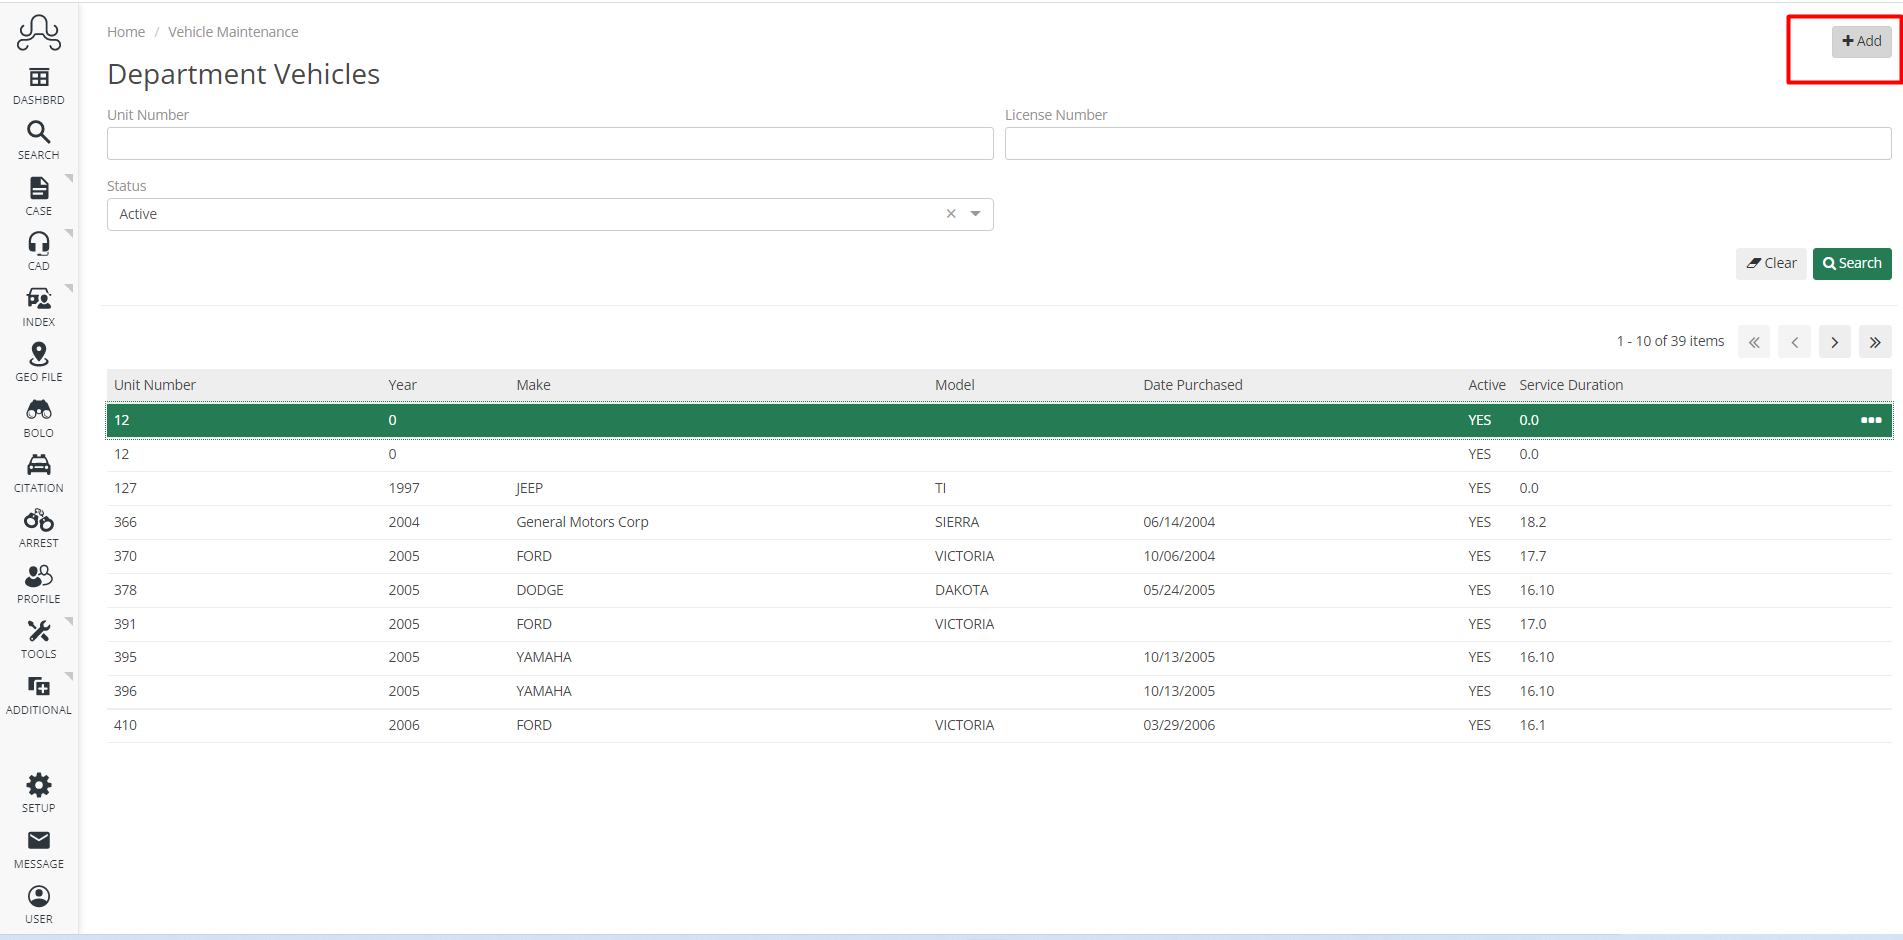
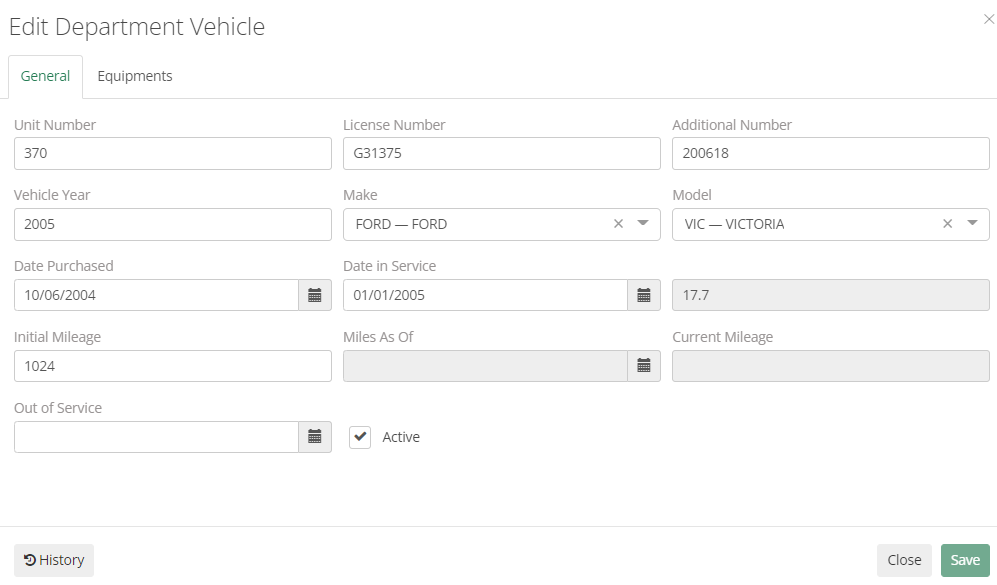
While adding Vehicles, the first section of information to be filled out is “General”. This is to add general information about vehicles such as unit number, license number, vehicle year, make and model, date purchased, date in service, initial mileage, current mileage, and out of service
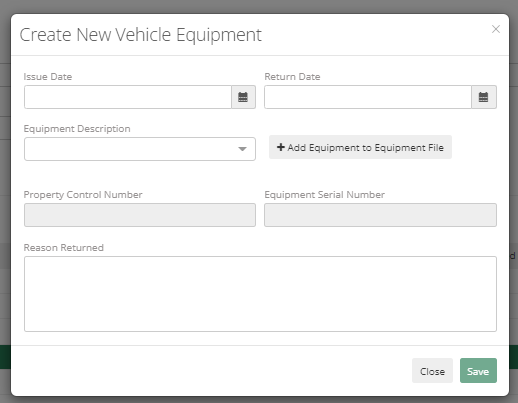
The Next step is adding Equipment to the vehicle. Vehicle Equipment can be added through the Equipment tab here alternatively Admin can navigate to Side Menu >Setup>User Setup > Equipment and Add Equipment.
The vehicle must be added before adding equipment to it. To fill out equipment details, issue date, return date, equipment description, Add Equipment to Equipment File, Property Control Number, Equipment Serial Number, and Reason Returned need to be entered.
Maintenance Code
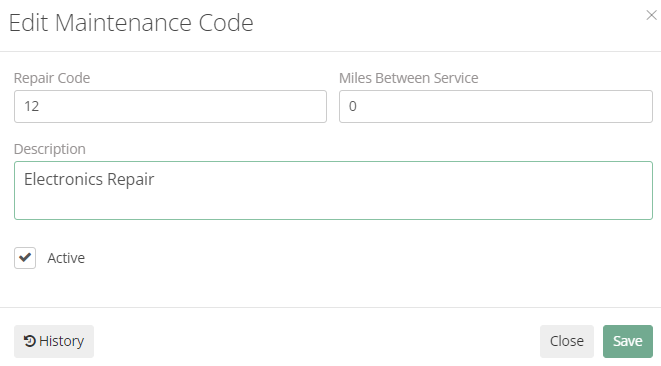
This section helps in Setting up different types of codes for maintenance. It contains fields such as Repair code, Miles between services, and description
Vendors
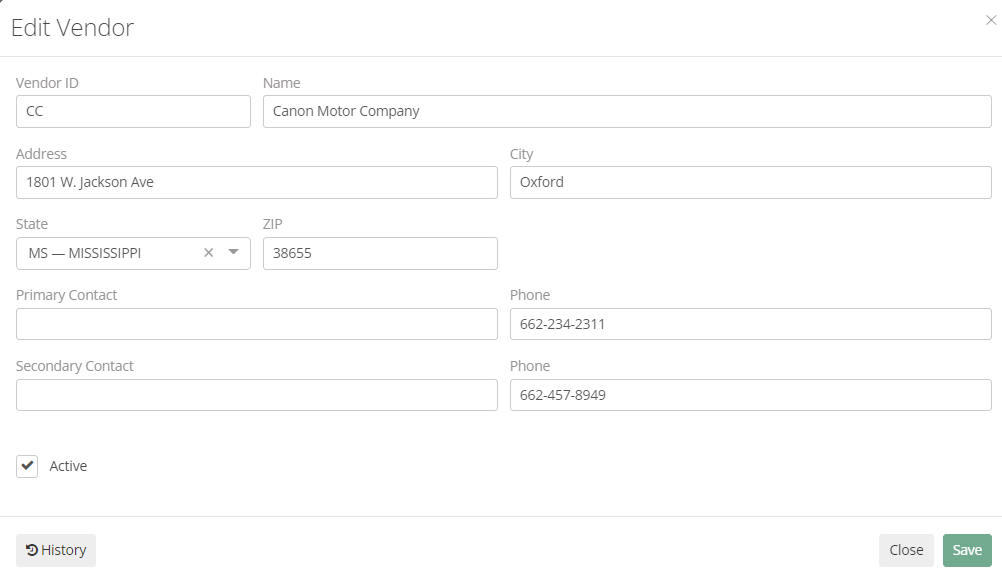
This section allows for setting up vendors which are going to do repairs for the Department. It includes details like Vendor ID, Name, Address, City, State, Zip, Primary Contact Name and Number, Secondary Contact Name and Number, and Whether the Checkbox for the status of the Vendor is Active or not.
Setup: Crime Code Setup
Crime and Incident Codes
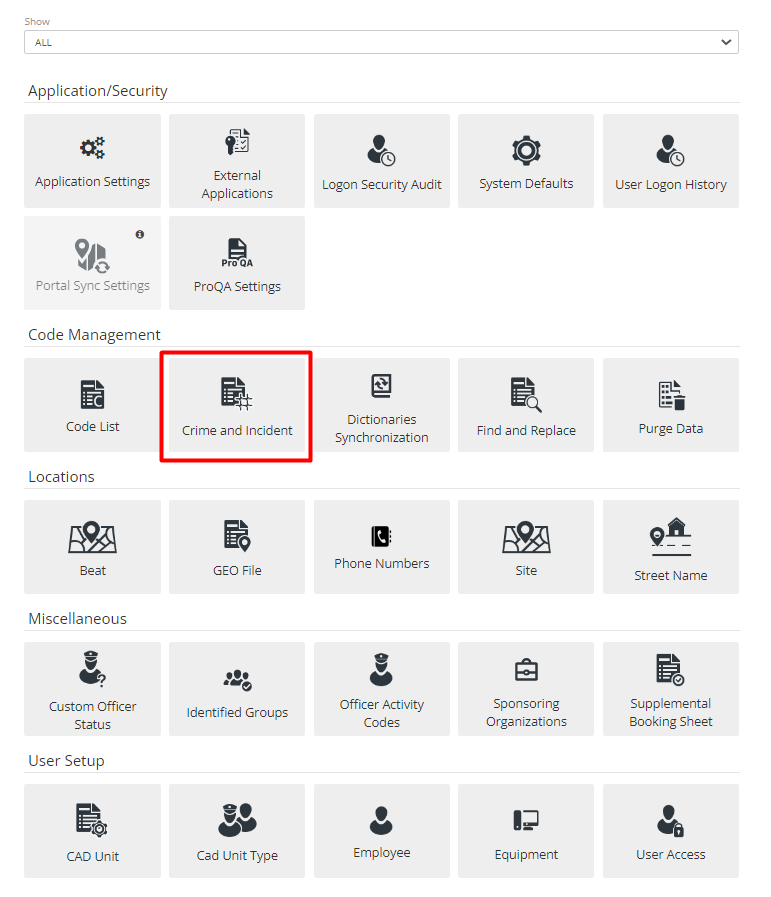
It’s an important part of ARMS, Admin will be checking and changing these codes as per reporting criteria. To get there click on the Crime and Incident Tab in the Setup menu.
The first screen displays the list of Crime codes added to the system, it can be filtered to filter as per requirement or else Admin can also Add a New Crime code. Admin can also Bulk Edit items in the list and can Export codes which will export all the Crime codes into a CSV file or Excel Spread Sheet.
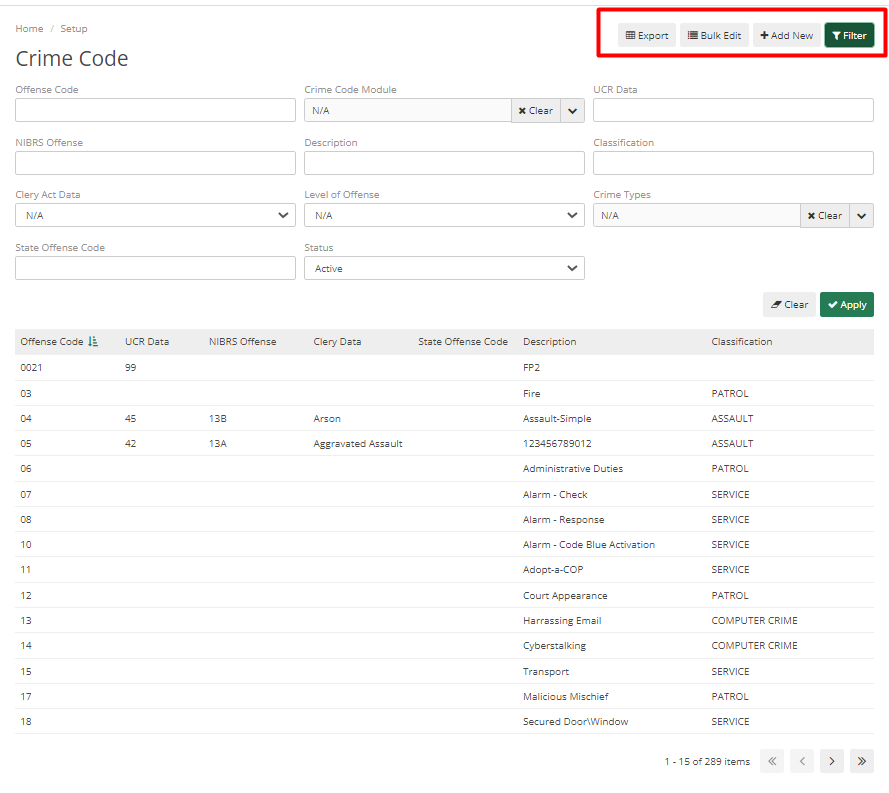
Important fields to understand while adding Crime Codes are as below:
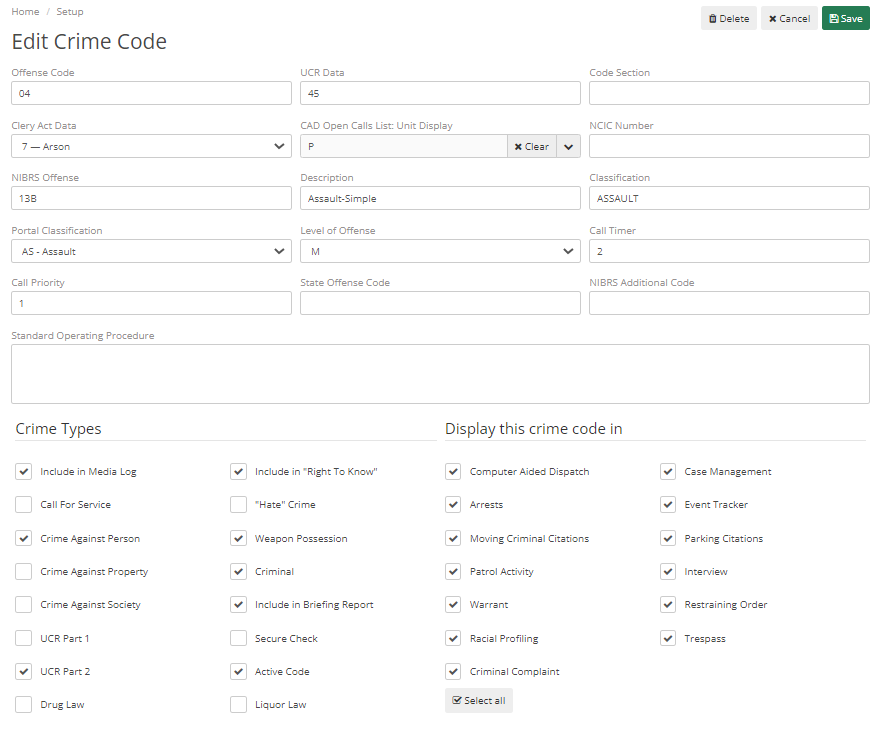
Offense code – It is a code for Offenses that the Dispatcher can put in and can quickly type out.
UCR Data - It is for UCR Summary Reporting.
Code Section - It can be anything that can be specific to a state.
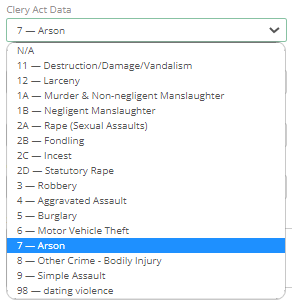
Clery Act Data - It is for Clery, Admin can select Clery Act Data from the list from the selected Offense Code.
NCIC Number – If the selected offense code is some offense code that needs to be seen by NCIC then this option is required to fill.
NIBRS Offense – It is for NIBRS reporting, that’s going to be added if Admin/Officer is reporting for NIBRS.
Description – It is a description of the Offense Code; it describes what type of code it is.
Classification – It is a general overview of the Offense code. For example, Aggravated assault, simple assault, etc. all come under assault. It makes it easier to see reporting as per classification.
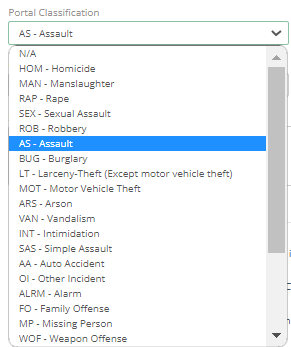
Portal Classification – It relates to the mapping portal where it chooses a specific classification that matches the portal.
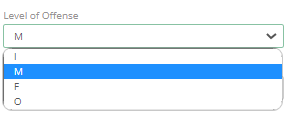
Level of Offense – It shows the level of Offense which can be Incident, Misdemeanors, Felonies, or Other.
Call Timer - Alert will pop up as per the time set here. If 60 min is set, then every 60 min an alert will pop up to a Dispatcher. It can be lowered or higher as per the requirement. Dispatchers can change if they have permission, every time
Call Priority – It goes from 1 to 5, the higher the priority the higher the Call in Open Call List. 1 would be on top and would be at the bottom.
State Offense Code – This is for NIBRS Reporting; it will be required while reporting for NIBRS.
Standard Operating Procedure – This shows up on the Dispatcher side, whenever a Dispatcher puts in a crime code it will pop up an alert for them to be able to view the Standard Operating Procedure.
Crime Types – This is more for Reporting of this Crime Code. It has multiple checkboxes as described below:
Include in Media Log and Include in “Right to know” is related to Clery.
Include in Media Log means when a user tries to Print Media Log it will show up with this Crime Code.
Call for Service – Any kind of Crime code that the department considers a Call for Service for the department
Crime Against Person – Crime which includes a Person as a Victim. For Example, Assault.
Crime Against Property - Crime which includes a Property as a Victim. For Example, Burglary.
Crime Against Society - Crime where no person is involved or there is no Victim. For Example, Involvement of Drugs/Narcotics/Weapons.
UCR Part 1 and Part 2 – It is for UCR Summary Reporting.
Drug Law, Liquor Law, ”Hate” Crime and Weapon Possession - These all are related to Clery Reporting. Weapon Possession is to track that, that call has a Weapon Possession.
Criminal – It will label crime as Criminal.
Include in Briefing Report – It will add a Department Briefing Report in ARMS Home Screen.
Secure Check – If there is a building check and the Officer is allowed to self-initiate the call then they will see crime codes that have security checks allowed.
Active Code – If this checkbox is unchecked then it will not show any Officer or any Dispatcher. It will retain all information in past but will not allow anything in the future unless it’s marked active again.
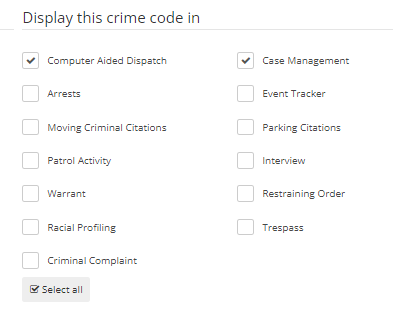
Display this crime code in - All checkboxes here help to customize the view for Dispatchers and Officers. It will display as per settings made here.
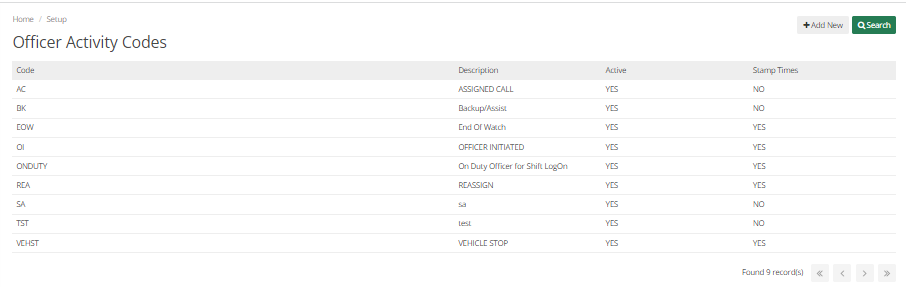
Officer Activity Codes
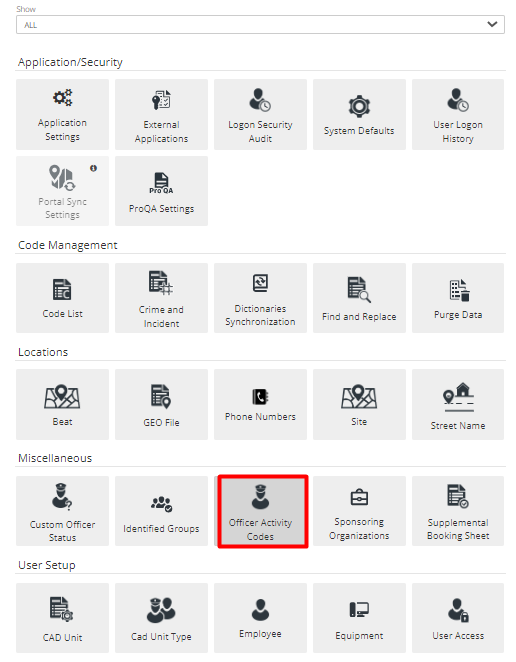
Officer Activity Codes are used by Dispatchers to describe what kind of Activity that Officer is on. There is an Add New and Search option by which Admin can Add a New Officer Activity code or search for an old one.
Code – Code to denote Activity
Description – Describes Code
Active – Denotes the Status of Code whether it’s Active or Not.
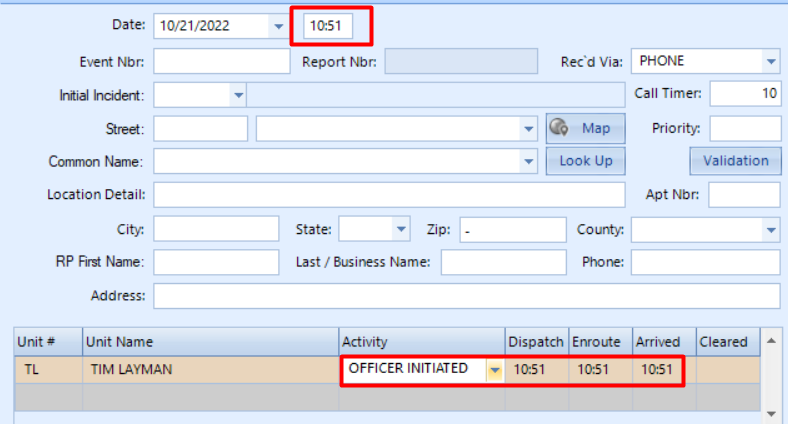
Stamp Times – If allowed for any Officer Activity Code then it will automatically add Dispatch, Enroute, and Arrive Time matching the time when the call was initiated. So, it saves lots of time for the Dispatcher.
For Example, if Stamp Time is allowed in Officer Initiated Code, then as soon as Officer selects Activity it will automatically pull Dispatch, Arrive, and Enroute timing. It can be edited if required.
Custom Officer Status
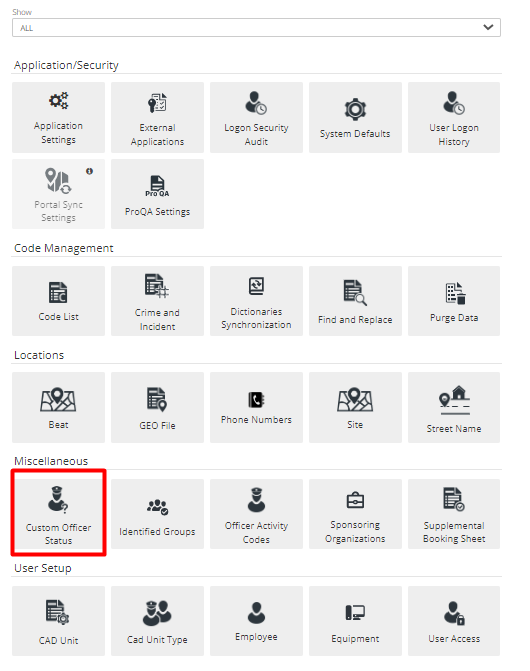
It is a way for Department to customize Officer Status as per the Department’s needs.

It has multiple fields as described below:
Code – It defines Code.
Description – It describes the detail of the Code.
Main Status – It shows the Status to which it will be Related. If it is marked as arrived then to change Officer Status to Custom Officer Status, the Status of Officer must arrive.
CAD Unit Type – This denotes that Code will only apply to the selected CAD Unit Type.
Setup: Location Setup
Site, Beats, and Streets
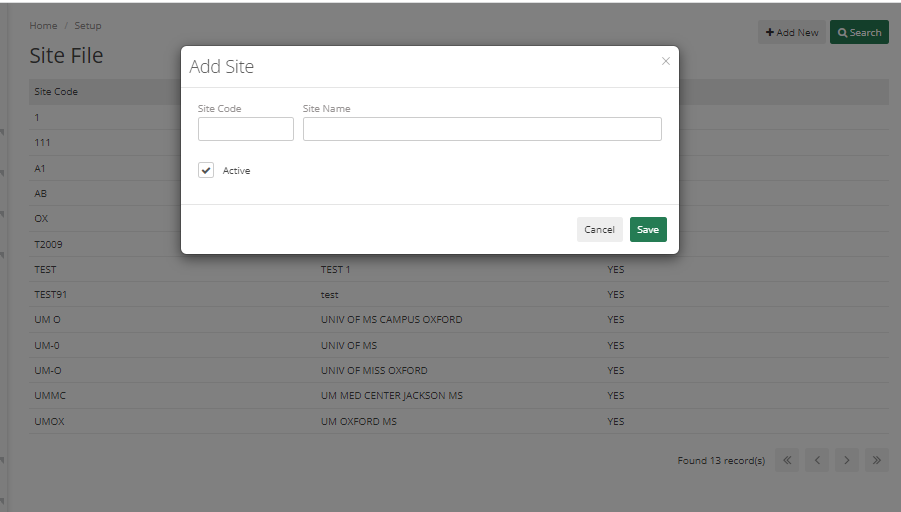
Site
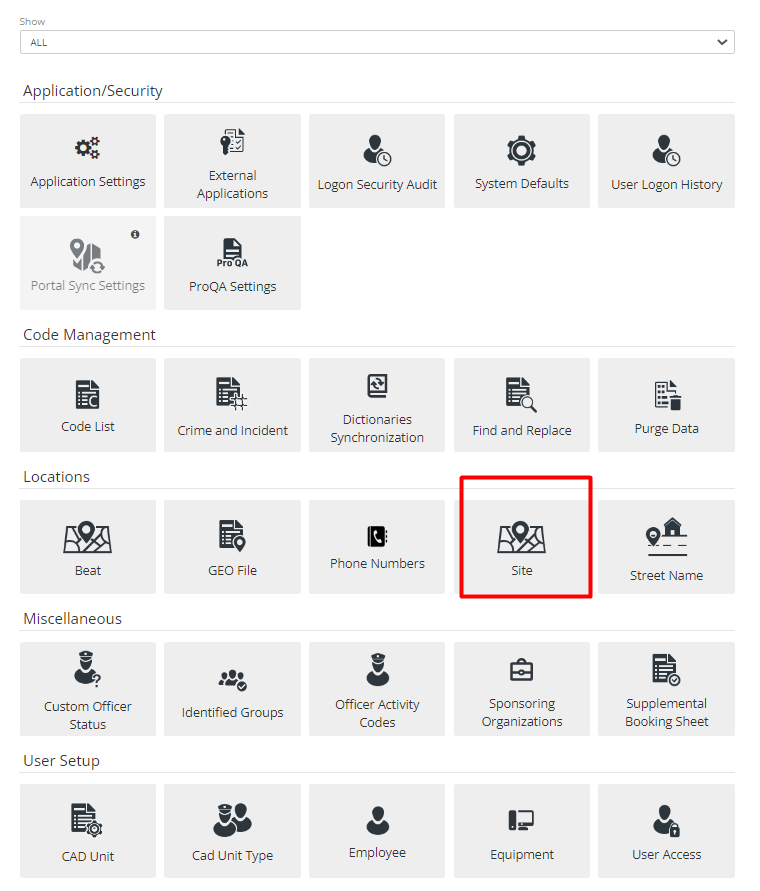
The site is section-wise part of a big Location. For College, it could be Satellite Campus and for Police Department, it could be a separate area that is a part of the same thing. To set it up is easy, just go to Setup > Site Tab> click on Add New, and one can add Site Code, and Site Name and mark it as Active.
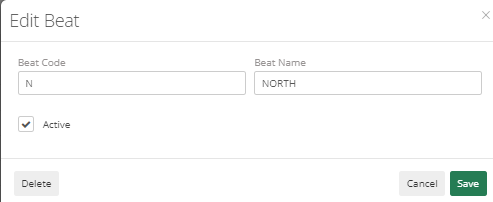
Beat
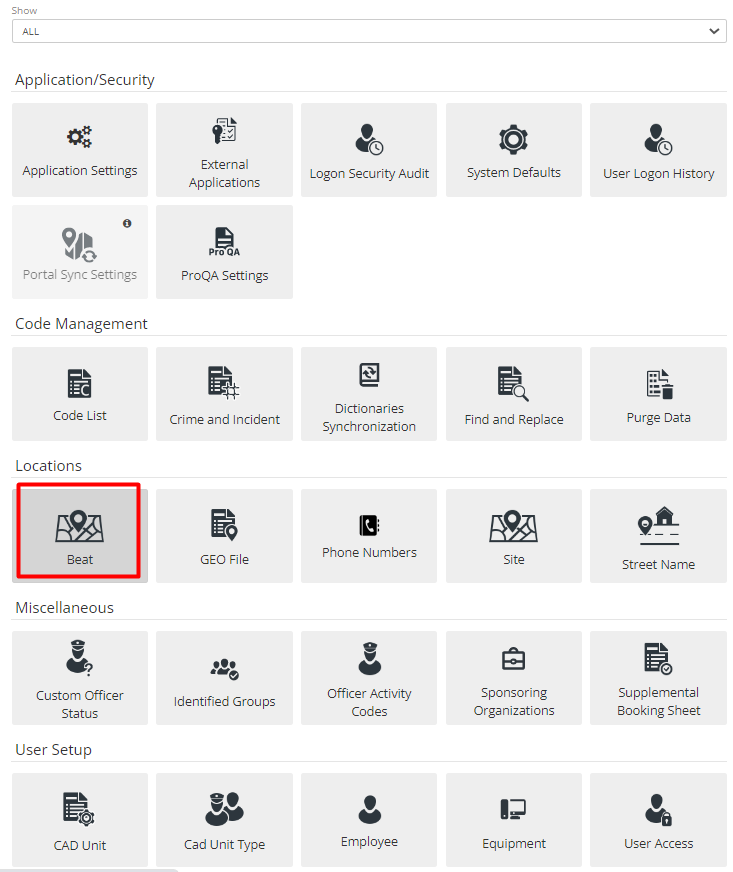
It is a smaller section of the Site. Admin can track a particular zone where Officer is going to Patrol. New Beat can be added similarly to the Site.
Street Name
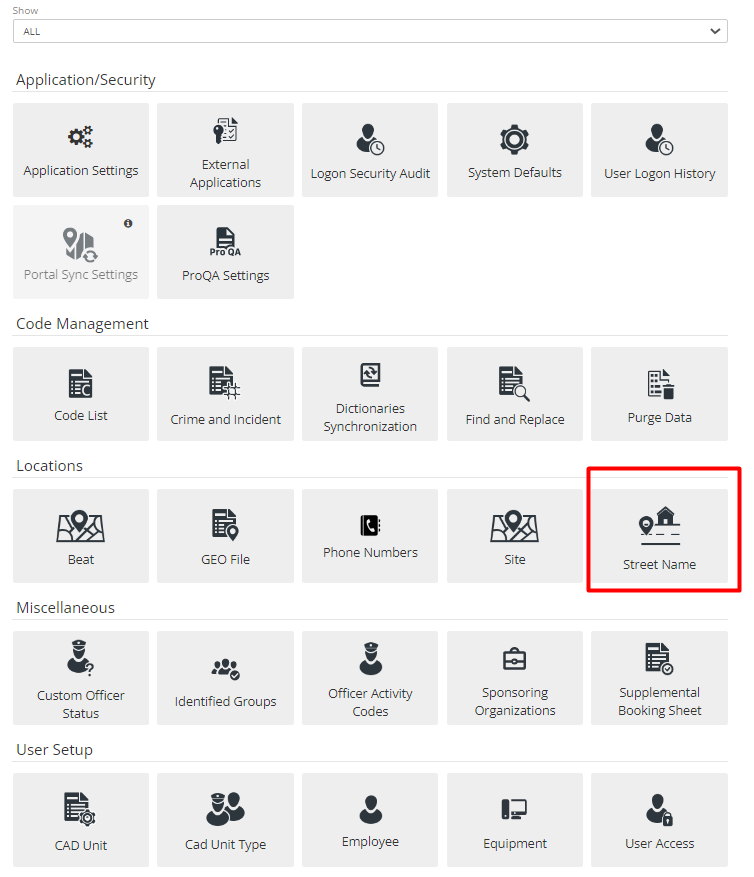
This is to set up street names. Any street where Department Officer will patrol, or Dispatchers will get Call for can be set up here. This will ease out Reporting and Data Entry of each record. On clicking Add new button new Street Name can be added. It will have fields like Beat, Street Name, City, Zip, County, State, From Address, To Address, and Active and Invalidated checkboxes.
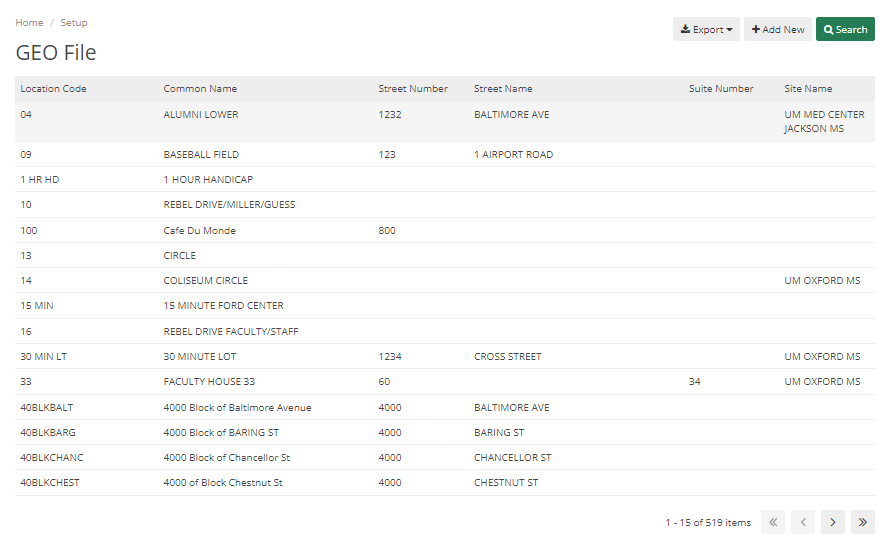
GEO Files
The GEO file is a section that encompasses the Site, Beat, and Street Name. It is more of Locations within the Department’s Jurisdiction. In this section, Admin can Search, Export, and Add New Geo Files.
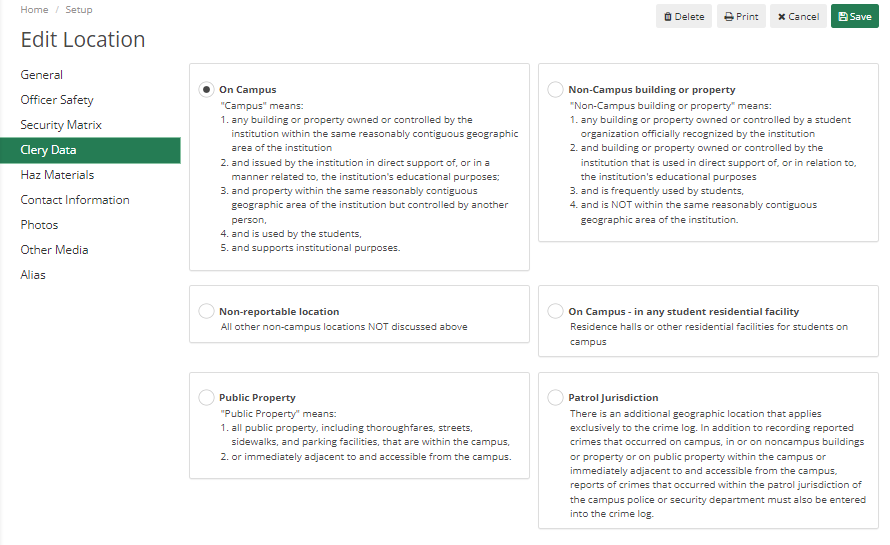
There are multiple tabs to Add details in Geo File like General, Officer Safety, Security Matrix, Clery Data, Haz Materials, Contact Information, Photos, Other Media, and Alias.
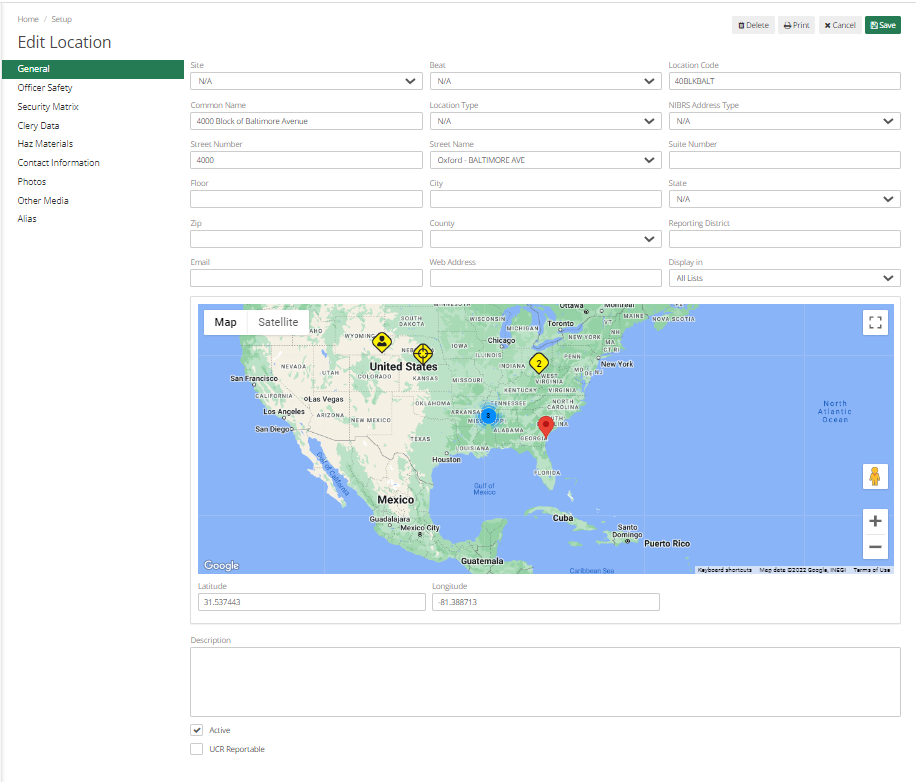
In General Tab, there are multiple fields they are as below:
Site - Select Site from dropdown, Admin can generate Lots of Reports based on Sites track Cases as per Site, the Dispatcher can display their Unit type or Locations based on Site.
Location Code – It helps to quickly pull locations by the location code.
Common Name – It would be the Normal Name of a Location that is commonly used.
Location Type – More values can be added to this dropdown through Code List.
NIBRS Address Type – If the Department Reports NIBRS, then this field can be selected.
City, State, Zip, County, etc. basic Location-related Information. Other information like the Email Address and website of that location can be filled in.
Admin can also Map actual location in Map by adding Latitude and Longitude.
The description field helps to describe location details.
If details are being added for UCR Reporting, then UCR Reportable can be marked.
Officer Safety Tab - If there is any kind of Information regarding the location that the Officer/ Dispatcher needs to know, then that information can be added here. It will Pop-Up as an Alert.
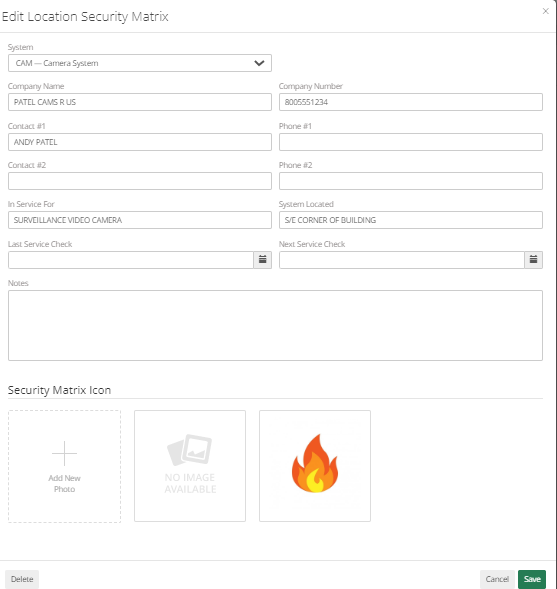
Security Matrix Tab - This will allow Admin to add Information about the Location if that location has any security System. Details Like System, Company Name, Category Number, Phone Number, In Service For, System Located, Last Service Check, Next Service Check, Notes, and Security Matrix Icon can be added.
Clery Data – Here Admin can choose where the location would be for Clery Reporting. It Defaults to On Campus and can be changed if required.
Haz Materials – It will alert for any kind of dangerous materials at the Location.
Contact Information – Add location-related Contact Information.
Photos – Add location-related Photos. Generally, it would be used to add Blueprints.
Other Media – In case Blueprints or any related information is in pdf form then it can be uploaded in this section.
Alias – If the location is called by some other name for some people, then it can be mentioned here.
Once done, Hit Save. Anything added here will be displayed to Officer/Dispatcher when they select the Location.
Setup: Code Management
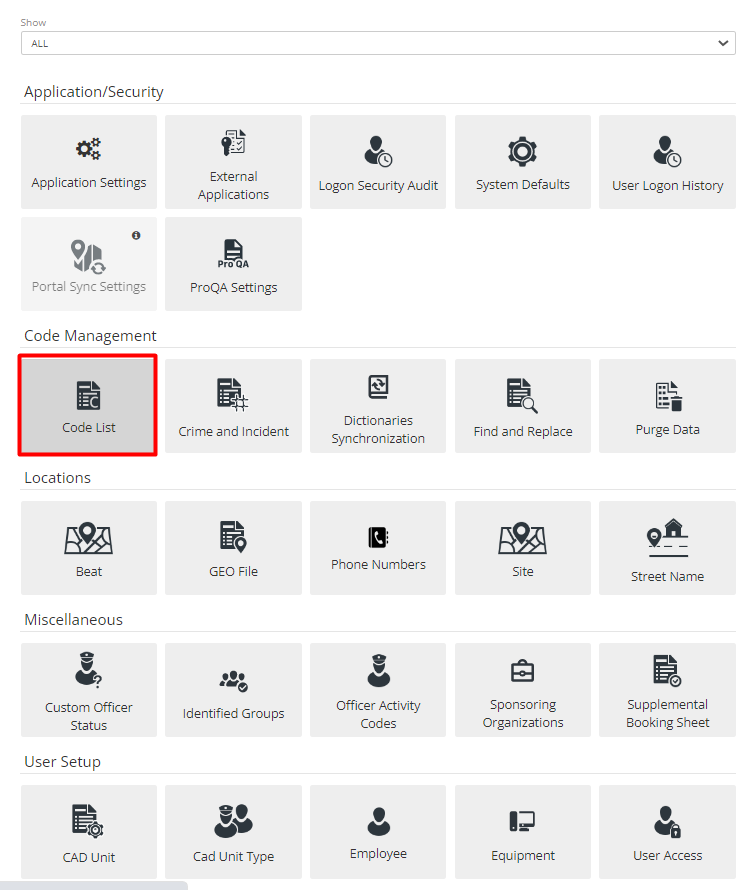
Code List
For any code in the system that is an Employee file, Crime code or Geo File anything in the dropdowns can be found in this tab. If Admin wants to Add, Delete, or Modify any codes in ARMS then they can go to Code List in Setup.
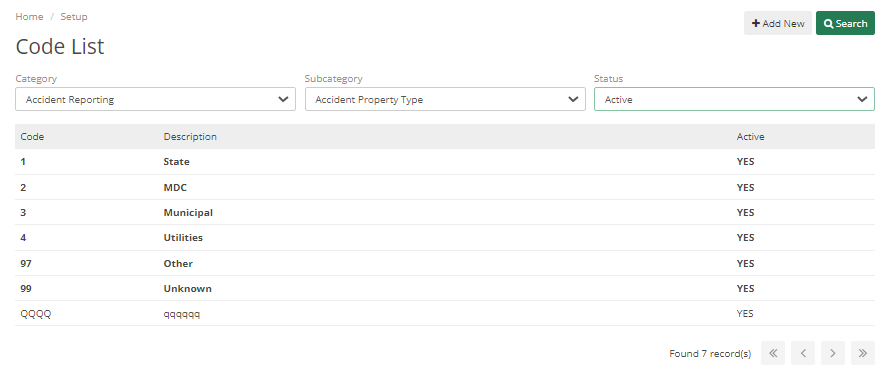
It is separated into two parts Category and Subcategory. Select Category lists all Main Module of ARMS and in Subcategory select the required field.
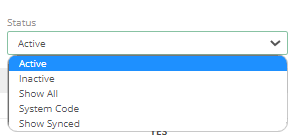
Status has multiple different options like Active-any code is active, Inactive- codes which can be seen by the Dispatcher but can’t be included in CAD or Case, Show All – which will show all active and inactive codes, System Code – it’s any bold code which can’t be deleted, it is System code added by ARMS team, and Show Synced – It will show codes synched by Admin during Dictionary Synchronization.
Find and Replace
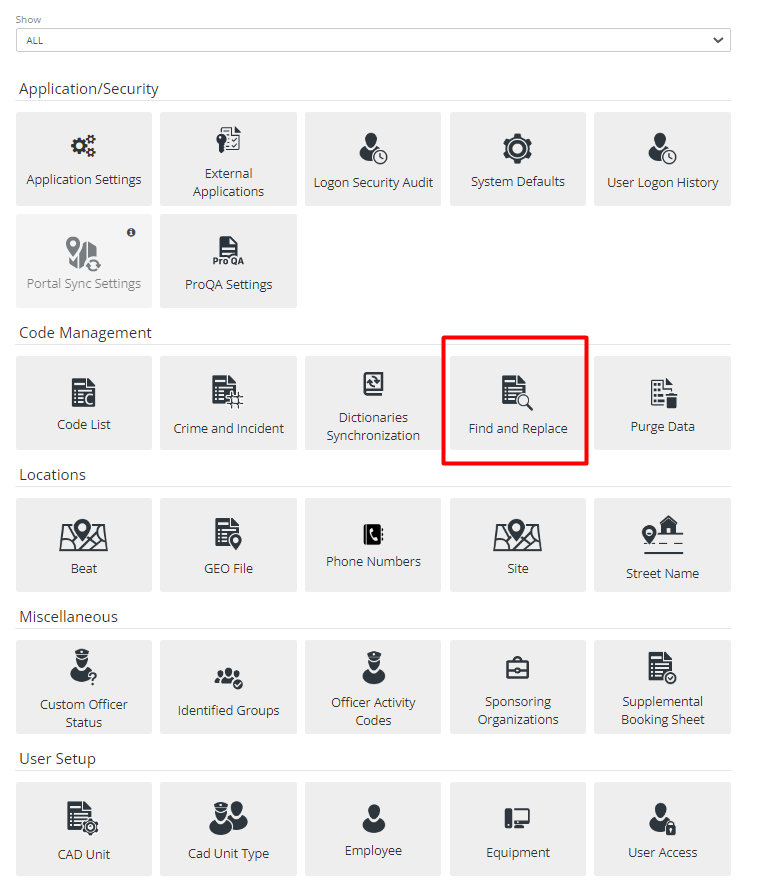
The find and Replace section will be helpful if the Department needs a code cleanup or wants to remove code or Mark code as Inactive but requires merging code with another.
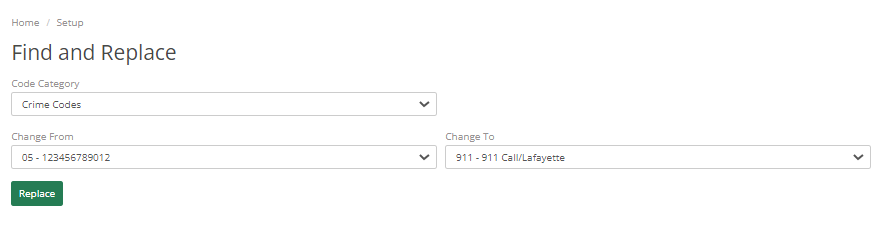
Code Category- It will show all lists of Categories in which the user can find data and can then replace it.
Change from and Change To – This will allow them to select from which Category the User wants to replace the existing category. Any Case with code in Change from will be replaced by code in Change To.
Dictionaries Synchronization
To enable Dictionary Synchronization, go to the System Default Tab in Setup Menu and scroll down to Dictionary Synchronization Settings and Enable it by selecting the checkbox.
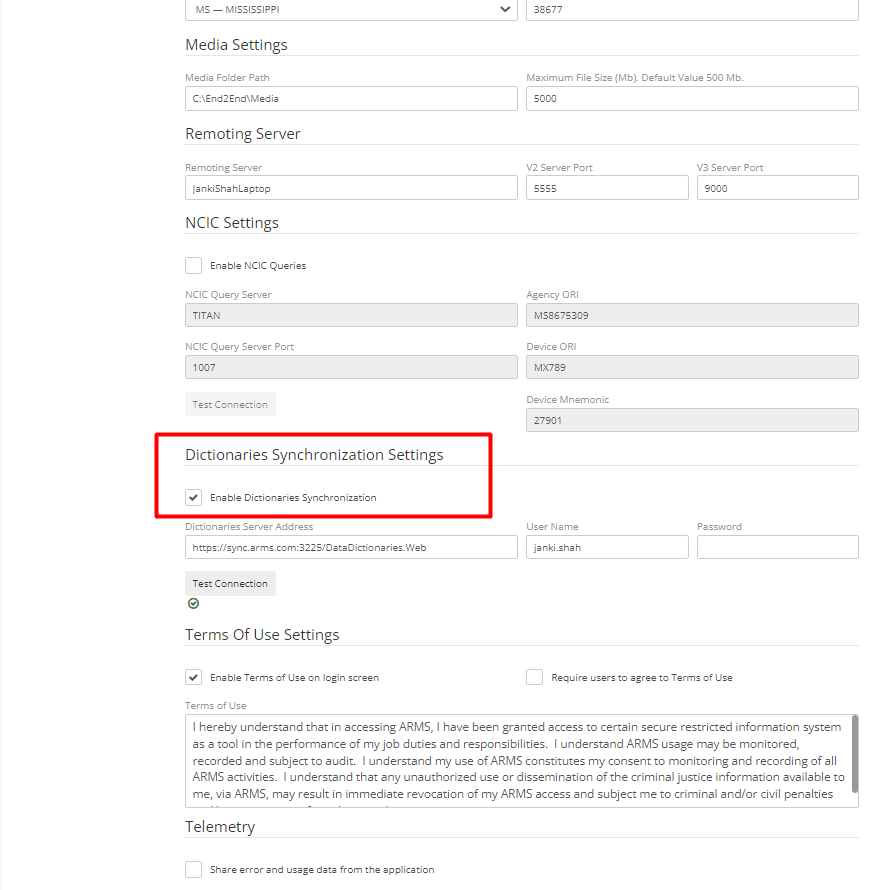
After enabling Dictionary Synchronization Settings, the Department will require to get their Server Address, Username, and Password from the ARMS team.
Department will require to contact the ARMS support team, to get help in setting up and testing the connection. To connect with the server IT team of the Department must make sure that port 3224 is open to pull dictionary synchronization data from ARMS Server. It will pull standardized codes in the system.
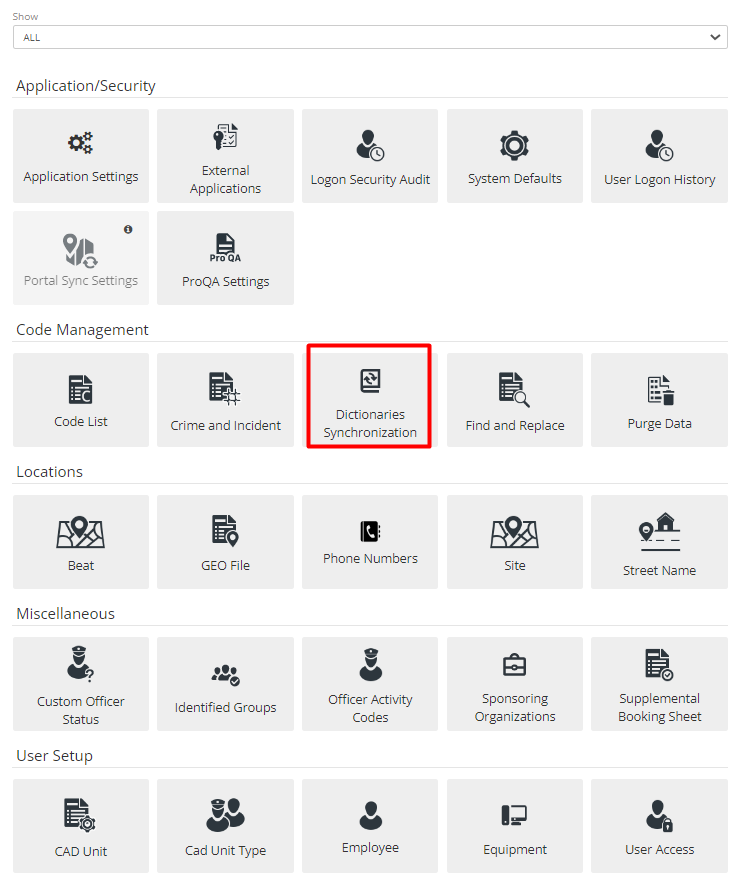
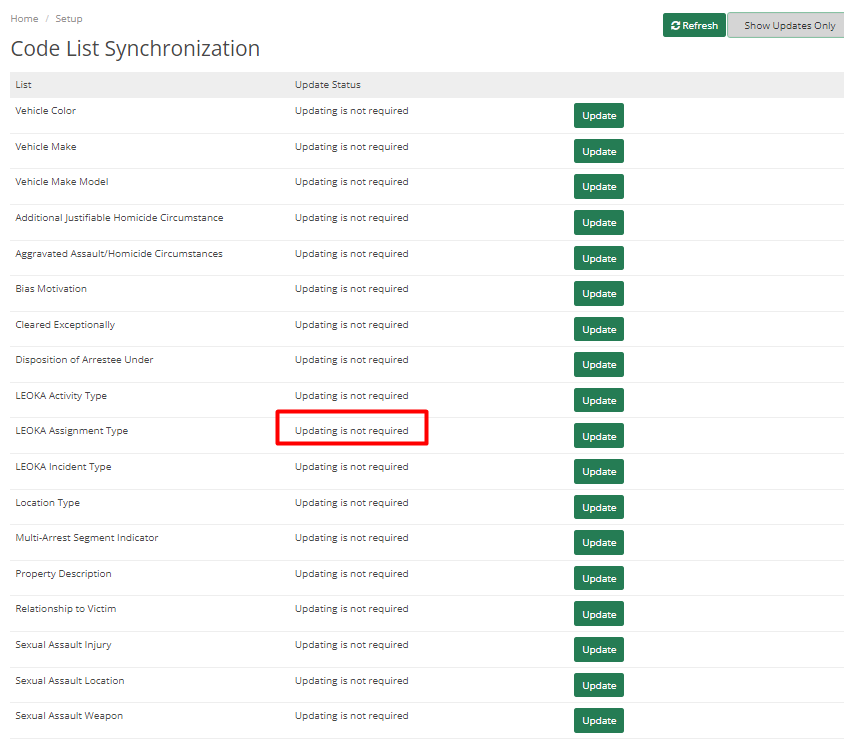
After checking the connection, Go to Dictionary Synchronization Tab in Setup Menu. This tab will show a list of Codes that requires or do not require an update. Click on Refresh to check if any Update is available and click on the Show Updates only button to display only the list of codes that requires an update. Hit Update to Update to Standardized code.
Purge Data
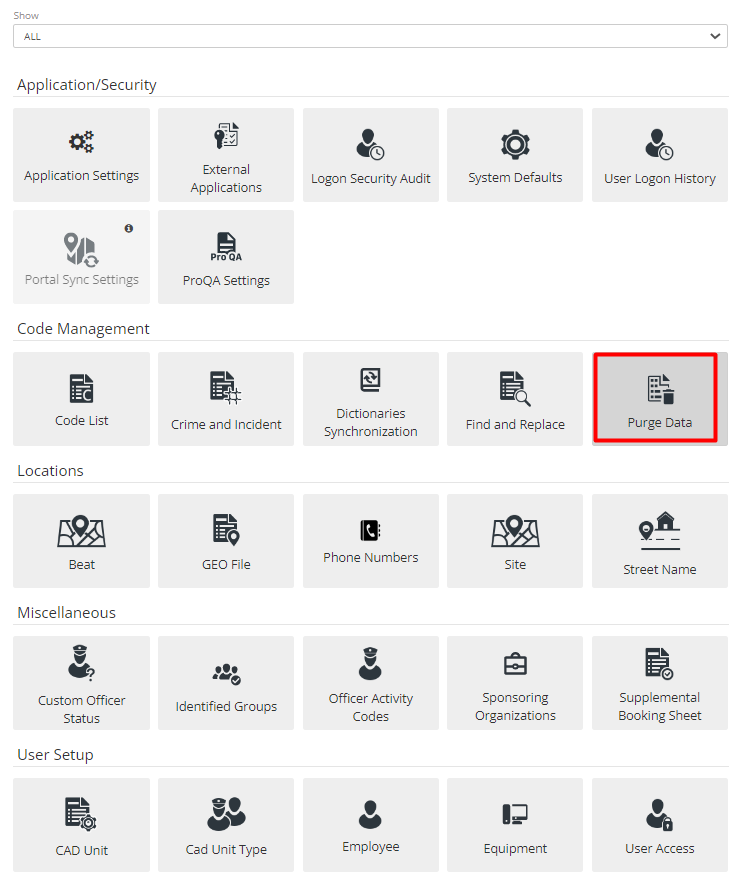
If Users want to remove data or erase old data that is no longer required from ARMS, then it can be done by going to the Purge Data section in Setup. This is a sensitive section, make sure before purging data.
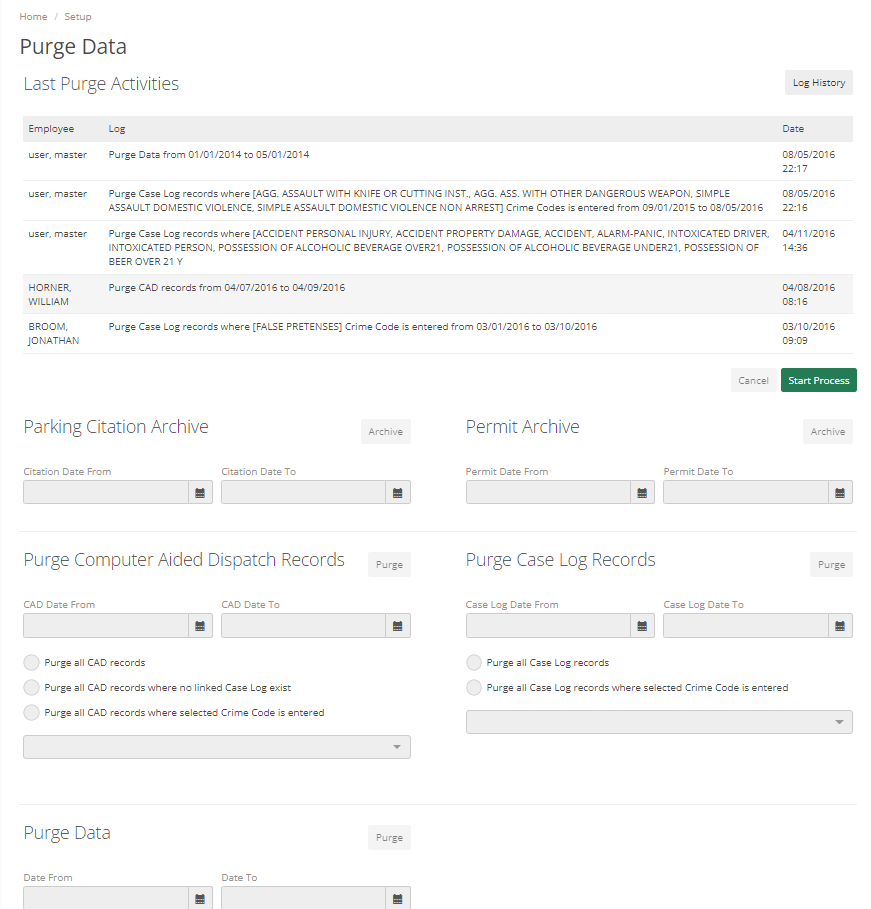
Log History – It shows the history of Purging Data. It has different columns such as Employee: Details of Employee who purged data, Log: Details of which type of Data purged, and date range of deleted records. Date – Purging Date
Parking Citation Archive – If the Department is using Basic Parking Citations, then users with Access can Archive Parking Citation.
Permit Archive – If the Department is using Basic Parking Citation, then users with Access can Archive Permits.
Purge Computer-Aided Dispatch Records – Users can Purge CAD Records for a specific Date Range. They can Purge all CAD Records, Records where no linked Case Log exists, or Records where a selected Crime Code is entered.
Purge Case Log Records – Users can Purge Case Log Records for a specific Date Range. They can Purge all Case Log Records or Records where the selected Crime Code is entered.
Purge Data – It will remove Everything from specific data.
To start this process, click on the Start Process button in the top right corner of the screen.
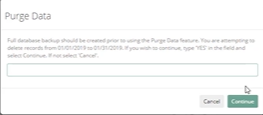
Multiple Warning dialogs will appear to prevent accidental deletion of Records
Merge Duplicates
Some Admin features are not in the Setup menu. One of those features is Merge Duplicates. It is included in Names, Vehicles, and Businesses where the Admin can merge any of these in case Officers have added any duplicates.
Here, for example, we will show Merge Duplicates of Names. To merge duplicates, click on Merge Duplicates on Top in the Name Section. Admin can search Names by Last Name, First Name, and Student ID.
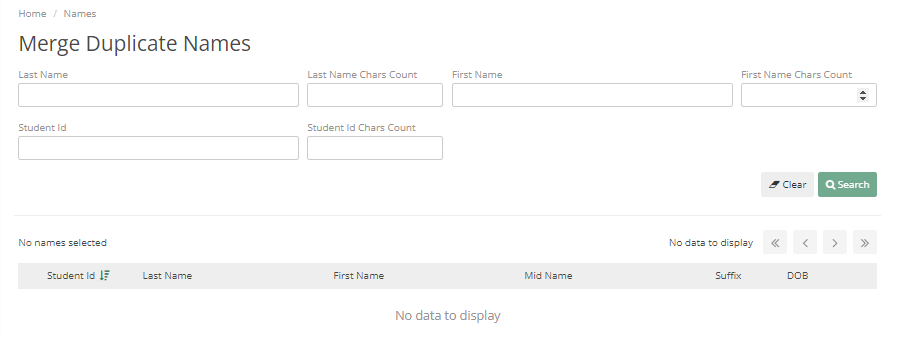
If there are two or more duplicates they can be merged.
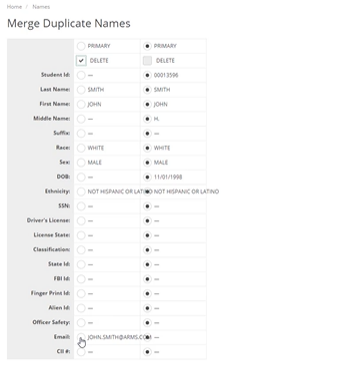
The Name required can be merged with another similar name by marking it as Primary. Once selected click on Merge and it will warn Admin with a dialog box that says that if a user merges these Names, then it cannot be reverted. The merged Name will get replaced with the old Name in each CAD event and Case where it was added before. So, if a user is sure only then they should merge the Names.
This process will be the same for Businesses and Vehicles.
Password Management
Another section that Administrators may need outside Setup Menu is Passwords. There are a couple of different places where passwords can be checked for.
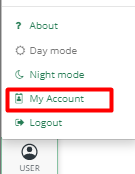
The first is in User > My Account. There are two options available in My Account Change Password and Manage Security Questions.
Change Password – It helps to change the current Password.
Manage Security Questions – It enables password recovery and set up security questions for an account. Anybody can set up security questions for their account.
Another way to Manage Passwords is through Password Management Tab on ARMS Home Screen.
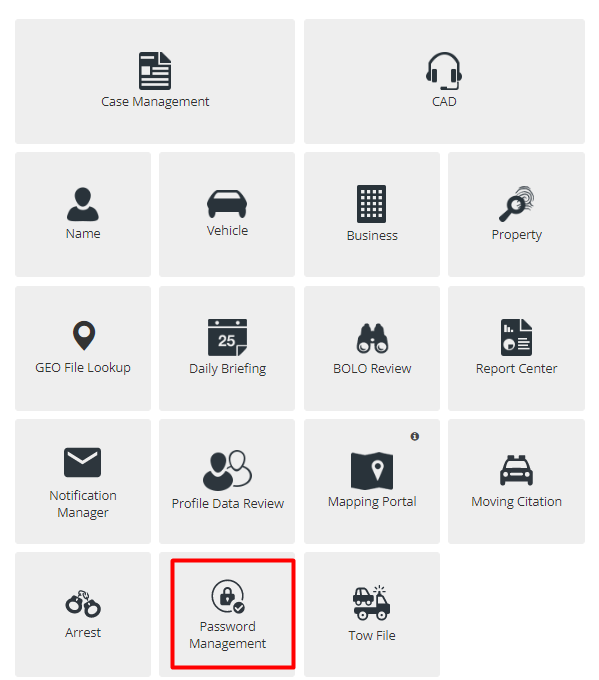
If Admin wants to just manage passwords for their Department or Reactivate the Employee account and does not want to enable password recovery or anything like that, then Admin needs to go to Password Management.
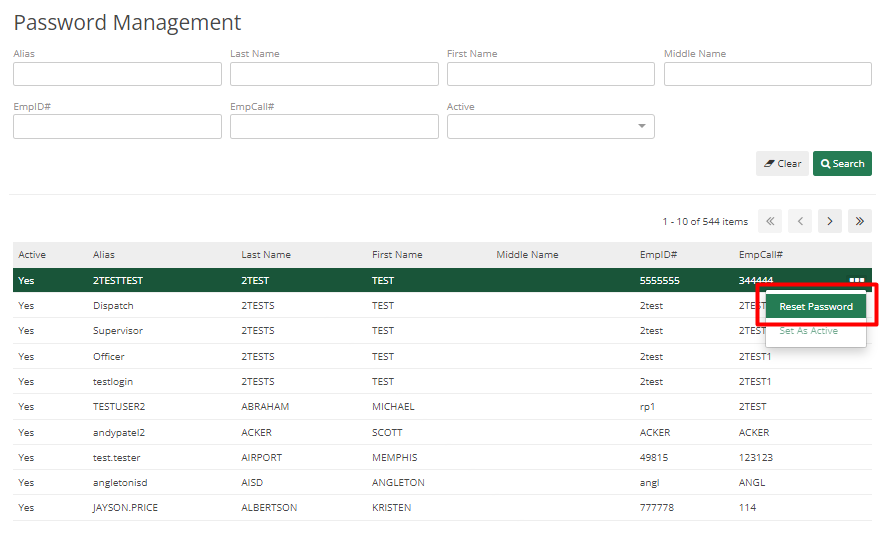
Search the Employee for whom Admin wants to manage the password click on the three dots on the right side and select Reset Password or Set as Active as per the Requirement.
If Employee adds the wrong password multiple times, then their account gets deactivated, to re-active their account select Set as Active from this menu if they remember their old password otherwise click on Reset Password.
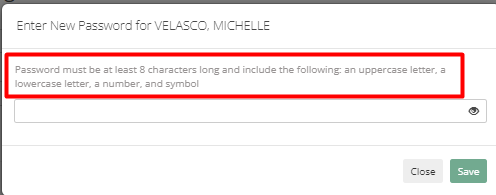
To reset the password correctly follow the instruction in the reset password dialog.